|
|
||
|---|---|---|
| .idea | ||
| common | ||
| config | ||
| data | ||
| logs | ||
| report_zip | ||
| target | ||
| test_caes | ||
| 解析 | ||
| LICENSE | ||
| README.md | ||
| conftest.py | ||
| info.txt | ||
| install_requirements.sh | ||
| requirements.txt | ||
| requirements_all.txt | ||
| result.txt | ||
| run.py | ||
| run2.py | ||
| send_notice_test.py | ||
README.md
![]()
![]()


Aip接口自动化测试pytest+allure+request+jsonpath+excle/yaml
服务端项目(测试项目)
https://gitee.com/y_project/RuoYi-Vue 这是非常火爆的SpringBoot+Vue3前后端分离项目,作为接口自动化测试的服务端
部署方法:
官方部署文档:http://doc.ruoyi.vip/ruoyi-vue
部署视频:https://www.bilibili.com/video/BV1vX4y1Z7k8
Aip接口自动化测试框架介绍
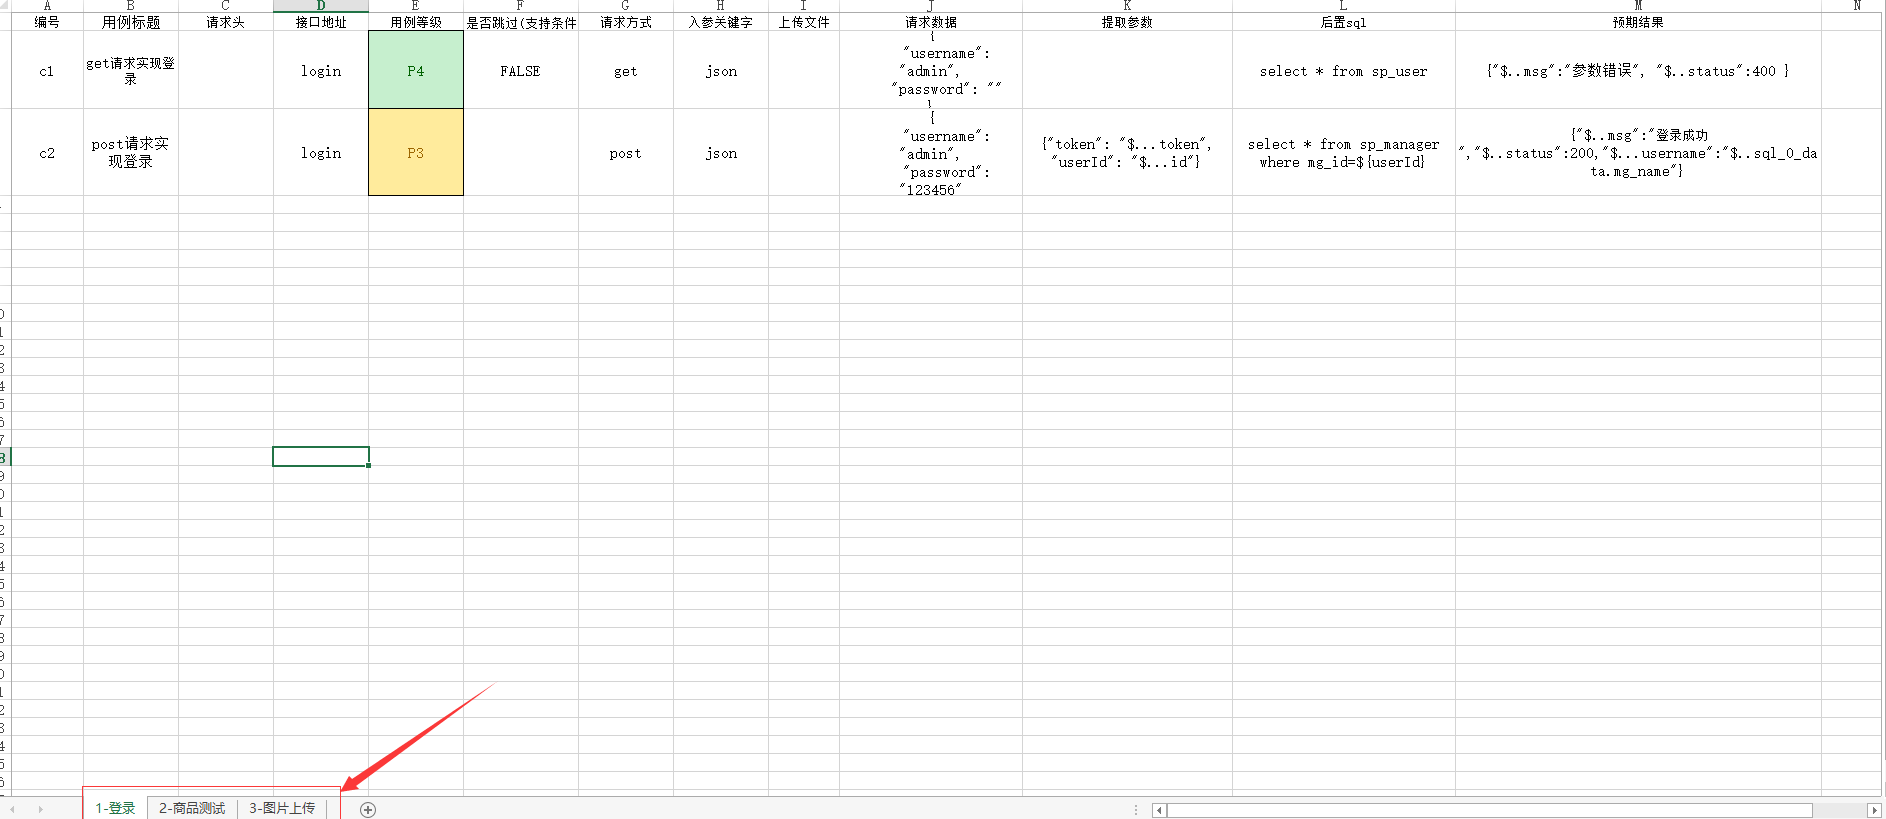
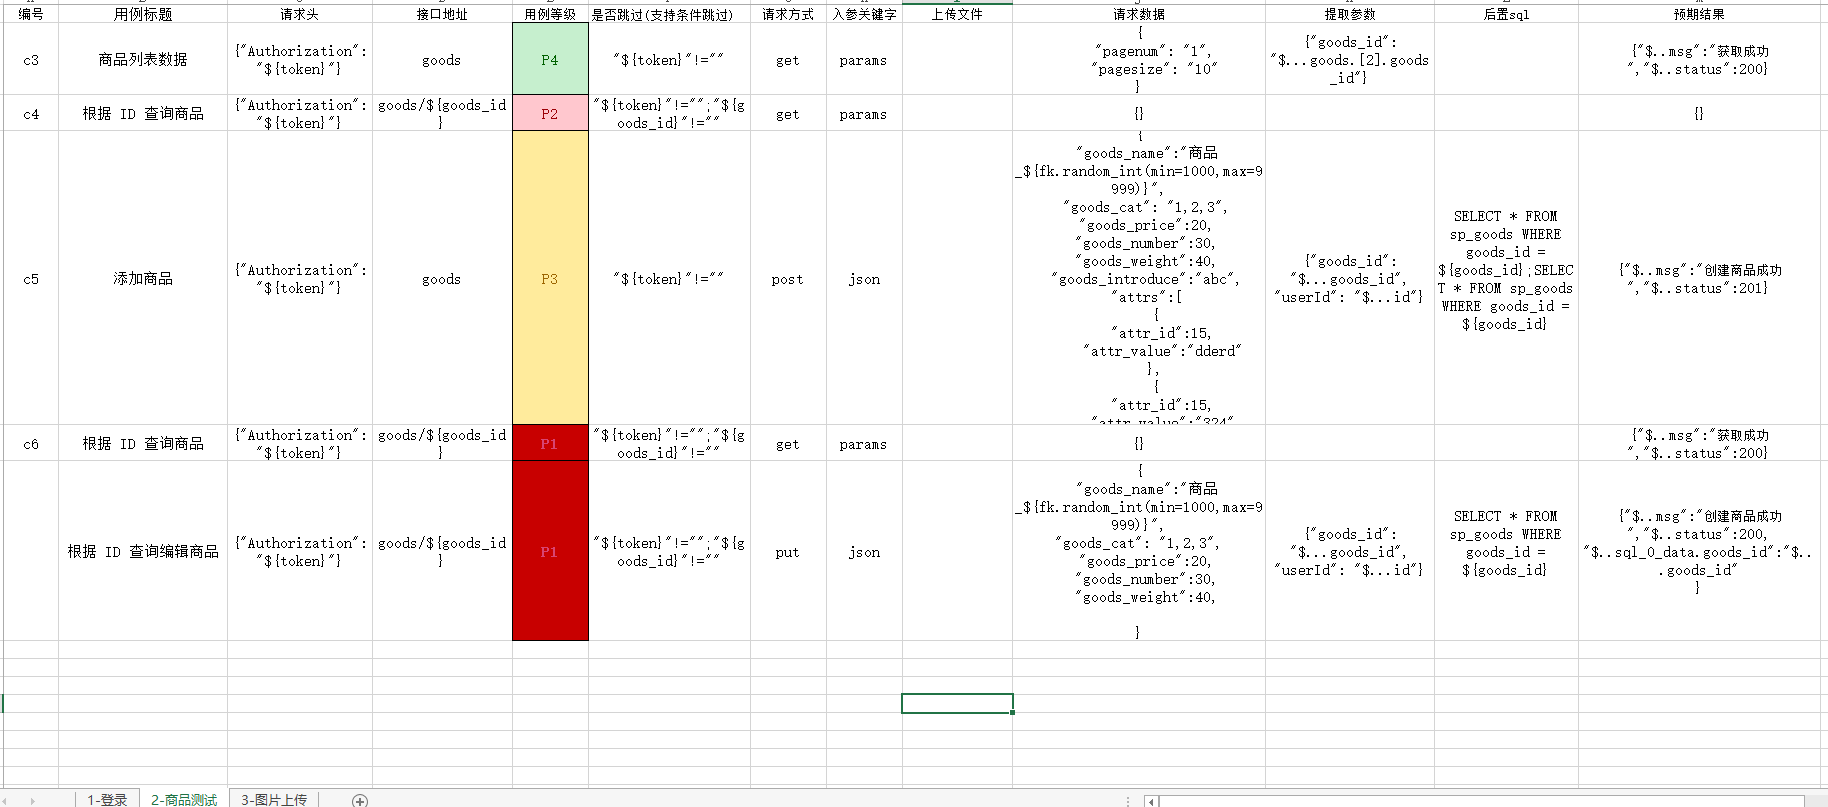
Aip接口自动化测试python+pytest+allure+request+jsonpath+excle/yaml,一个支持仅编辑Excle/yaml就可实现的接口自动化测试框架。
1.编辑Excle做接口数据驱动的数据源,新增yaml添加用例,yaml,excle混和都支持
2.接口上下游数据依赖处理
3.用例中字符串中写入函数名,获取随机值做新增接口数据
4.数据库查询断言 ,数据库提取参数
5.数据库初始化备份恢复
5.sql查询数据做查询断言和请求数据
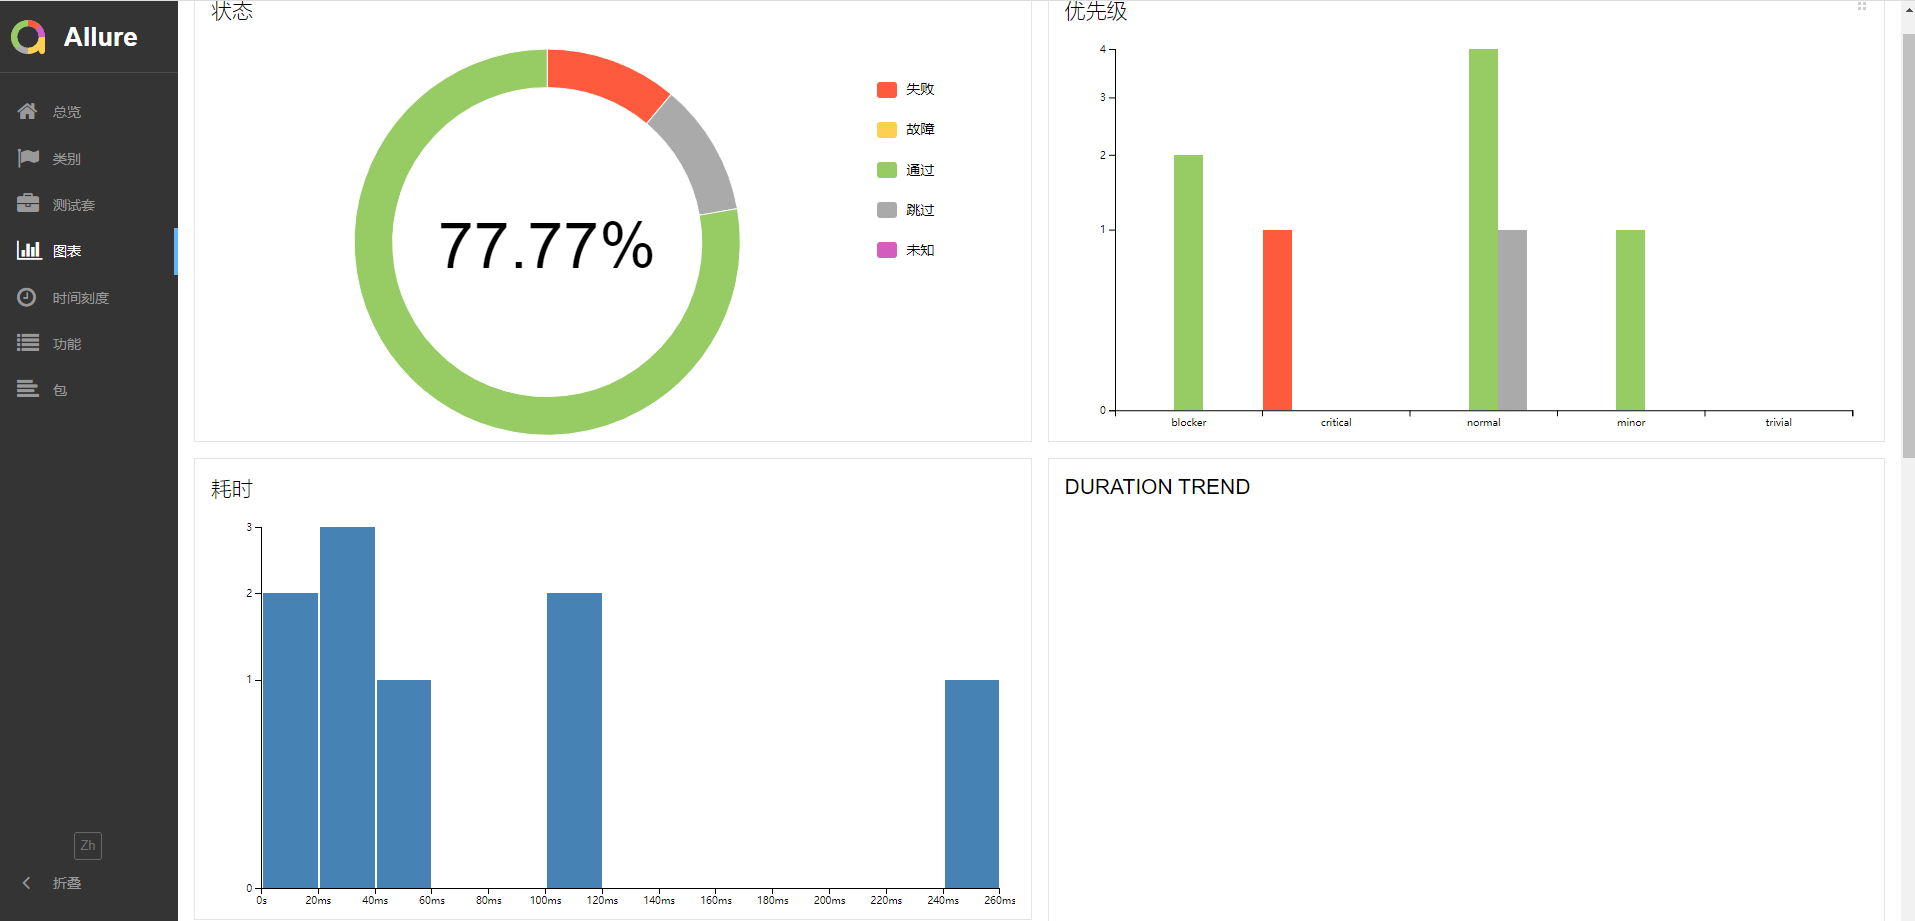
6.使用pytest+allure框架
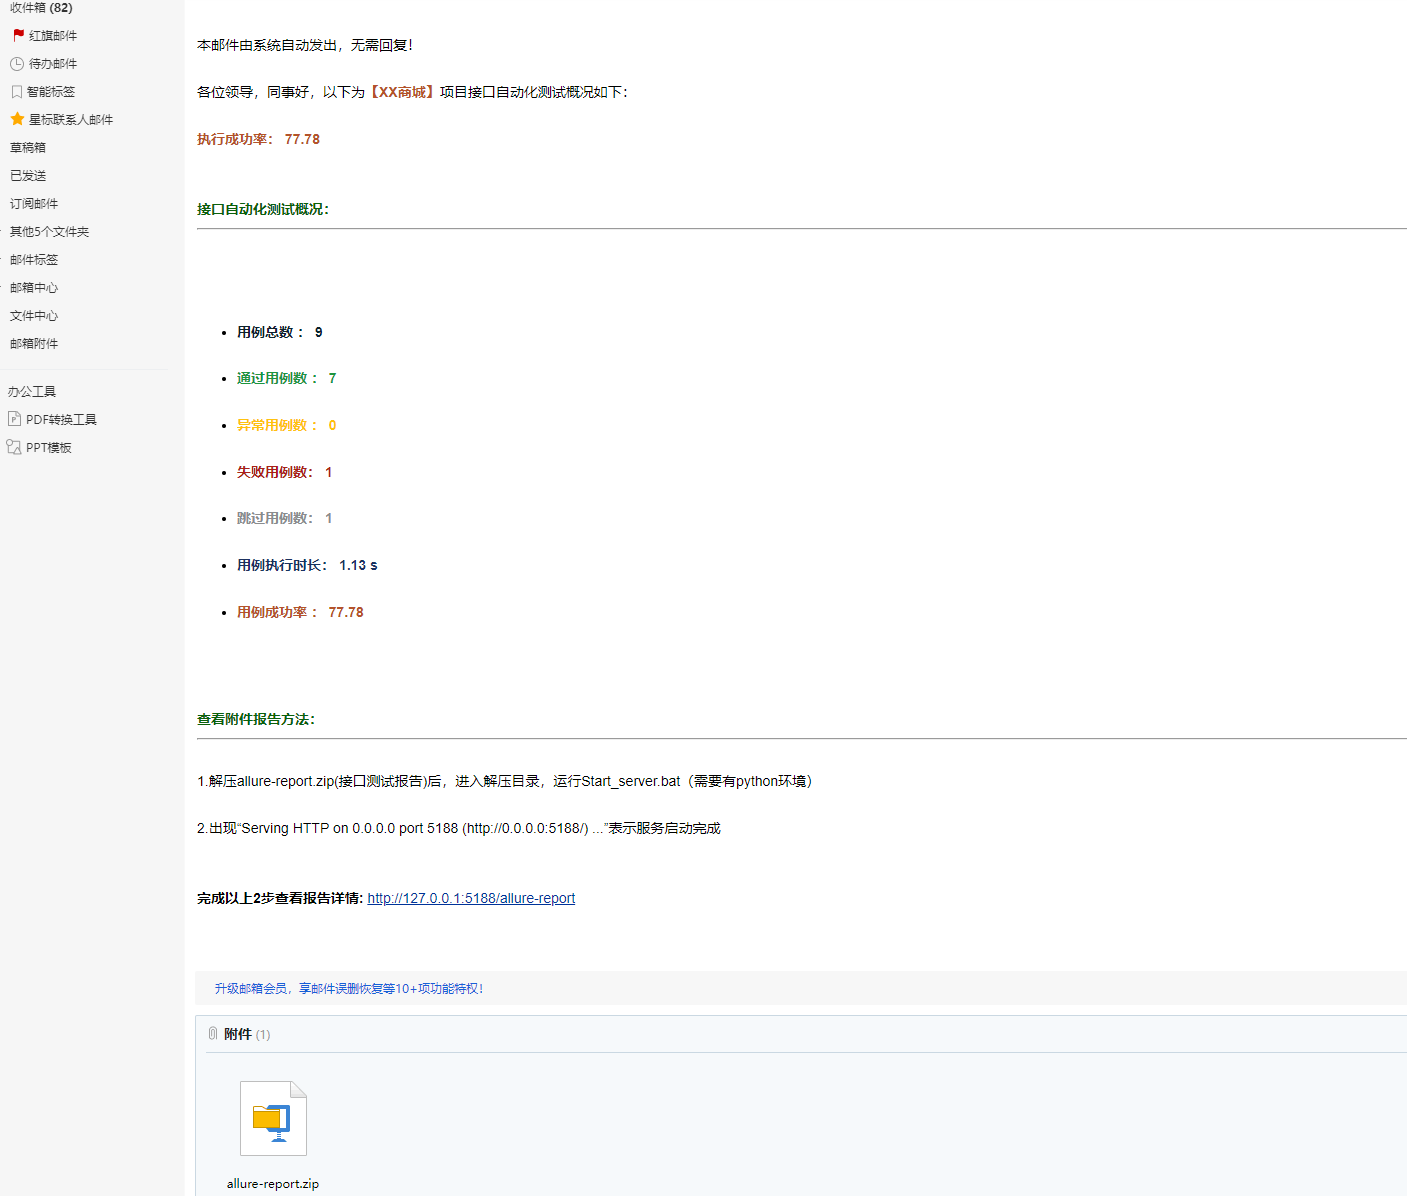
7.测试完成后打包allure报告为zip包通过邮件发送
8.一键切换运行环境,dev/test/prod
软件架构
软件架构说明
项目结构:
├─common    #公共模块类
│  │  all_path.py  #定义文件路径
│  │  api_request.py   #发送请求
│  │  assert_api.py    #请求断言
│  │  backup_recovery.py    #备份恢复操作逻辑
│  │  condition.py     #跳过用例逻辑
│  │  db.py             #数据库读取操作
│  │  exchange_data.py  #接口参数的数据替换和提取
│  │  logger.py         #系统日志打印
│  │  operation_excle.py #读取写入excel
│  │  read_file.py      #读取配置文件yaml
│  │  send_email.py     #发送邮件
│  │__init__.py
│
├─config  #配置文件和相关资源
│      1.jpg
│      3.jpg
│      config.yaml
│      mydb.sql
│      mydb_bak.sql
│      Start_server.bat
│
├─data   #测试数据用例表格
│      case_data.xlsx
│
├─logs  #日志打印文件
│      20220921.log
│      __init__.py
│
├─report_zip  #测试完成后测试报告压缩包发送邮件
│      allure-report.zip
│      __init__.py
│
├─target   #运行测试保持的测试报告路径
├─test_caes   #测试用例文件夹
│  │  test_001.py  #执行测试用例
│  └─__init__.py
│
│─解析    #解析框架重要的模块
│        Faker库造测试数据.py
│        flask开发2个http接口.py
│        te_001.py
│        te_09.py
│        参数依赖01-jsonpath提取参数.py
│        参数依赖02-locals()获取本地变量 及exec()执行字符串中的代码.py
│        参数依赖03-Template 使用,替换参数.py
│        参数依赖04-框架中替换参数及执行字符串中方法取值.py
│        发送请求01-get方法中url参数拼接和写到请求体中的理解.py
│        发送请求02-请求参类型params,json,data 含义.py
│        发送请求03-理解两种发送请求方法.py
│        发送请求04-封装请求参数转化的理解.py
│        备份恢复sql-FTP上传文件.py
│        备份恢复sql-ssh执行命令.py
│        继承方法以及传参.py
│        邮件.py
│
│  conftest.py  #pytest conftest
│  info.txt    #项目结构
│  LICENSE
│  README.md   #项目说明
│  requirements.txt #项目依赖
│  requirements_all.txt  #本地环境依赖
│  run.py   #运行入口
│  搭建服务器说明.txt  #  搭建接口服务说明

安装教程
- python3.10.7 需要安装pytest==7.1.3
- 安装依赖环境 pip install -r requirements.txt -i http://pypi.douban.com/simple/ --trusted-host pypi.douban.com
- 安装allrue报告allure-2.18.1.zip
- 安装java环境,allure需要java环境
使用说明
-
根据搭建后台服务说明搭建服务
部署方法: 官方部署文档:http://doc.ruoyi.vip/ruoyi-vue 部署视频:https://www.bilibili.com/video/BV1vX4y1Z7k8 -
配置config\comfg.yaml参数
server: # 本地接口服务http://192.168.1.234:8056/prod-api/ dev: http://127.0.0.1:8083 test: http://192.168.1.182:8056/prod-api prod: http://192.168.1.234:8056/prod-api/ Operations_db: # 操作数据库 assert_db: True # True 启用数据库查询断言 False 不启用 backup: True #启动测试前启动备份数据库 数据库服务器 linux,windows都适用 recovery: True #测试完成后恢复备份数据库 数据库服务器 linux,windows都适用 severity: case_severity: ["P1","P2","P3","P4"]#用例等级 "["P1","P2","P3","P4","P5"]" 设置需要测试用例等级 cor_rel_case_severity: #用例等级和allure报告优先级的对应关系 P1: blocker P2: critical P3: normal P4: minor P5: trivial # 基准的请求头信息 request_headers: {} # 基准存放提取参数的池子 extra_pool: {"token":'',"username":"admin","password":"admin123"} # 基准的请求参数 request_parameters: {} test_case_type: # 用例读取的来源 为True读取文件类型,为False不读取,如excel 和yaml都为True时 读取累加 dev: - read: True # True 读取excle文件中的用例 False 不读取 test_case: ./data/env_dev/case_excle/ file: xlsx order: 1 #顺序 - read: True # True False 读取yaml文件中的用例 test_case: ./data/env_dev/case_yaml/ file: yaml order: 0 #顺序 test: - read: True # True 读取excle文件中的用例 False 不读取 test_case: ./data/env_test/case_excle/ file: xlsx order: 1 #数字排序顺序 - read: True # True False 读取yaml文件中的用例 test_case: ./data/env_test/case_yaml/ file: yaml order: 0 #数字排序顺序 prod: - read: False # True 读取excle文件中的用例 False 不读取 test_case: ./data/env_prod/case_excle/ file: xlsx order: 1 #顺序 - read: True # True False 读取yaml文件中的用例 test_case: ./data/env_prod/case_yaml/ file: yaml order: 0 #顺序 email: # 发件人邮箱 user: huoyan_hyh@163.com # 发件人邮箱授权码 password: DYTKTEPXOZXXZMHK # 邮箱host host: smtp.163.com contents: 解压allure-report.zip(接口测试报告)后,进入解压目录,运行Start_server.bat(需要有python环境),在浏览器输入http://127.0.0.1:5188/allure-report 即可查看测试报告。出现“Serving HTTP on 0.0.0.0 port 5188 (http://0.0.0.0:5188/) ...”表示服务启动完成,可以输入 http://127.0.0.1:5188/allure-report 地址查看报告 # 收件人邮箱 addressees: ["397135766@qq.com", "huangpeng245@163.com"] #["397135766@qq.com", "178999718@qq.com"] title: 接口自动化测试报告(见附件) # 附件 enclosures: ./report_zip/allure-report.zip # 数据库校验- mysql database: #host: "192.168.1.183" #localhost 127.0.0.1 dev: #开发环境数据库 db_type: postgresql #mysql,postgresql 数据库类型 data: host: "192.168.1.234" #localhost 127.0.0.1 port: 5432 user: postgres # 不用''会被解析成int类型数据 password: root database: mydb test: #测试环境数据库 db_type: mysql #mysql,postgresql 数据库类型 data: host: "127.0.0.1" #localhost 127.0.0.1 port: 3306 user: root # 不用''会被解析成int类型数据 password: root database: ry-vue prod: #测试环境数据库 db_type: mysql #mysql,postgresql 数据库类型 data: host: "192.168.1.234" #localhost 127.0.0.1 port: 3306 user: root # 不用''会被解析成int类型数据 password: '123456' database: ry-vue -
配置数据库查询断言和备份恢复
数据库查询断言配置:test_caes/test_001.pyimport pytest,allure from common.assert_api import AssertApi from common.api_request import Api_Request from common.read_exce_yaml_caes import get_yaml_excle_caes #@allure.epic(ReadFile.read_config("$.project_name")) # 项目名称 class Test(): @pytest.mark.parametrize("case",get_yaml_excle_caes('test')) @allure.step def test_001(self,case,get_db,env_url): response=(Api_Request.api_data(case,env_url)) assert AssertApi().assert_api(response,case,get_db)备份恢复数据库:conftest.py
autouse=False 为True时开启数据库备份恢复功能,为False时不开启备份恢复功能#备份恢复数据库 @pytest.fixture(scope="session", autouse=True) def bac_rec(Acmdopt): db_data = dict(ReadFile.read_config('$.database.%s'%Acmdopt)) BR = BackupRecovery(db_data['data']) db_bak_path = './config/ry-vue_bak.sql' # 当前数据库备份文件 db_re_path = './config/ry-vue_re.sql' # 初始化好测试数据的数据库sql文件 backup = ReadFile.read_config('$.Operations_db.backup') if backup: BR.backup(db_bak_path) BR.recovery(db_re_path) yield recovery = ReadFile.read_config('$.Operations_db.recovery') if recovery: BR.recovery(db_bak_path) -
运行run.py
import pytest,shutil,subprocess from shutil import copy from common.read_file import ReadFile from common.send_email import EmailServe from common import all_path from common.exchange_data import ExchangeData def run(): setting = dict(ReadFile.read_config('$.email')) #获取邮件相关配置信息 try: shutil.rmtree(all_path.targetPath) #删除allure历史数据 except: pass # --reruns = 3 失败重试 pytest.main(['./test_caes', '-vs', "--env=test","--reruns=3", "--alluredir", "target/allure-results"]) # pytest测试框架主程序运行 copy(all_path.Start_server_bat, all_path.targetPath) #拷贝 启动服务器脚本(config/Start_server.bat),由config目录拷贝到target目录下进行压缩打包发送邮件 copy(all_path.environmentPath, all_path.allure_results) # 拷贝 环境配置文件 allure_html = 'allure generate ./target/allure-results -o ./target/allure-report --clean' # 生成allure的html报告 subprocess.call(allure_html, shell=True) # 生成allure的html报告 EmailServe.send_email(setting,all_path.targetPath,ExchangeData.get_pytest_summary()) #发送邮件 if __name__ == '__main__': run() -
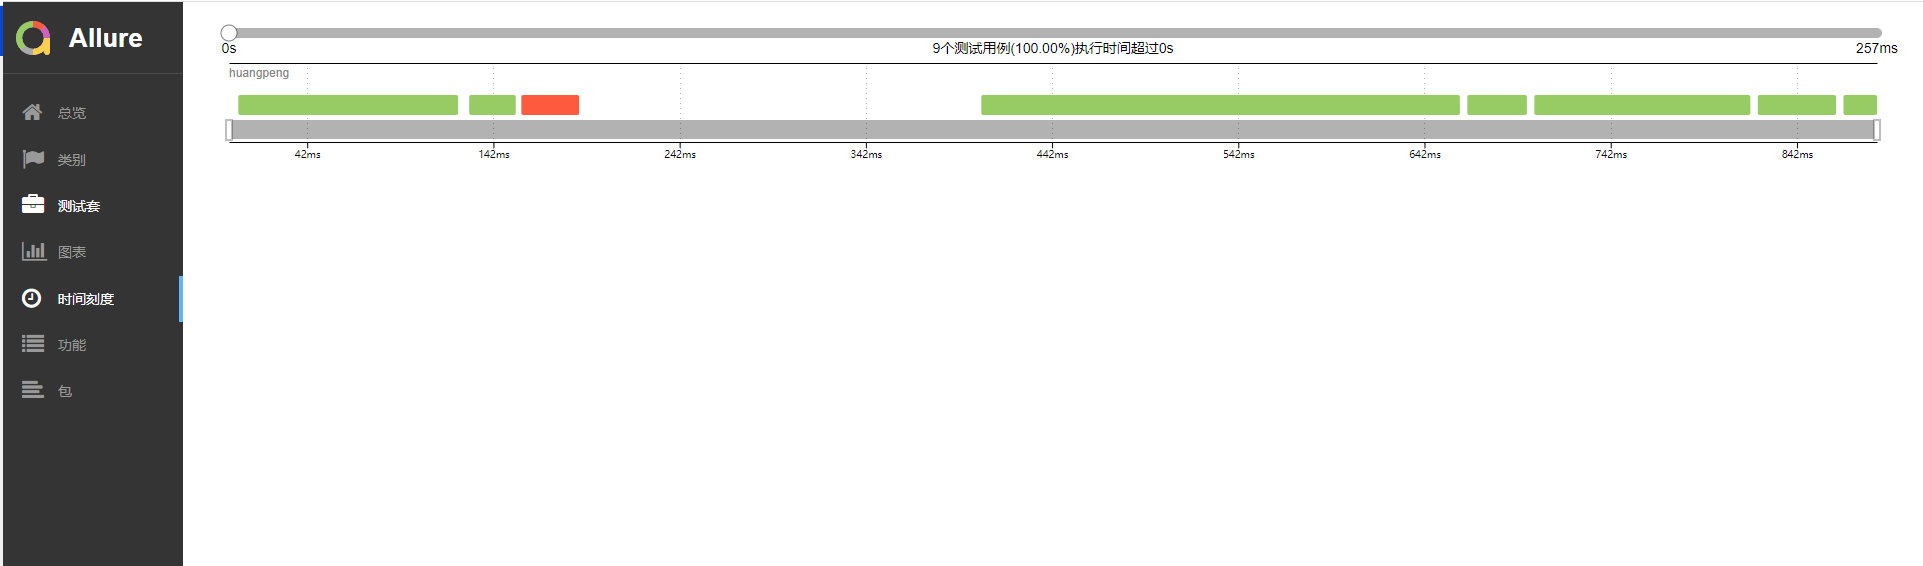
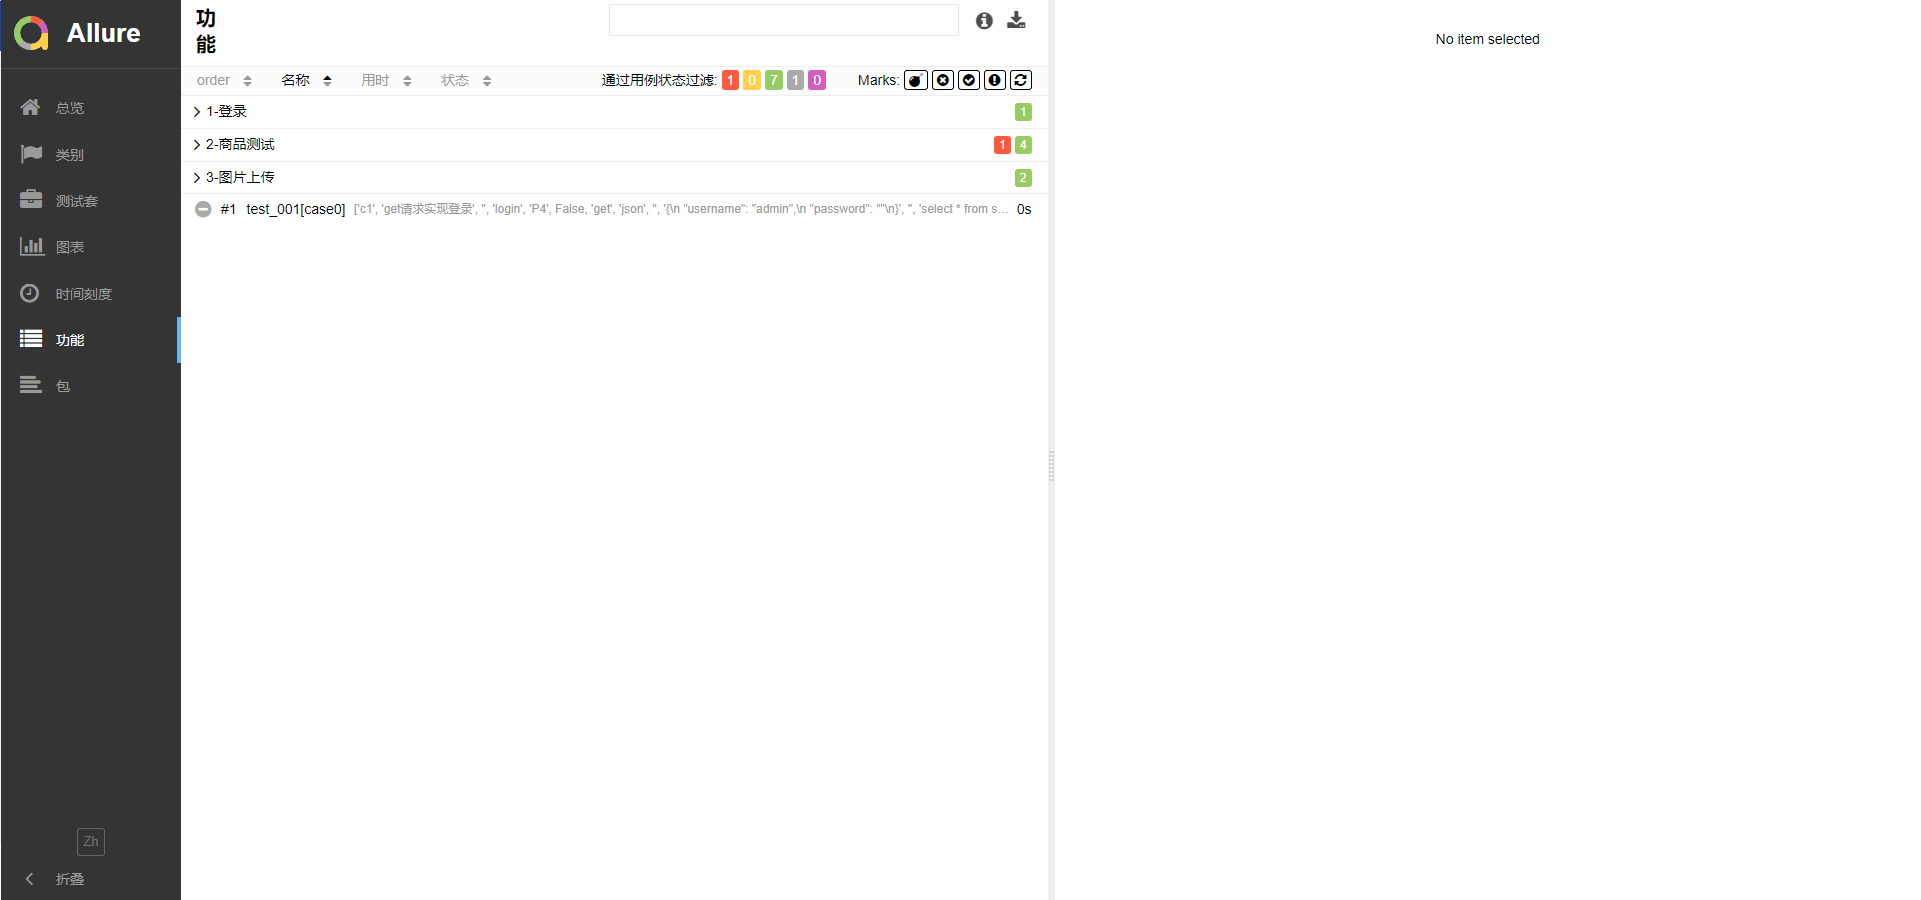
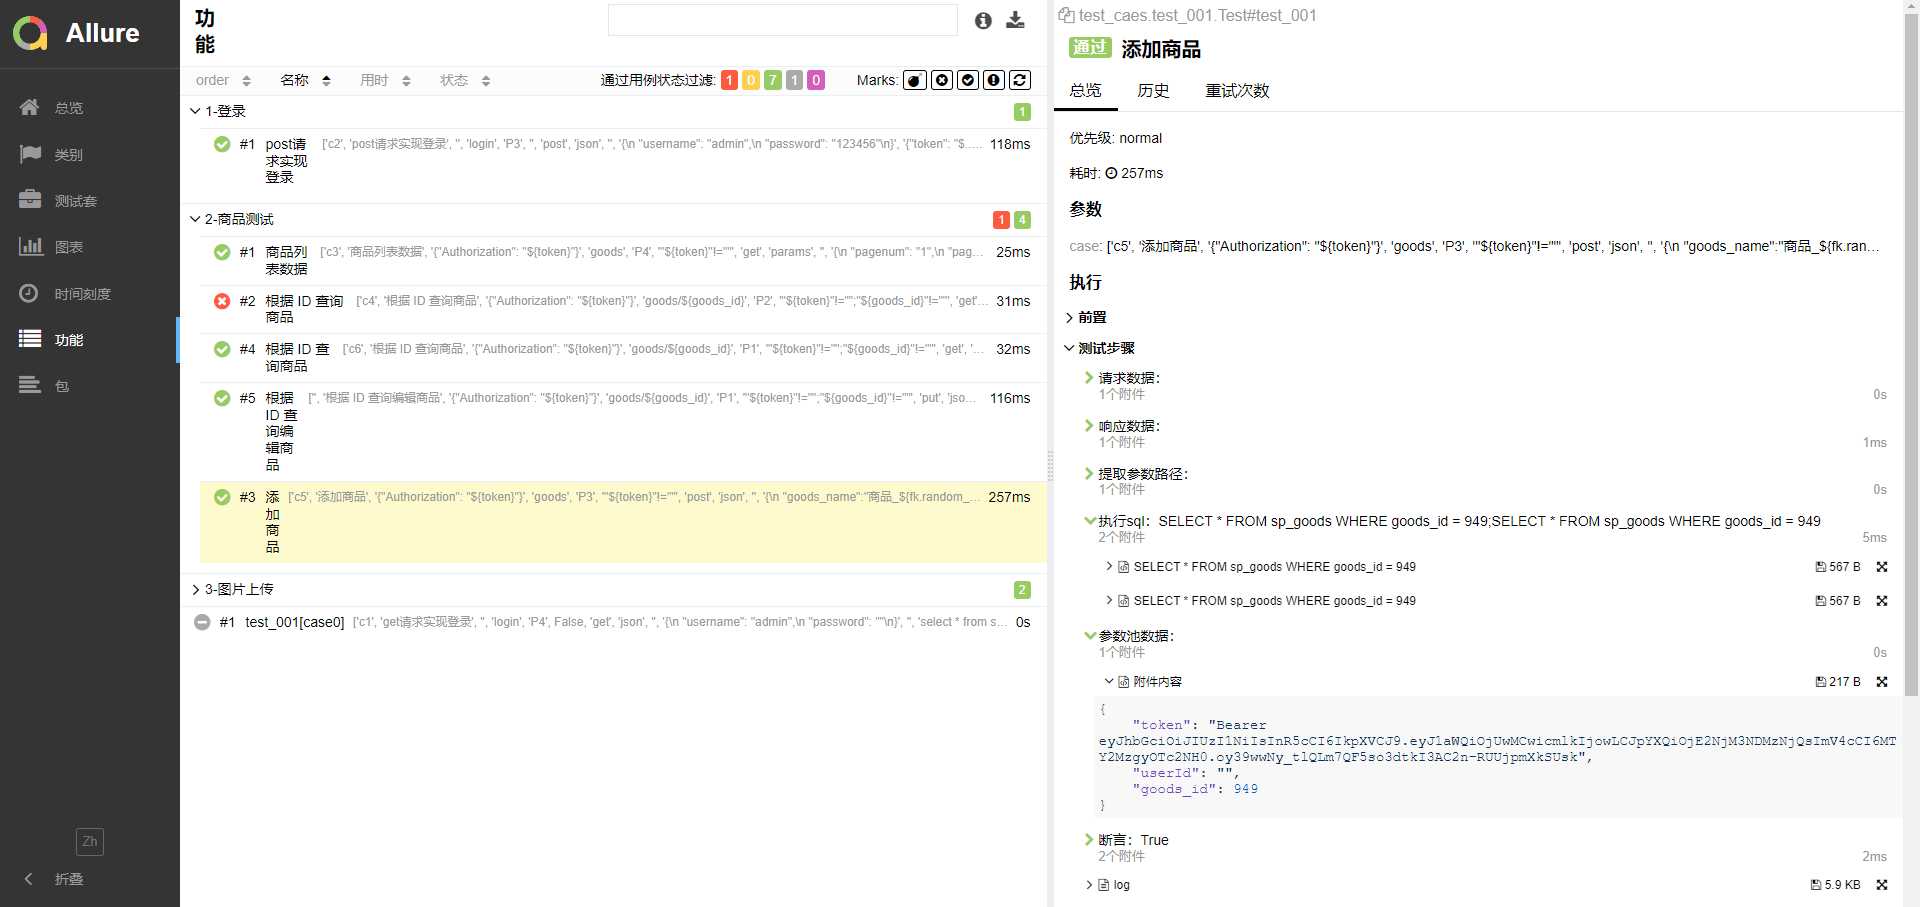
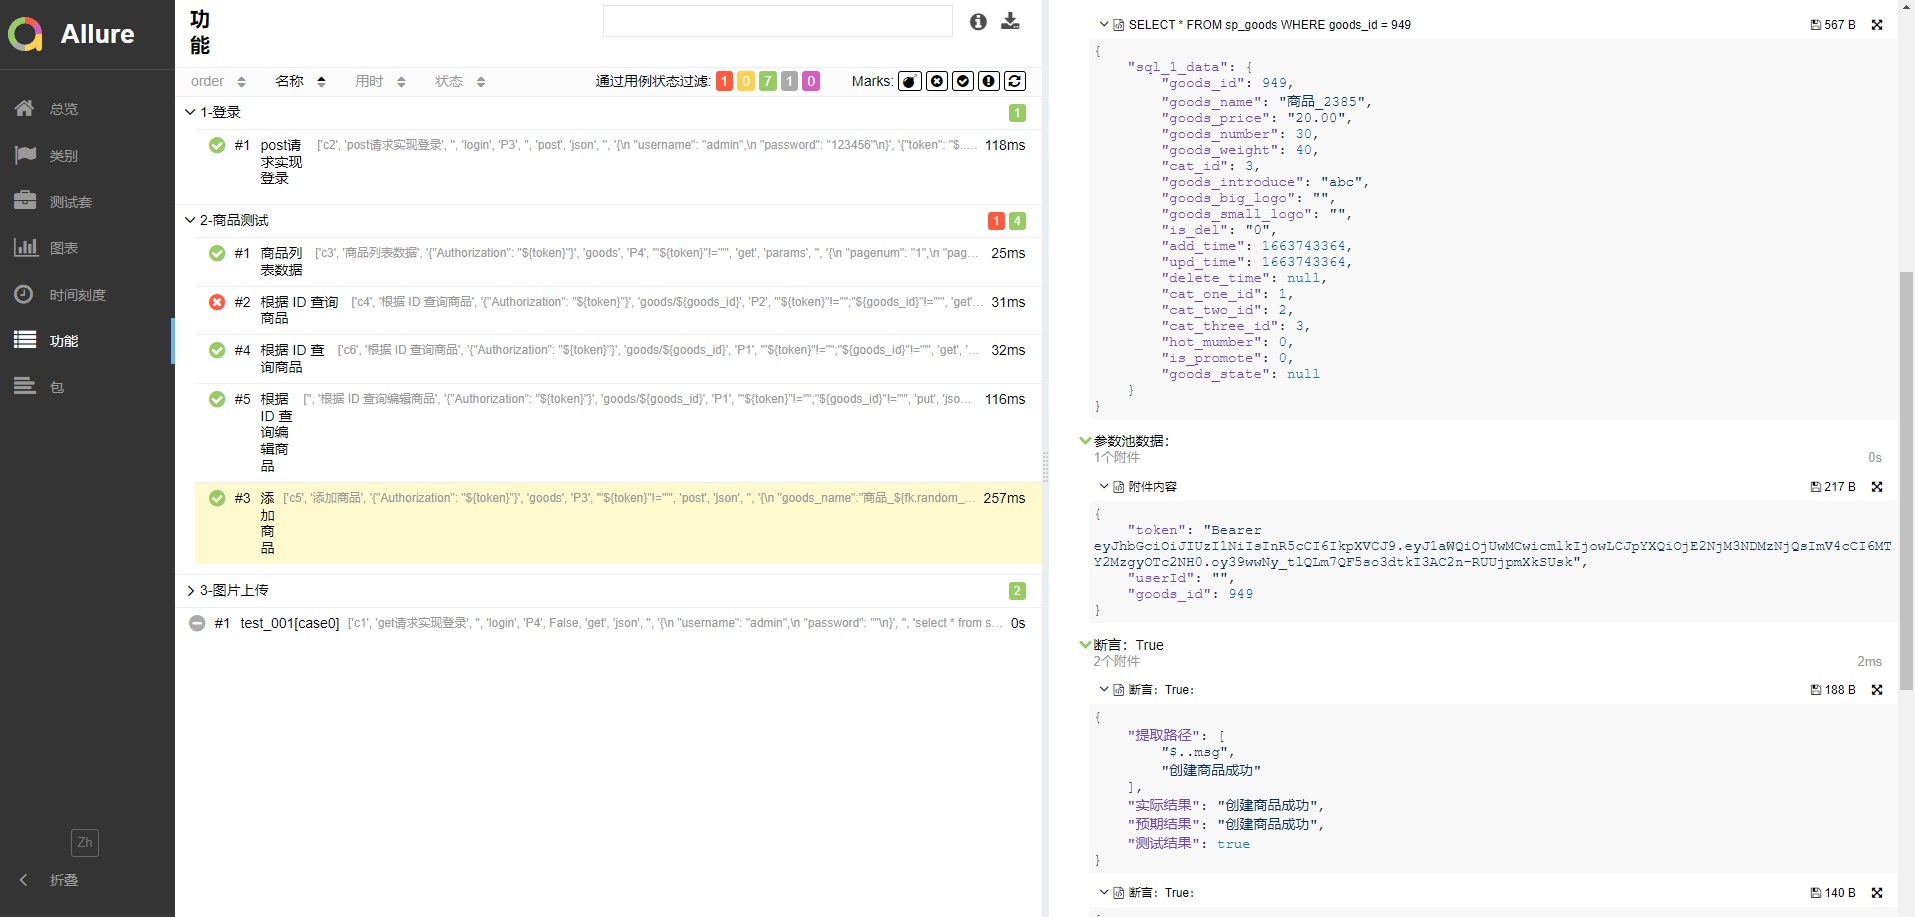
查看allure报告
target/allue-report/index.html pycharm中右击 Run"index.html"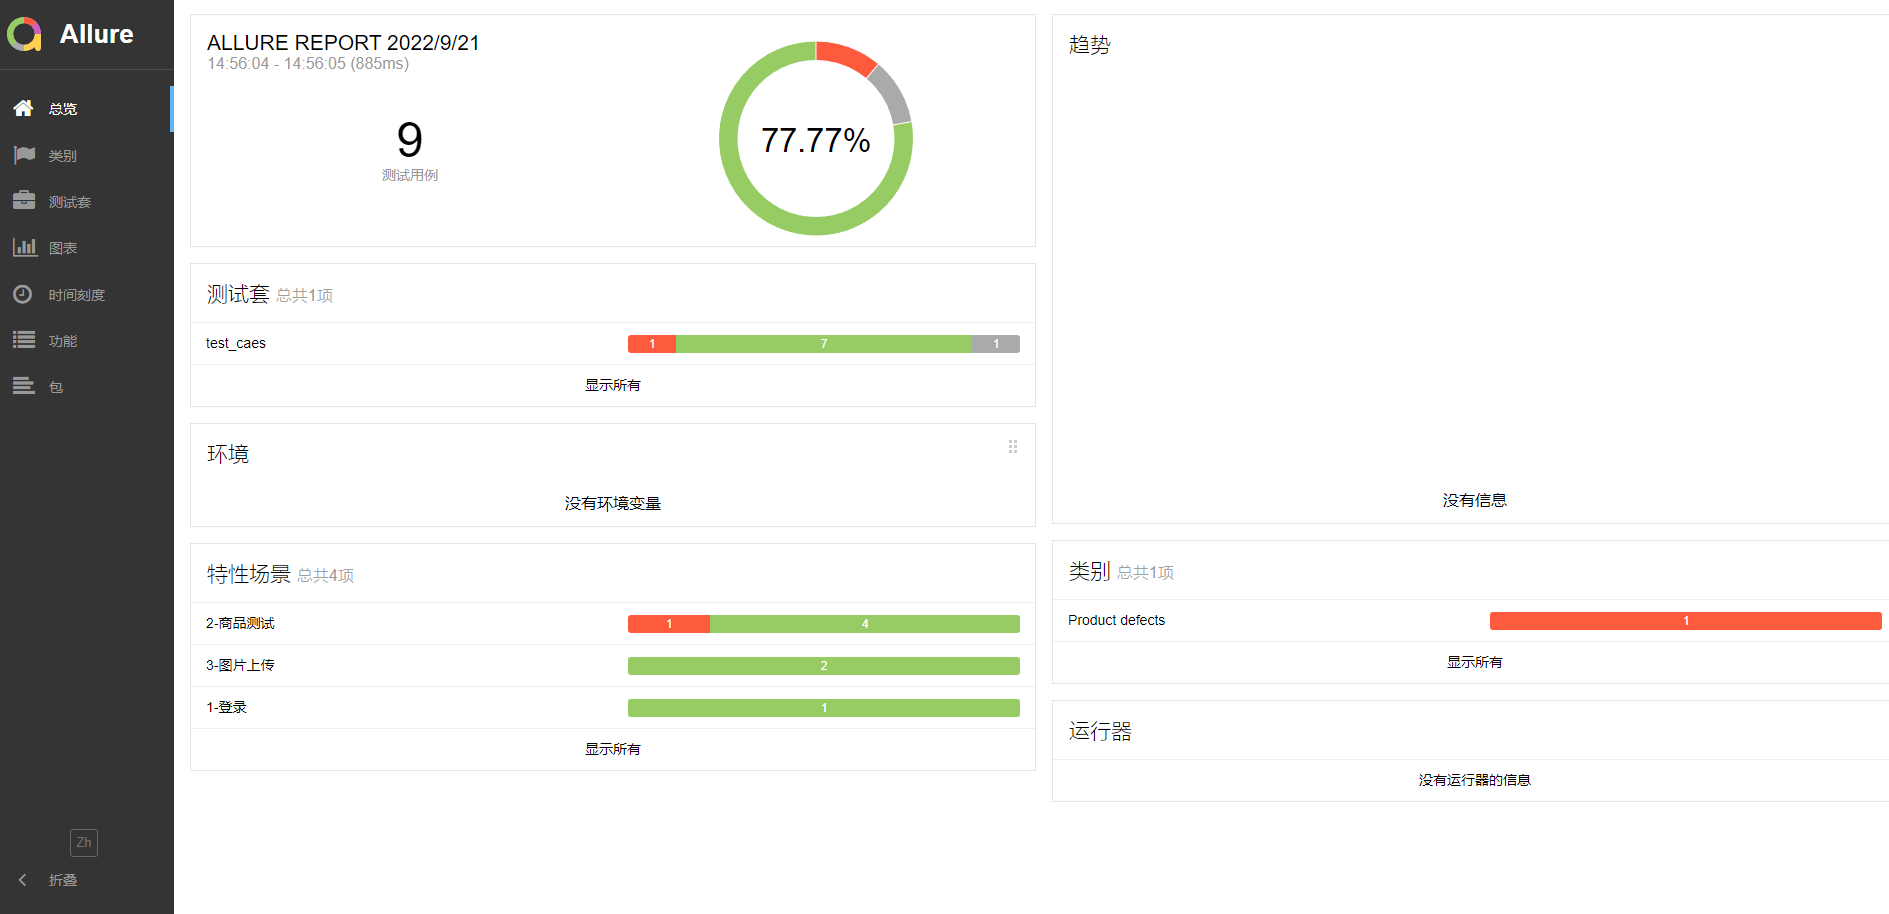
联系方式


备注:如群码过期请添加微信,备注 “加群” 拉入群