完成组织成员管理、文件管理、分支管理、代码评审部分内容,补充对成员权限的说明 #53
|
|
@ -0,0 +1,29 @@
|
|||
version: 2
|
||||
name: SSH命令调试
|
||||
description: 用以调试ssh命令
|
||||
global:
|
||||
concurrent: 1
|
||||
workflow:
|
||||
- ref: start
|
||||
name: 开始
|
||||
task: start
|
||||
- ref: end
|
||||
name: 结束
|
||||
task: end
|
||||
needs:
|
||||
- ssh_cmd_0
|
||||
- ref: ssh_cmd_0
|
||||
name: ssh执行命令
|
||||
task: ssh_cmd@1.1.1
|
||||
input:
|
||||
ssh_pass: ((ssh.key))
|
||||
ssh_ip: '"121.43.168.217"'
|
||||
ssh_port: '"22"'
|
||||
ssh_user: '"root"'
|
||||
ssh_cmd: '"docker stop groupeazzy && docker rm groupeazzy && docker pull
|
||||
registry.cn-guangzhou.aliyuncs.com/nudt_devops/gitlink_help_center_groupeazzy:latest
|
||||
&& docker run -d -p 3000:3000 --name groupeazzy
|
||||
registry.cn-guangzhou.aliyuncs.com/nudt_devops/gitlink_help_center_groupeazzy:latest"'
|
||||
needs:
|
||||
- start
|
||||
|
||||
|
|
@ -1,85 +0,0 @@
|
|||
version: 2
|
||||
name: 【生产环境】发布更新
|
||||
description: "非管理员请勿操作 "
|
||||
global:
|
||||
concurrent: 1
|
||||
workflow:
|
||||
- ref: start
|
||||
name: 开始
|
||||
task: start
|
||||
- ref: nodejs_build_0
|
||||
name: nodejs构建
|
||||
task: nodejs_build@1.7.0-node18
|
||||
input:
|
||||
workspace: ((git_clone_0.git_path))
|
||||
build_action: '"build"'
|
||||
build_args: '""'
|
||||
install_args: '""'
|
||||
registry_url: '""'
|
||||
disturl_url: '""'
|
||||
sass_binary_site_url: '""'
|
||||
package_management_type: '"yarn"'
|
||||
vc_package_dir: '"."'
|
||||
cache_path: '"/cache"'
|
||||
needs:
|
||||
- git_clone_0
|
||||
- ref: git_clone_0
|
||||
name: git clone
|
||||
task: git_clone@1.2.9
|
||||
input:
|
||||
remote_url: '"https://www.gitlink.org.cn/gitlink/gitlink_help_center.git"'
|
||||
ref: '"refs/heads/master"'
|
||||
commit_id: '""'
|
||||
depth: 1
|
||||
needs:
|
||||
- dingtalk_notice_text_0
|
||||
- ref: end
|
||||
name: 结束
|
||||
task: end
|
||||
needs:
|
||||
- dingtalk_notice_text_1
|
||||
- ref: scp_resource_0
|
||||
name: scp替换打包文件到服务器
|
||||
task: scp_resource@1.4.3
|
||||
input:
|
||||
ssh_pass: ((help_pro_server.password))
|
||||
ssh_ip: '"106.75.45.236"'
|
||||
ssh_port: '"22"'
|
||||
ssh_user: '"root"'
|
||||
remote_file: '"/root/gitlink_help_center"'
|
||||
local_file: ((git_clone_0.git_path))+"/build"
|
||||
file_content: '""'
|
||||
needs:
|
||||
- nodejs_build_0
|
||||
- ref: ssh_cmd_0
|
||||
name: 重启nginx
|
||||
task: ssh_cmd@1.1.1
|
||||
input:
|
||||
ssh_pass: ((help_pro_server.password))
|
||||
ssh_ip: '"106.75.45.236"'
|
||||
ssh_port: '"22"'
|
||||
ssh_user: '"root"'
|
||||
ssh_cmd: '"service nginx restart"'
|
||||
needs:
|
||||
- scp_resource_0
|
||||
- ref: dingtalk_notice_text_0
|
||||
name: 钉钉通知-开始更新
|
||||
task: dingtalk_notice_text@1.0.2
|
||||
input:
|
||||
boot_webhook_url: ((dingdingtalk.url))
|
||||
msg_text: '"GitLink帮助中心-生产环境开始更新。。。"'
|
||||
at_user_ids: '"[]"'
|
||||
at_mobiles: '"[]"'
|
||||
needs:
|
||||
- start
|
||||
- ref: dingtalk_notice_text_1
|
||||
name: 钉钉通知-更新完成
|
||||
task: dingtalk_notice_text@1.0.2
|
||||
input:
|
||||
boot_webhook_url: ((dingdingtalk.url))
|
||||
msg_text: '"GitLink帮助中心-生产环境更新完成"'
|
||||
at_user_ids: '"[]"'
|
||||
at_mobiles: '"[]"'
|
||||
needs:
|
||||
- ssh_cmd_0
|
||||
|
||||
|
|
@ -1,57 +0,0 @@
|
|||
version: 2
|
||||
name: 发布更新
|
||||
description: ""
|
||||
global:
|
||||
concurrent: 1
|
||||
trigger:
|
||||
webhook: gitlink@1.0.0
|
||||
event:
|
||||
- ref: push
|
||||
ruleset-operator: AND
|
||||
workflow:
|
||||
- ref: start
|
||||
name: 开始
|
||||
task: start
|
||||
- ref: end
|
||||
name: 结束
|
||||
task: end
|
||||
needs:
|
||||
- git_push_0
|
||||
- ref: docker_image_build_0
|
||||
name: docker镜像构建
|
||||
task: docker_image_build@1.6.0
|
||||
input:
|
||||
image_name: '""'
|
||||
image_tag: '"latest"'
|
||||
registry_address: '""'
|
||||
docker_file: '"Dockerfile"'
|
||||
docker_build_path: '"."'
|
||||
workspace: '"."'
|
||||
image_push: true
|
||||
build_args: '""'
|
||||
needs:
|
||||
- start
|
||||
- ref: ssh_cmd_0
|
||||
name: ssh执行命令
|
||||
task: ssh_cmd@1.1.1
|
||||
input:
|
||||
ssh_ip: '""'
|
||||
ssh_port: '"22"'
|
||||
ssh_user: '"root"'
|
||||
ssh_cmd: '""'
|
||||
needs:
|
||||
- docker_image_build_0
|
||||
- ref: git_push_0
|
||||
name: git_push
|
||||
task: sailstar/git_push@1.0.6
|
||||
input:
|
||||
remote_url: '""'
|
||||
remote_branch: '"master"'
|
||||
source_path: '""'
|
||||
target_dir: '""'
|
||||
commit_message: '"jianmu default commit message"'
|
||||
committer_name: '"jianmu"'
|
||||
committer_email: '"jianmu@example.com"'
|
||||
needs:
|
||||
- ssh_cmd_0
|
||||
|
||||
|
|
@ -0,0 +1,68 @@
|
|||
version: 2
|
||||
name: 未命名项目
|
||||
description: ""
|
||||
global:
|
||||
concurrent: 1
|
||||
trigger:
|
||||
webhook: gitlink@1.0.0
|
||||
event:
|
||||
- ref: push
|
||||
ruleset:
|
||||
- param-ref: branch
|
||||
operator: EQ
|
||||
value: '"master"'
|
||||
ruleset-operator: AND
|
||||
workflow:
|
||||
- ref: start
|
||||
name: 开始
|
||||
task: start
|
||||
- ref: git_clone_0
|
||||
name: git clone
|
||||
task: git_clone@1.2.9
|
||||
input:
|
||||
remote_url: '"https://gitlink.org.cn/Eazzy/reposync.git"'
|
||||
ref: '"refs/heads/master"'
|
||||
commit_id: '""'
|
||||
depth: 1
|
||||
needs:
|
||||
- start
|
||||
- ref: ssh_cmd_0
|
||||
name: ssh执行命令
|
||||
task: ssh_cmd@1.1.1
|
||||
input:
|
||||
ssh_pass: ((ssh.key))
|
||||
ssh_ip: '"121.43.168.217"'
|
||||
ssh_port: '"22"'
|
||||
ssh_user: '"root"'
|
||||
ssh_cmd: "\"docker stop reposyncer_app && docker rm reposyncer_app && docker
|
||||
pull
|
||||
registry.cn-guangzhou.aliyuncs.com/nudt_devops/gitlink_help_center_grou\
|
||||
peazzy:latest && docker run -it -d -e CEROBOT_MYSQL_HOST='8.134.99.218'
|
||||
-e CEROBOT_MYSQL_PORT=3306 -e CEROBOT_MYSQL_USER=root -e
|
||||
CEROBOT_MYSQL_PWD='951623847' -e CEROBOT_MYSQL_DB='reposyncer' -e
|
||||
BOOT_MODE='app' -p 8089:8000 --name reposyncer_app
|
||||
registry.cn-guangzhou.aliyuncs.com/nudt_devops/reposync_eazzy:latest\""
|
||||
needs:
|
||||
- docker_image_build_0
|
||||
- ref: docker_image_build_0
|
||||
name: docker镜像构建
|
||||
task: docker_image_build@1.6.0
|
||||
input:
|
||||
docker_username: ((docker.username))
|
||||
docker_password: ((docker.docker_key))
|
||||
image_name: '"registry.cn-guangzhou.aliyuncs.com/nudt_devops/reposync_eazzy:latest"'
|
||||
image_tag: '"latest"'
|
||||
registry_address: '"registry.cn-guangzhou.aliyuncs.com"'
|
||||
docker_file: '"Dockerfile"'
|
||||
docker_build_path: '"."'
|
||||
workspace: '"."'
|
||||
image_push: true
|
||||
build_args: '""'
|
||||
needs:
|
||||
- git_clone_0
|
||||
- ref: end
|
||||
name: 结束
|
||||
task: end
|
||||
needs:
|
||||
- ssh_cmd_0
|
||||
|
||||
|
|
@ -1,31 +1,26 @@
|
|||
version: 2
|
||||
name: test
|
||||
name: 自动上传镜像
|
||||
description: ""
|
||||
global:
|
||||
concurrent: 1
|
||||
trigger:
|
||||
webhook: gitlink@1.0.0
|
||||
event:
|
||||
- ref: pr
|
||||
- ref: push
|
||||
ruleset:
|
||||
- param-ref: source_branch
|
||||
- param-ref: branch
|
||||
operator: EQ
|
||||
value: '""'
|
||||
value: '"master"'
|
||||
ruleset-operator: AND
|
||||
workflow:
|
||||
- ref: start
|
||||
name: 开始
|
||||
task: start
|
||||
- ref: end
|
||||
name: 结束
|
||||
task: end
|
||||
needs:
|
||||
- ssh_cmd_0
|
||||
- ref: git_clone_0
|
||||
name: git clone
|
||||
task: git_clone@1.2.9
|
||||
input:
|
||||
remote_url: '"https://gitlink.org.cn/SheYuWu03/gitlink_help_center.git"'
|
||||
remote_url: '"https://gitlink.org.cn/Eazzy/gitlink_help_center.git"'
|
||||
ref: '"refs/heads/master"'
|
||||
commit_id: '""'
|
||||
depth: 1
|
||||
|
|
@ -35,24 +30,35 @@ workflow:
|
|||
name: docker镜像构建
|
||||
task: docker_image_build@1.6.0
|
||||
input:
|
||||
image_name: '""'
|
||||
docker_username: ((docker.username))
|
||||
docker_password: ((docker.docker_key))
|
||||
image_name: '"registry.cn-guangzhou.aliyuncs.com/nudt_devops/gitlink_help_center_groupeazzy"'
|
||||
image_tag: '"latest"'
|
||||
registry_address: '""'
|
||||
registry_address: '"registry.cn-guangzhou.aliyuncs.com"'
|
||||
docker_file: '"Dockerfile"'
|
||||
docker_build_path: '"."'
|
||||
workspace: '"."'
|
||||
workspace: git_clone_0.git_path
|
||||
image_push: true
|
||||
build_args: '""'
|
||||
needs:
|
||||
- git_clone_0
|
||||
- ref: end
|
||||
name: 结束
|
||||
task: end
|
||||
needs:
|
||||
- ssh_cmd_0
|
||||
- ref: ssh_cmd_0
|
||||
name: ssh执行命令
|
||||
task: ssh_cmd@1.1.1
|
||||
input:
|
||||
ssh_ip: '""'
|
||||
ssh_pass: ((ssh.key))
|
||||
ssh_ip: '"121.43.168.217"'
|
||||
ssh_port: '"22"'
|
||||
ssh_user: '"root"'
|
||||
ssh_cmd: '""'
|
||||
ssh_cmd: '"docker stop groupeazzy && docker rm groupeazzy && docker pull
|
||||
registry.cn-guangzhou.aliyuncs.com/nudt_devops/gitlink_help_center_groupeazzy:latest
|
||||
&& docker run -d -p 3000:3000 --name groupeazzy
|
||||
registry.cn-guangzhou.aliyuncs.com/nudt_devops/gitlink_help_center_groupeazzy:latest"'
|
||||
needs:
|
||||
- docker_image_build_0
|
||||
|
||||
|
|
@ -1,10 +1,10 @@
|
|||
FROM node:18-alpine
|
||||
LABEL maintainer="yuankaifneg <2894340009@qq.com>"
|
||||
LABEL maintainer="RisingEazzy <1044745821@qq.com>"
|
||||
|
||||
WORKDIR /gitlink_help_center
|
||||
|
||||
COPY ./ /gitlink_help_center/
|
||||
|
||||
RUN yarn install
|
||||
RUN npm run build -- --locale zh-cn
|
||||
RUN npm run build
|
||||
CMD ["npm", "run", "serve"]
|
||||
|
|
|
|||
|
|
@ -2,92 +2,18 @@
|
|||
sidebar_label: "介绍"
|
||||
label: "介绍"
|
||||
sidebar_position: 1
|
||||
slug: /
|
||||
slug: /intro
|
||||
---
|
||||
|
||||
# 关于GitLink
|
||||
GitLink(确实开源)是CCF官方指定的开源创新服务平台,旨在以“为开源创新服务”为使命,以“成为开源创新的汇聚地”为愿景,秉承“创新、开放、协作、共享”的价值观,致力于为大规模开源开放协同创新助力赋能,打造创新成果孵化和新工科人才培养的开源创新生态!
|
||||
|
||||

|
||||

|
||||
|
||||
# 平台功能
|
||||
|
||||
- **分布式协作开发**:支持在线文件编辑、分支管理、贡献统计、仓库复刻、合并请求;
|
||||
- **一站式过程管理**:支持疑修、里程碑、通知提醒、标签归档、Wiki文档、组织管理;
|
||||
- **高效流水线运维**:提供轻量级工作流引擎,并支持自定义配置、静态扫描、制品构建;
|
||||
- **多层次代码分析**:支持代码溯源分析、许可证风险分析、开源漏洞检测和加固建议;
|
||||
- **多维度用户画像**:支持开发活动统计、贡献日历、能力建模、角色与专业定位分析。
|
||||
|
||||
# 帮助文档
|
||||
帮助文档有助于您全面了解GitLink平台,让我们一起为开源创新贡献力量!
|
||||
|
||||
<div class="row">
|
||||
<div class="col col--12">
|
||||
<section class="row list">
|
||||
<article class="col col--6 margin-bottom--lg">
|
||||
<a class="card padding--lg cardContainer" href="/快速开始/注册GitLink账号">
|
||||
<h2 class="text--truncate cardTitle" title="快速开始">快速开始</h2>
|
||||
<p>帮助用户快速注册使用平台[5个文档]</p>
|
||||
</a></article>
|
||||
<article class="col col--6 margin-bottom--lg">
|
||||
<a class="card padding--lg cardContainer" href="/代码库管理/仓库创建">
|
||||
<h2 class="text--truncate cardTitle" title="代码库管理">代码库管理</h2>
|
||||
<p>代码库使用及设置[8个文档]</p>
|
||||
</a></article>
|
||||
<article class="col col--6 margin-bottom--lg">
|
||||
<a class="card padding--lg cardContainer" href="/组织管理/组织简介">
|
||||
<h2 class="text--truncate cardTitle" title="组织管理">组织管理</h2>
|
||||
<p>组织使用及设置[5个文档]</p>
|
||||
</a></article>
|
||||
<article class="col col--6 margin-bottom--lg">
|
||||
<a class="card padding--lg cardContainer" href="/疑修/疑修简介">
|
||||
<h2 class="text--truncate cardTitle" title="疑修">疑修</h2>
|
||||
<p>疑修(Issue)使用及设置[7个文档]</p>
|
||||
</a></article>
|
||||
<article class="col col--6 margin-bottom--lg">
|
||||
<a class="card padding--lg cardContainer" href="/合并请求/合并请求简介">
|
||||
<h2 class="text--truncate cardTitle" title="合并请求">合并请求</h2>
|
||||
<p>合并请求(Pull Request)使用及设置[5个文档]</p>
|
||||
</a></article>
|
||||
<article class="col col--6 margin-bottom--lg">
|
||||
<a class="card padding--lg cardContainer" href="/DevOps引擎/引擎简介">
|
||||
<h2 class="text--truncate cardTitle" title="DevOps引擎">DevOps引擎</h2>
|
||||
<p>DevOps引擎(Engine)使用及设置[6个文档]</p>
|
||||
</a></article>
|
||||
<article class="col col--6 margin-bottom--lg">
|
||||
<a class="card padding--lg cardContainer" href="/维基/模板导入及导出">
|
||||
<h2 class="text--truncate cardTitle" title="维基">维基</h2>
|
||||
<p>维基(Wiki)使用及设置[2个文档]</p>
|
||||
</a></article>
|
||||
<article class="col col--6 margin-bottom--lg">
|
||||
<a class="card padding--lg cardContainer" href="/Bot市场/bot安装">
|
||||
<h2 class="text--truncate cardTitle" title="Bot市场">Bot市场</h2>
|
||||
<p>Bot市场使用及设置[4个文档]</p>
|
||||
</a></article>
|
||||
<article class="col col--6 margin-bottom--lg">
|
||||
<a class="card padding--lg cardContainer" href="/第三方服务/跨平台代码同步">
|
||||
<h2 class="text--truncate cardTitle" title="第三方服务">第三方服务</h2>
|
||||
<p>第三方服务使用及设置[3个文档]</p>
|
||||
</a></article>
|
||||
<article class="col col--6 margin-bottom--lg">
|
||||
<a class="card padding--lg cardContainer" href="/通知/通知简介">
|
||||
<h2 class="text--truncate cardTitle" title="通知">通知</h2>
|
||||
<p>通知简介及设置[2个文档]</p>
|
||||
</a></article>
|
||||
<article class="col col--6 margin-bottom--lg">
|
||||
<a class="card padding--lg cardContainer" href="/个人主页建站/建站流程">
|
||||
<h2 class="text--truncate cardTitle" title="个人主页建站">个人主页建站</h2>
|
||||
<p>个人主页建站使用及设置[2个文档]</p>
|
||||
</a></article>
|
||||
<article class="col col--6 margin-bottom--lg">
|
||||
<a class="card padding--lg cardContainer" href="/平台公告">
|
||||
<h2 class="text--truncate cardTitle" title="平台公告">平台公告</h2>
|
||||
</a></article>
|
||||
<article class="col col--6 margin-bottom--lg">
|
||||
<a class="card padding--lg cardContainer" href="/服务协议/GitLink服务协议">
|
||||
<h2 class="text--truncate cardTitle" title="服务协议">服务协议</h2>
|
||||
<p>GitLink服务协议[1个文档]</p>
|
||||
</a></article>
|
||||
</section>
|
||||
</div>
|
||||
</div>
|
||||
|
|
@ -2,3 +2,21 @@
|
|||
sidebar_label: '代码提交'
|
||||
sidebar_position: 3
|
||||
---
|
||||
|
||||
|
||||
## GitLink 代码提交
|
||||
|
||||
|
||||
## 1.直接在网页上提交代码:
|
||||
<br/>
|
||||
**接着:**
|
||||
<br/>
|
||||
## 2.通过git将本地代码文件上传(可单个文件,可多个文件构成的文件夹) [非代码亦可上传]
|
||||
**在对应目录下打开git bash,输入以下命令:**
|
||||
git add +[你要提交的代码文件]
|
||||
git commit -m "xxx" [xxx为你自己备注的提交信息]
|
||||
git push
|
||||
**示意图如下:**
|
||||
<br/>
|
||||
|
||||
|
||||
|
|
@ -2,6 +2,11 @@
|
|||
sidebar_label: '分支管理'
|
||||
sidebar_position: 5
|
||||
---
|
||||
|
||||
在代码仓库点击分支可以直接进入分支管理界面,如下所示。
|
||||
<br/>
|
||||
再这个界面我们可以删除分支、新建分支、查看删除的分支等操作,还可以查看每个分支变动的信息,或者下载某个分支,也支持设置默认分支,当然只能有一个默认分支,也可以在如下图所示的分支设置界面中进行设置。
|
||||
<br/>
|
||||
### **1. 分支管理方式(1)**
|
||||
在代码库栏下,如下图所示,用户可以点击代码库分支从而查看当前项目的所有分支,并且选择对其进行操作。
|
||||
.png)<br/>
|
||||
|
|
|
|||
|
|
@ -18,6 +18,12 @@ sidebar_position: 7
|
|||
进入成员管理模块后,单击项目成员右侧的角色栏,可以选择赋予该名项目成员的权限等级,如下图所示。
|
||||
<br/>
|
||||
|
||||
|
||||
#### ***4.1.成员权限说明***
|
||||
在 GitLink 平台,仓库成员权限可以分为以下几种:
|
||||
<br/>
|
||||
|
||||
|
||||
### **5. 删除项目成员**
|
||||
进入成员管理模块后,单击项目成员右侧的”删除“按键,可以删除改名项目成员,如下图所示。
|
||||
<br/>
|
||||
|
|
|
|||
|
|
@ -13,3 +13,10 @@ sidebar_position: 4
|
|||
### **3. 创建文件**
|
||||
在代码库栏下,点击“文件”按钮,选择“创建文件”,随后会直接跳转至下图所示界面。
|
||||
<br/>
|
||||
|
||||
我们在代码仓库中可以直接看到文件并进行文件管理,如下图所示。
|
||||
<br/>
|
||||
其中可以看到文件对应的分支和文件所有的信息,并且可以看到文件最新的变动情况及变动人。
|
||||
我们可以直接点击左上的文件按钮进行上传文件或者新建文件(注意是文件不是文件夹,如果要上传文件夹需要使用git)
|
||||
在左边可以打开文件目录,直接找到想要查看的文件直接进行预览,如下图所示。
|
||||
<br/>
|
||||
|
|
@ -4,6 +4,16 @@ sidebar_position: 3
|
|||
---
|
||||
|
||||
# 代码评审
|
||||
1.在管理合并请求界面的右上角点击“代码评审”按钮进入代码评审界面,如下所示。
|
||||
<br/>
|
||||
2.进入界面后我们可以看到合并的相关信息,比如提交的文件、修改的文件、文件修改前后的差异等信息,点击右上角编辑按钮即可对提交的代码进行编辑,如下图所示。
|
||||

|
||||
3.编辑完成后点击保存,此时在界面左下角弹出修改窗口,并在文件浏览框中出现审查前后的代码对比,可以查看审查过程中修改过的代码,确认无误后在修改框中输入审查信息并提交(注意审查信息不能为空),如下图所示。
|
||||

|
||||
4.审查完文件并提交审查信息后返回管理合并请求界面,我们在该界面可以在“提交”选项下看到审查日志,并进行最终对请求的合并,如下所示。
|
||||

|
||||
|
||||
总结:代码审查功能有利于管理者在管理合并请求时对提交的代码进行修改管理,方便管理者对代码仓库的整体掌控,缺点是对代码修改的操作性在不如本地IDE,但是如果对代码微调的话这是一个很好很方便的功能!👍👍👍😁
|
||||
### **1. 进入代码评审**
|
||||
如下图所示,点击“代码评审”按钮可以进入代码评审
|
||||
<br/>
|
||||
|
|
|
|||
|
|
@ -7,9 +7,9 @@ sidebar_position: 2
|
|||
|
||||
1. 进入需要发起合并请求的项目的“**合并请求(PR)**”界面,点击上方的“**新建合并请求**”按钮后,进入合并请求发布界面,如下所示:
|
||||
|
||||

|
||||

|
||||
|
||||

|
||||

|
||||
|
||||
2. 选择需要合并的**源分支**和**目标分支**,其中源分支为已完成代码开发、需要合并其代码变更的分支,目标分支为要并入代码变更的分支,既可以是同一仓库下的其他分支(branch),也可以是被复刻的源仓库下的分支;
|
||||
|
||||
|
|
@ -19,4 +19,4 @@ sidebar_position: 2
|
|||
|
||||
5. 最后信息填写完毕后,点击底部的“**创建**”按钮即可提交您的第一个合并请求了🎉🎉🎉!
|
||||
|
||||

|
||||

|
||||
|
|
@ -9,7 +9,7 @@ sidebar_position: 4
|
|||
|
||||
然而,对于不同分支间的提交合并,存在多种合并模式,下图为GitLink中支持的合并模式,包括**合并请求**、**变基并合并**、**变基合并 --no-ff**以及**压缩提交并合并**四种。
|
||||
|
||||

|
||||

|
||||
|
||||
1. **合并请求**
|
||||
|
||||
|
|
@ -17,11 +17,11 @@ sidebar_position: 4
|
|||
|
||||
快进合并前:
|
||||
|
||||

|
||||

|
||||
|
||||
快进合并后:
|
||||
|
||||

|
||||

|
||||
|
||||
**注意**:可以看到,合并的过程就是直接把`master`指针移动到了`dev`指针处,这种合并被称为**快进(fast-forward)**,之所以出现这种情形是因为在提交3之后,`master`分支上没有新的提交,所以通过直接快进`master`指针就可以完成合并;但如果在`master`分支上也有新的提交,就需要进行实质性的合并了,如下面两幅图所示:
|
||||
|
||||
|
|
@ -29,18 +29,18 @@ sidebar_position: 4
|
|||
|
||||
非快进合并前:
|
||||
|
||||

|
||||

|
||||
|
||||
|
||||
合并之后,提交A、B、C都会按时间线加入`master`的提交记录中,并且会生成一个新的提交D,用于记录合并这件事情;此外,如果合并过程中发生了冲突,即两个分支对同一个文件进行了修改,则需要手动处理冲突;这种合并方式就是**非快进(no fast-forward)**,这也是**合并请求**模式下的默认方式!
|
||||
|
||||
非快进合并后:
|
||||
|
||||

|
||||

|
||||
|
||||
为了方便理解,可以以线性方式查看合并后的`master`分支上的提交记录
|
||||
|
||||

|
||||

|
||||
|
||||
**总结**:在**合并请求**模式下,默认采用**非快进**合并开发分支到`master`分支上,而**非快进**方式会生成一个特殊的提交用于记录此次合并事件!
|
||||
|
||||
|
|
@ -52,18 +52,18 @@ sidebar_position: 4
|
|||
|
||||
变基前:
|
||||
|
||||

|
||||

|
||||
|
||||
变基后、合并前:
|
||||
|
||||

|
||||

|
||||
|
||||
|
||||
`dev`分支变基之后,`master`分支就没有“更新”的提交了,所以此时进行合并,就得到了如下的结果
|
||||
|
||||
合并后:
|
||||
|
||||

|
||||

|
||||
|
||||
**总结**:在**变基并合并**模式下,开发分支`dev`可以先进行变基操作,使其上的提交看起来都是在`master`分支最新的提交基础上进行的,然后再通过**快进**方式合并回`master`分支,从而起到整理提交记录的作用!
|
||||
|
||||
|
|
@ -73,11 +73,11 @@ sidebar_position: 4
|
|||
|
||||
`--no-ff`合并前:
|
||||
|
||||

|
||||

|
||||
|
||||
`--no-ff`合并后:
|
||||
|
||||

|
||||

|
||||
|
||||
**总结**:通过`--no-ff`选项,可以显式声明在合并时采用**非快进**方式,这样就可以在`master`分支中添加一个记录合并事件的提交!
|
||||
|
||||
|
|
@ -87,14 +87,14 @@ sidebar_position: 4
|
|||
|
||||
压缩前:
|
||||
|
||||

|
||||

|
||||
|
||||
压缩后、提交前:
|
||||
|
||||

|
||||

|
||||
|
||||
提交后:
|
||||
|
||||

|
||||

|
||||
|
||||
**总结**:在合并前,先对开发分支上的琐碎提交进行压缩,可以使`master`分支上的提交信息更简洁,但是要注意,这种合并模式本质上是`master`分支一次性保存`dev`上的变更,并创建新的提交记录这些变更,所以提交者发生了变化!
|
||||
|
|
@ -15,4 +15,4 @@ GitLink中的 **合并请求(PR)** 模块提供合并请求创建和管理两方
|
|||
|
||||
如下图所示为合并请求(PR)管理模块:
|
||||
|
||||

|
||||

|
||||
|
|
@ -2,3 +2,18 @@
|
|||
sidebar_label: '平台公告'
|
||||
sidebar_position: 1
|
||||
---
|
||||
|
||||
|
||||
#**尊敬的gitlink用户:**
|
||||
|
||||
我们很高兴地宣布,gitlink网站将于7月中旬推出全新版本!这次更新将带来许多新的功能和改进,旨在提升您的用户体验和网站使用效率。
|
||||
|
||||
在新版本中,您可以期待更流畅的界面和更直观的操作,帮助您更快速地找到您需要的信息和功能。我们还将增加一些新的功能,例如用户个人主页、实时通知等,让您能够更好地管理和分享您的项目。
|
||||
|
||||
除此之外,我们还将提升网站的安全性和稳定性,保障您的数据和信息安全。我们一直致力于为您提供一个高质量的平台,让您能够更轻松地与团队合作,管理您的代码库,并且实现项目的成功。
|
||||
|
||||
我们希望您能够继续支持gitlink网站,并且期待您在新版本上的体验!如果您有任何意见或建议,欢迎随时联系我们的维护团队(21级软件工程专业杨逸哲小组),我们将竭诚为您提供帮助。
|
||||
|
||||
谢谢您对gitlink的支持!
|
||||
|
||||
杨逸哲维护团队 敬上
|
||||
|
|
@ -9,16 +9,16 @@ sidebar_position: 2
|
|||
|
||||
平台提供了“新建”按钮,用户可以通过点击快速从零开始创建新的公开或者私有项目。
|
||||
|
||||

|
||||

|
||||
|
||||
## 2. 填写项目信息
|
||||
|
||||
填写项目基本信息。
|
||||
|
||||

|
||||

|
||||
|
||||
## 3. 创建成功
|
||||
|
||||
点击创建项目,创建成功后进入项目主页。
|
||||
|
||||

|
||||

|
||||
|
|
|
|||
|
|
@ -9,19 +9,19 @@ sidebar_position: 5
|
|||
|
||||
在首页选择**导入项目**
|
||||
|
||||

|
||||

|
||||
|
||||
## 2. 填写信息
|
||||
|
||||
填写需要导入的第三方Git项目地址和项目信息,如果导入项目为私有仓库,则需输入目标平台用户token进行授权。
|
||||
|
||||

|
||||

|
||||
|
||||
## 3. 授权验证
|
||||
|
||||
在使用GitLink平台导入其他平台(如GitHub、Gitee)的开源项目时,如果项目为私有,则无法通过正常途径导入,需要输入对应平台有权限的token值进行校验。
|
||||
|
||||

|
||||

|
||||
|
||||
下面将列举一些典型开源平台的token获取方式。
|
||||
|
||||
|
|
@ -85,8 +85,8 @@ sidebar_position: 5
|
|||
|
||||
提示正在从第三方Git项目地址迁移
|
||||
|
||||

|
||||

|
||||
|
||||
迁移成功则导入项目成功
|
||||
|
||||

|
||||

|
||||
|
|
@ -9,14 +9,14 @@ sidebar_position: 3
|
|||
|
||||
点击编辑按钮,开始编辑代码。
|
||||
|
||||

|
||||

|
||||
|
||||
# 2. 提交代码
|
||||
|
||||
在编辑框中编写代码,编写完成后填写变更信息后提交变更。
|
||||
|
||||

|
||||

|
||||
|
||||
## 3. 代码更新成功
|
||||
|
||||
提交成功后代码代码更新成功。
|
||||
提交成功后代码代码更新成功。
|
||||
|
|
@ -11,11 +11,11 @@ sidebar_position: 4
|
|||
|
||||
进入“项目”模块,左侧列出了项目类型和项目类别。其中,项目类型主要包括开源托管项目和开源镜像项目两类。项目类别主要包括:云计算、大数据、区块链、物联网、机器学习、人工智能、智慧医疗、其他。
|
||||
|
||||

|
||||

|
||||
|
||||
右侧展示了所有项目的基本信息,包括创建者、项目名、项目简介、浏览量、项目类别、更新时间、点赞数量、Fork 数量等信息,用户可以通过关键字搜索查找特定的项目,也可以按照更新时间、创建时间、Fork 数量、点赞数量等对项目进行排序。
|
||||
|
||||

|
||||

|
||||
|
||||
用户点击项目名称,即可进入到项目详情,查看和参与开源项目开发。
|
||||
|
||||
|
|
@ -27,18 +27,18 @@ sidebar_position: 4
|
|||
|
||||
搜索项目:
|
||||
|
||||

|
||||

|
||||
|
||||
搜索结果:
|
||||
|
||||

|
||||

|
||||
|
||||
### 菜单栏搜索框
|
||||
|
||||
搜索项目:
|
||||
|
||||

|
||||

|
||||
|
||||
搜索结果:
|
||||
|
||||

|
||||

|
||||
|
|
@ -7,21 +7,21 @@ sidebar_position: 1
|
|||
|
||||
## 1. 点击**立即注册**按钮
|
||||
|
||||

|
||||

|
||||
|
||||
## 2. 填写注册信息
|
||||
|
||||
- 手机号注册
|
||||
|
||||

|
||||

|
||||
|
||||
- 邮箱注册
|
||||
|
||||

|
||||

|
||||
|
||||
## 3. 注册完成
|
||||
|
||||
填写完所需信息后点击注册,注册成功后则进入个人主页
|
||||
|
||||

|
||||

|
||||
|
||||
|
|
|
|||
|
|
@ -18,7 +18,7 @@ GitLink默认疑修共有缺陷、功能、疑问、支持、任务、协助、
|
|||
- **文档:** 表示文档材料补充;
|
||||
- **测试:** 表示需要测试的需求;
|
||||
- **重复:** 表示已存在类似的疑修。
|
||||

|
||||

|
||||
|
||||
另外,**项目成员**可以根据需求或习惯,进行标记含义或颜色标志的修改、新建标记和删除标记操作。
|
||||

|
||||

|
||||
|
|
@ -6,7 +6,7 @@ sidebar_position: 4
|
|||
|
||||
对于项目开发过程中创建的所有疑修,可以在**疑修(Issue)** 界面统一查看,如下图所示为[确实开源](https://www.gitlink.org.cn/Gitlink/forgeplus)项目下的疑修列表。
|
||||
|
||||

|
||||

|
||||
|
||||
+ **创建疑修**:在疑修列表界面下,点击“**创建疑修**”按钮,同样可以创建疑修,具体见 ***疑修创建*** 一节;
|
||||
|
||||
|
|
|
|||
|
|
@ -6,16 +6,16 @@ sidebar_position: 2
|
|||
|
||||
1. 进入需要发布疑修的项目的“**代码库**”界面,点击上方的“**+疑修**”按钮即可进入疑修发布界面,如下图所示:
|
||||
|
||||

|
||||

|
||||
|
||||
2. 开始创建疑修,包括疑修标题、内容,输入疑修内容时既可以采用简单灵活的[Markdown语法](https://markdown.com.cn/),同时可以点击上方的功能按钮;然后上传需要的附件内容;最后点击“**创建**”按钮提交你的第一个疑修🎉🎉🎉
|
||||
|
||||

|
||||

|
||||
|
||||
3. 此外,在创建疑修时,可以通过符号 **`#`** 快速添加需要引用的疑修,进而为当前疑修提供辅助的信息;如下图所示,键入 **`#`** 后会弹出可引用的疑修列表,通过鼠标下滑或者键盘输入疑修编号选择需要引用的疑修后,会自动添加引用疑修的链接🔗
|
||||
|
||||

|
||||

|
||||
|
||||

|
||||

|
||||
|
||||
|
||||
|
|
|
|||
|
|
@ -6,7 +6,7 @@ sidebar_position: 3
|
|||
|
||||
**疑修**本质上是开发任务,而开发任务随着开发活动的进行,其状态也会发生改变,而“**状态**”便是用于跟踪记录开发活动的变更。如图所示,GitLink中疑修的**状态**包括“新增”、“正在解决”、“已解决”、“关闭”和“拒绝“五类,用于表示开发任务的处理进度。
|
||||
|
||||

|
||||

|
||||
|
||||
+ **新增**:新创建的疑修默认状态为“新增”;
|
||||
|
||||
|
|
|
|||
|
|
@ -6,7 +6,7 @@ sidebar_position: 1
|
|||
|
||||
**疑修(Issue)** 管理模块主要为项目组成员提供**开发任务**发布、指派、跟踪等功能服务。
|
||||
|
||||

|
||||

|
||||
|
||||
**说明事项**
|
||||
|
||||
|
|
|
|||
|
|
@ -6,13 +6,13 @@ sidebar_position: 5
|
|||
# 评论及操作记录
|
||||
### 评论
|
||||
每个疑修都相当于一个可以进度追踪的帖子,因此支持评论和回复,不仅仅是项目成员,所有人都可以在某个疑修下进行评论和回复,发表疑问或是见解,进行交流。
|
||||

|
||||

|
||||
|
||||
### 疑修声明
|
||||
用户可以对任意疑修发布“疑修声明”,留言自己对于该疑修的解决思路。点击疑修详情右侧的“声明”后,可以编辑留言,编辑完成后点击“确认”即可发布声明,如下图所示:
|
||||

|
||||

|
||||
|
||||
### 操作记录
|
||||
所有人都可以创建疑修,但是要注意,非项目成员仅可以修改自己创建的疑修,而项目成员有权限修改所有的疑修。
|
||||
对于某个疑修的所有编辑操作,包括**创建疑修、添加负责人、移除负责人、更改状态、更改优先级、添加标记、移除标记、添加里程碑、移除里程碑、设置关联分支、移除关联分支、设置开始日期和设置结束日期**,均被记录在操作记录中。
|
||||

|
||||

|
||||
|
|
@ -12,16 +12,16 @@ sidebar_position: 7
|
|||
项目成员可以基于以下步骤创建里程碑:
|
||||
1. 进入目标项目的 **“里程碑”** 界面,此时界面所示为已创建的里程碑的列表,所有已创建里程碑分为 **“已关闭”** 和 **“开启中”** 两类;
|
||||
2. 点击上方的 **“+创建里程碑”** 按钮即可进入里程碑创建界面;
|
||||

|
||||

|
||||
|
||||
3. 填写标题(必填)、描述(必填)、截止日期(选填)后,点击右下角的 **“创建里程碑”** 即可以完成一个新的里程碑的创建。
|
||||

|
||||

|
||||
|
||||
### 关联里程碑
|
||||
项目成员可以将疑修关联到里程碑,从而使里程碑包含明确的疑修列表,主要步骤如下:
|
||||
1. 在疑修列表中点击目标疑修;
|
||||
2. 编辑“里程碑”属性,选择需要关联的里程碑。
|
||||

|
||||

|
||||
|
||||
### 其他操作
|
||||
- **开启里程碑**
|
||||
|
|
@ -30,5 +30,5 @@ sidebar_position: 7
|
|||
- **删除里程碑**
|
||||
|
||||
上述操作均可以在里程碑列表中,对目标里程碑进行处理实现,如下图所示:
|
||||

|
||||

|
||||

|
||||

|
||||
|
|
@ -20,6 +20,8 @@ sidebar_position: 2
|
|||
|
||||

|
||||
|
||||
2、配置跨平台的同步仓库,支持github和gitee。需输入代码库地址(git地址和网站访问地址均支持),以及配置对应token用于授权同步,此处须注意token的权限以及是否过期。<br />
|
||||
Github配置方式为:个人头像→Settings→Developer Settings→Personal access tokens (classic)→Generate new token→勾选repo按钮→保存<br />
|
||||
2、配置跨平台的同步仓库,支持github和gitee。需输入代码库地址(git地址和网站访问地址均支持),以及配置对应token用于授权同步,此处须注意token的权限以及是否过期。<br />
|
||||
Github配置方式为:个人头像→Settings→Developer Settings→Personal access tokens (classic)→Generate new token→勾选repo按钮→保存<br />
|
||||
Gitee配置方式为:个人头像→设置→私人令牌→生成新令牌→勾选projects权限→提交
|
||||
|
|
@ -52,6 +54,12 @@ Gitee配置方式为:个人头像→设置→私人令牌→生成新令牌→
|
|||
### 管理同步分支
|
||||
|
||||
|
||||
同步分支配置完成后,用户可在同步分支列表完成一系列操作<br />
|
||||
①添加绑定新的同步分支,如两个仓库已建立了Develop分支,需要再建立feature分支的同步,可实时添加<br />
|
||||
②查询两个分支间最新一次的同步时间及同步状态。若同步失败,可在同步记录中查询日志分析失败原因<br />
|
||||
③添加同步仓库,若已绑定了github的同步仓库,想在gitee导入一个仓库进行开发,并想完成实时多个仓库的分支同步。<br />
|
||||
④查看同步配置,可用于查询同步仓库的地址,GitLink 用于接受第三方webhook请求的地址,以及更新token。以防token过期<br />
|
||||
⑤查询同步记录,包括查看历次同步的代码变更方,同步时间,同步状态及对应commt id,查询同步日志。<br />
|
||||
同步分支配置完成后,用户可在同步分支列表完成一系列操作<br />
|
||||
①添加绑定新的同步分支,如两个仓库已建立了Develop分支,需要再建立feature分支的同步,可实时添加<br />
|
||||
②查询两个分支间最新一次的同步时间及同步状态。若同步失败,可在同步记录中查询日志分析失败原因<br />
|
||||
|
|
@ -64,6 +72,9 @@ Gitee配置方式为:个人头像→设置→私人令牌→生成新令牌→
|
|||
|
||||
### 注意事项
|
||||
|
||||
1、在建立同步时,工具将根据用户选择的首次同步方向强行推送一次代码,请谨慎选择同步方向,以规避代码被覆盖的风险。同步建立之后,哪一方push事件触发被webhook监听,将同步至另一方,请勿在多仓库同时提交代码,以防出现冲突<br />
|
||||
2、目前仅支持个人仓库的同步,组织仓库的同步暂不支持,敬请期待<br />
|
||||
3、在配置过程中,请仔细检查token的权限,是否已包含了仓库读写。同时请检查token是否已过期,若过期请点击【查看同步配置】按钮进入页面更新此token<br />
|
||||
1、在建立同步时,工具将根据用户选择的首次同步方向强行推送一次代码,请谨慎选择同步方向,以规避代码被覆盖的风险。同步建立之后,哪一方push事件触发被webhook监听,将同步至另一方,请勿在多仓库同时提交代码,以防出现冲突<br />
|
||||
2、目前仅支持个人仓库的同步,组织仓库的同步暂不支持,敬请期待<br />
|
||||
3、在配置过程中,请仔细检查token的权限,是否已包含了仓库读写。同时请检查token是否已过期,若过期请点击【查看同步配置】按钮进入页面更新此token<br />
|
||||
|
|
|
|||
|
|
@ -62,6 +62,6 @@ sidebar_position: 1
|
|||
|
||||
## 用户操作流程
|
||||
|
||||
.png)<br/>
|
||||
<br/>
|
||||
|
||||
<center>用户操作流程</center><br/>
|
||||
|
|
|
|||
|
|
@ -6,26 +6,26 @@ sidebar_position: 2
|
|||
|
||||
在 *https://www.gitlink.org.cn* 页面点击顶部导航栏的“+”符号可以进行组织新建操作。
|
||||
|
||||

|
||||

|
||||
|
||||
在新建页面中输入**组织账号**、**组织名称**、**组织描述**、**所在地区**、**可见性**以及**组织头像**等信息后,点击“**创建组织**”按钮完成组织的创建。
|
||||
|
||||

|
||||

|
||||
|
||||
## 组织账号
|
||||
|
||||

|
||||

|
||||
|
||||
**注**:只能使用以字母、数字开头,包含字母、数字、下划线、横杠等,长度4到20个字符
|
||||
|
||||
## 组织名称与组织描述
|
||||
|
||||

|
||||

|
||||
|
||||
**注**:此处为必填项,不得为空
|
||||
|
||||
## 可见性
|
||||
|
||||

|
||||

|
||||
|
||||
**注**:可见性预设三类组织:公开、受限(仅对登录用户可见)、私有(仅对组织成员可见)。
|
||||
|
|
|
|||
|
|
@ -9,26 +9,26 @@ sidebar_position: 3
|
|||
|
||||
在团队新建页面,输入团队标识、团队名称、团队描述、项目权限以及版本库权限等信息后,点击“新建团队”完成团队的创建。
|
||||
|
||||

|
||||

|
||||
|
||||
## 查看组织团队
|
||||
|
||||
点击组织信息页面中的某个团队名称可以查看该团队的详细信息,该页面包括团队的名称、描述等信息,此外还会列出该团队关联的成员以及项目。
|
||||
|
||||

|
||||

|
||||
|
||||
## 管理组织团队
|
||||
|
||||
点击团队信息页面中的“团队设置”按钮可以对团队进行管理
|
||||
|
||||
- 基本设置:修改项目的基本信息,如名称和描述等。
|
||||

|
||||

|
||||
|
||||
- 团队成员管理:为该团队添加新成员或者移除已有成员。
|
||||

|
||||

|
||||
|
||||
- 团队项目管理:为该团队关联新项目(该组织已经创建的项目)或者移除已关联项目。
|
||||

|
||||

|
||||
|
||||
|
||||
|
||||
|
|
|
|||
|
|
@ -2,6 +2,8 @@
|
|||
sidebar_label: '组织成员管理'
|
||||
sidebar_position: 4
|
||||
---
|
||||
在成员管理界面我们可以看到一个项目中参与的所有成员以及其邮箱号和角色,角色分为管理者、开发者和报告者,三者的区别就是权限不一致,管理者是最高等级角色拥有所有权限,其他权限递减。如下图所示,还可以根据需求邀请新的成员入组或者调整组员的角色等级,或是删除组员。
|
||||

|
||||
# 成员管理(Members Management)
|
||||
|
||||
在 个人所管理的项目当中的**仓库设置**当中的**成员管理**可以进入成员管理界面
|
||||
|
|
|
|||
|
|
@ -9,7 +9,7 @@ sidebar_position: 1
|
|||
|
||||
您的团队可以通过使用组织帐户在 GitLink 上进行协作,组织帐户充当共享工作的容器,并为工作赋予独特的名称和品牌。同时,平台支持组织在“组织详情”页面发布新闻动态,显示项目概览和仓库详情等内容
|
||||
|
||||

|
||||

|
||||
|
||||
## 作为组织拥有者
|
||||
|
||||
|
|
@ -19,7 +19,7 @@ sidebar_position: 1
|
|||
|
||||
为了简化访问管理并增强协作,您可以创建能体现组结构的嵌套团队。您可以根据他们的角色或项目将人员分组,并分配任务。
|
||||
|
||||

|
||||

|
||||
|
||||
平台同时支持组织拥有者管理对数据访问的自定义设置。
|
||||
|
||||
|
|
|
|||
|
|
@ -6,7 +6,7 @@ sidebar_position: 5
|
|||
|
||||
点击组织信息页面中的“新建项目”按钮可以创建属于该组织的托管项目或者镜像项目。
|
||||
|
||||

|
||||

|
||||
|
||||
**注**:在“拥有者”一栏的下拉选项中,可以选择:个人、组织、团队
|
||||
|
||||
|
|
|
|||
|
|
@ -17,13 +17,13 @@ GitLink将通知分为“系统通知”和“@我”的两种类型:
|
|||
| 我管理的仓库 | 有新的疑修;有新的合并请求;有成员变动;仓库设置被更改;|
|
||||
* “@我”的通知目前支持在用户首页、课程首页、项目首页的动态列表中使用@功能对用户进行通知:
|
||||
例,在项目首页提交疑修时,输入@后可以通过下拉列表选择@其他用户。
|
||||

|
||||

|
||||
|
||||
#### 2.查看通知
|
||||
登录后在平台右上角个人头像旁即可查看收到的通知数量;移动光标至通知按钮出现下拉列表可以分别查看“系统通知”和“@我”的通知;下拉列表右下角可以对所有消息进行一键已读;点击通知即可跳转至通知详情界面。
|
||||

|
||||

|
||||
<br/>
|
||||
|
||||
|
||||
点击通知按钮可以进入消息通知界面,“我的通知”界面可以进行“进查看未读消息”和“所有消息一键已读”的选择。
|
||||

|
||||

|
||||
|
|
@ -9,13 +9,13 @@ sidebar_position: 2
|
|||
## 通知设置
|
||||
#### 1.进入通知设置界面
|
||||
通过点击首页的通知按钮进入通知设置界面;
|
||||

|
||||

|
||||
<br/>
|
||||
或在头像下拉列表中选择设置可以进入消息通知设置界面;
|
||||
|
||||

|
||||

|
||||
|
||||
#### 2.进行通知设置
|
||||
通过“通知管理”可以对接受通知的方式进行设置,默认所有通知都是通过站内信的方式接受,可以通过勾选为重要的通知类型增加邮件接受方式。
|
||||
|
||||

|
||||

|
||||
|
|
@ -36,10 +36,20 @@ module.exports = {
|
|||
},
|
||||
},
|
||||
colorMode: {
|
||||
defaultMode: 'light',
|
||||
defaultMode: 'dark',
|
||||
disableSwitch: false,
|
||||
respectPrefersColorScheme: true,
|
||||
},
|
||||
announcementBar: {
|
||||
content: `如果对你有帮助,请在 <a style="color: red" target="_blank" rel="noopener noreferrer" href="https://www.gitlink.org.cn/Eazzy/gitlink_help_center">GitLink</a> 上给它一颗❤和👍 `,
|
||||
isCloseable: false, // 是否可关闭
|
||||
},
|
||||
docs: {
|
||||
sidebar: {
|
||||
hideable: true,
|
||||
autoCollapseCategories: true,
|
||||
},
|
||||
},
|
||||
navbar: {
|
||||
style:"dark",
|
||||
title: '',
|
||||
|
|
@ -51,17 +61,56 @@ module.exports = {
|
|||
href:"https://www.gitlink.org.cn/"
|
||||
// srcDark: 'img/logo-dark.png',
|
||||
},
|
||||
hideOnScroll: true,
|
||||
items: [
|
||||
{
|
||||
type: 'doc',
|
||||
docId: 'intro',
|
||||
// type: 'doc',
|
||||
// docId: 'intro',
|
||||
position: 'left',
|
||||
label: '帮助中心'
|
||||
label: '帮助中心',
|
||||
to:'/'
|
||||
},
|
||||
{
|
||||
label:'回到主页',
|
||||
to:'https://www.gitlink.org.cn/',
|
||||
position:'left'
|
||||
},
|
||||
{
|
||||
label: '更多开源',
|
||||
position: 'right',
|
||||
items: [
|
||||
{
|
||||
label:'GitHub',
|
||||
to:'https://github.com/',
|
||||
},
|
||||
{
|
||||
label:'Gitee',
|
||||
to:'https://gitee.com/',
|
||||
},
|
||||
{
|
||||
label:'Stack Overflow',
|
||||
to:'https://stackoverflow.co/',
|
||||
},
|
||||
],
|
||||
},
|
||||
{
|
||||
type: 'localeDropdown',
|
||||
position: 'right',
|
||||
dropdownItemsAfter: [
|
||||
{
|
||||
type: 'html',
|
||||
value: '<hr style="margin: 0.3rem 0;">',
|
||||
},
|
||||
{
|
||||
href: 'https://www.gitlink.org.cn/Eazzy/gitlink_help_center/tree/master',
|
||||
label: 'Help Us Translate',
|
||||
},
|
||||
],
|
||||
},
|
||||
|
||||
// {
|
||||
// href: 'https://github.com/boxyhq',
|
||||
// type: 'search',
|
||||
// position: 'right',
|
||||
// className: 'header-github-link',
|
||||
// },
|
||||
],
|
||||
},
|
||||
|
|
@ -168,8 +217,17 @@ module.exports = {
|
|||
},
|
||||
],
|
||||
],
|
||||
// i18n: {
|
||||
// defaultLocale: 'zh-cn',
|
||||
// locales: ['zh-cn'],
|
||||
// },
|
||||
i18n: {
|
||||
defaultLocale: 'zh-cn',
|
||||
locales: ['zh-cn'],
|
||||
locales: ['en', 'zh-cn'],
|
||||
localeConfigs: {
|
||||
en: {
|
||||
htmlLang: 'en-GB',
|
||||
},
|
||||
},
|
||||
},
|
||||
};
|
||||
|
|
|
|||
|
|
@ -0,0 +1,308 @@
|
|||
{
|
||||
"theme.ErrorPageContent.title": {
|
||||
"message": "This page crashed.",
|
||||
"description": "The title of the fallback page when the page crashed"
|
||||
},
|
||||
"theme.NotFound.title": {
|
||||
"message": "Page Not Found",
|
||||
"description": "The title of the 404 page"
|
||||
},
|
||||
"theme.NotFound.p1": {
|
||||
"message": "We could not find what you were looking for.",
|
||||
"description": "The first paragraph of the 404 page"
|
||||
},
|
||||
"theme.NotFound.p2": {
|
||||
"message": "Please contact the owner of the site that linked you to the original URL and let them know their link is broken.",
|
||||
"description": "The 2nd paragraph of the 404 page"
|
||||
},
|
||||
"theme.admonition.note": {
|
||||
"message": "note",
|
||||
"description": "The default label used for the Note admonition (:::note)"
|
||||
},
|
||||
"theme.admonition.tip": {
|
||||
"message": "tip",
|
||||
"description": "The default label used for the Tip admonition (:::tip)"
|
||||
},
|
||||
"theme.admonition.danger": {
|
||||
"message": "danger",
|
||||
"description": "The default label used for the Danger admonition (:::danger)"
|
||||
},
|
||||
"theme.admonition.info": {
|
||||
"message": "info",
|
||||
"description": "The default label used for the Info admonition (:::info)"
|
||||
},
|
||||
"theme.admonition.caution": {
|
||||
"message": "caution",
|
||||
"description": "The default label used for the Caution admonition (:::caution)"
|
||||
},
|
||||
"theme.BackToTopButton.buttonAriaLabel": {
|
||||
"message": "Scroll back to top",
|
||||
"description": "The ARIA label for the back to top button"
|
||||
},
|
||||
"theme.blog.archive.title": {
|
||||
"message": "Archive",
|
||||
"description": "The page & hero title of the blog archive page"
|
||||
},
|
||||
"theme.blog.archive.description": {
|
||||
"message": "Archive",
|
||||
"description": "The page & hero description of the blog archive page"
|
||||
},
|
||||
"theme.blog.paginator.navAriaLabel": {
|
||||
"message": "Blog list page navigation",
|
||||
"description": "The ARIA label for the blog pagination"
|
||||
},
|
||||
"theme.blog.paginator.newerEntries": {
|
||||
"message": "Newer Entries",
|
||||
"description": "The label used to navigate to the newer blog posts page (previous page)"
|
||||
},
|
||||
"theme.blog.paginator.olderEntries": {
|
||||
"message": "Older Entries",
|
||||
"description": "The label used to navigate to the older blog posts page (next page)"
|
||||
},
|
||||
"theme.blog.post.paginator.navAriaLabel": {
|
||||
"message": "Blog post page navigation",
|
||||
"description": "The ARIA label for the blog posts pagination"
|
||||
},
|
||||
"theme.blog.post.paginator.newerPost": {
|
||||
"message": "Newer Post",
|
||||
"description": "The blog post button label to navigate to the newer/previous post"
|
||||
},
|
||||
"theme.blog.post.paginator.olderPost": {
|
||||
"message": "Older Post",
|
||||
"description": "The blog post button label to navigate to the older/next post"
|
||||
},
|
||||
"theme.blog.post.plurals": {
|
||||
"message": "One post|{count} posts",
|
||||
"description": "Pluralized label for \"{count} posts\". Use as much plural forms (separated by \"|\") as your language support (see https://www.unicode.org/cldr/cldr-aux/charts/34/supplemental/language_plural_rules.html)"
|
||||
},
|
||||
"theme.blog.tagTitle": {
|
||||
"message": "{nPosts} tagged with \"{tagName}\"",
|
||||
"description": "The title of the page for a blog tag"
|
||||
},
|
||||
"theme.tags.tagsPageLink": {
|
||||
"message": "View All Tags",
|
||||
"description": "The label of the link targeting the tag list page"
|
||||
},
|
||||
"theme.colorToggle.ariaLabel": {
|
||||
"message": "Switch between dark and light mode (currently {mode})",
|
||||
"description": "The ARIA label for the navbar color mode toggle"
|
||||
},
|
||||
"theme.colorToggle.ariaLabel.mode.dark": {
|
||||
"message": "dark mode",
|
||||
"description": "The name for the dark color mode"
|
||||
},
|
||||
"theme.colorToggle.ariaLabel.mode.light": {
|
||||
"message": "light mode",
|
||||
"description": "The name for the light color mode"
|
||||
},
|
||||
"theme.docs.breadcrumbs.navAriaLabel": {
|
||||
"message": "Breadcrumbs",
|
||||
"description": "The ARIA label for the breadcrumbs"
|
||||
},
|
||||
"theme.docs.DocCard.categoryDescription": {
|
||||
"message": "{count} items",
|
||||
"description": "The default description for a category card in the generated index about how many items this category includes"
|
||||
},
|
||||
"theme.docs.paginator.navAriaLabel": {
|
||||
"message": "Docs pages",
|
||||
"description": "The ARIA label for the docs pagination"
|
||||
},
|
||||
"theme.docs.paginator.previous": {
|
||||
"message": "Previous",
|
||||
"description": "The label used to navigate to the previous doc"
|
||||
},
|
||||
"theme.docs.paginator.next": {
|
||||
"message": "Next",
|
||||
"description": "The label used to navigate to the next doc"
|
||||
},
|
||||
"theme.docs.tagDocListPageTitle.nDocsTagged": {
|
||||
"message": "One doc tagged|{count} docs tagged",
|
||||
"description": "Pluralized label for \"{count} docs tagged\". Use as much plural forms (separated by \"|\") as your language support (see https://www.unicode.org/cldr/cldr-aux/charts/34/supplemental/language_plural_rules.html)"
|
||||
},
|
||||
"theme.docs.tagDocListPageTitle": {
|
||||
"message": "{nDocsTagged} with \"{tagName}\"",
|
||||
"description": "The title of the page for a docs tag"
|
||||
},
|
||||
"theme.docs.versionBadge.label": {
|
||||
"message": "Version: {versionLabel}"
|
||||
},
|
||||
"theme.docs.versions.unreleasedVersionLabel": {
|
||||
"message": "This is unreleased documentation for {siteTitle} {versionLabel} version.",
|
||||
"description": "The label used to tell the user that he's browsing an unreleased doc version"
|
||||
},
|
||||
"theme.docs.versions.unmaintainedVersionLabel": {
|
||||
"message": "This is documentation for {siteTitle} {versionLabel}, which is no longer actively maintained.",
|
||||
"description": "The label used to tell the user that he's browsing an unmaintained doc version"
|
||||
},
|
||||
"theme.docs.versions.latestVersionSuggestionLabel": {
|
||||
"message": "For up-to-date documentation, see the {latestVersionLink} ({versionLabel}).",
|
||||
"description": "The label used to tell the user to check the latest version"
|
||||
},
|
||||
"theme.docs.versions.latestVersionLinkLabel": {
|
||||
"message": "latest version",
|
||||
"description": "The label used for the latest version suggestion link label"
|
||||
},
|
||||
"theme.common.editThisPage": {
|
||||
"message": "Edit this page",
|
||||
"description": "The link label to edit the current page"
|
||||
},
|
||||
"theme.common.headingLinkTitle": {
|
||||
"message": "Direct link to {heading}",
|
||||
"description": "Title for link to heading"
|
||||
},
|
||||
"theme.lastUpdated.atDate": {
|
||||
"message": " on {date}",
|
||||
"description": "The words used to describe on which date a page has been last updated"
|
||||
},
|
||||
"theme.lastUpdated.byUser": {
|
||||
"message": " by {user}",
|
||||
"description": "The words used to describe by who the page has been last updated"
|
||||
},
|
||||
"theme.lastUpdated.lastUpdatedAtBy": {
|
||||
"message": "Last updated{atDate}{byUser}",
|
||||
"description": "The sentence used to display when a page has been last updated, and by who"
|
||||
},
|
||||
"theme.navbar.mobileVersionsDropdown.label": {
|
||||
"message": "Versions",
|
||||
"description": "The label for the navbar versions dropdown on mobile view"
|
||||
},
|
||||
"theme.tags.tagsListLabel": {
|
||||
"message": "Tags:",
|
||||
"description": "The label alongside a tag list"
|
||||
},
|
||||
"theme.AnnouncementBar.closeButtonAriaLabel": {
|
||||
"message": "Close",
|
||||
"description": "The ARIA label for close button of announcement bar"
|
||||
},
|
||||
"theme.blog.sidebar.navAriaLabel": {
|
||||
"message": "Blog recent posts navigation",
|
||||
"description": "The ARIA label for recent posts in the blog sidebar"
|
||||
},
|
||||
"theme.CodeBlock.copied": {
|
||||
"message": "Copied",
|
||||
"description": "The copied button label on code blocks"
|
||||
},
|
||||
"theme.CodeBlock.copyButtonAriaLabel": {
|
||||
"message": "Copy code to clipboard",
|
||||
"description": "The ARIA label for copy code blocks button"
|
||||
},
|
||||
"theme.CodeBlock.copy": {
|
||||
"message": "Copy",
|
||||
"description": "The copy button label on code blocks"
|
||||
},
|
||||
"theme.CodeBlock.wordWrapToggle": {
|
||||
"message": "Toggle word wrap",
|
||||
"description": "The title attribute for toggle word wrapping button of code block lines"
|
||||
},
|
||||
"theme.DocSidebarItem.toggleCollapsedCategoryAriaLabel": {
|
||||
"message": "Toggle the collapsible sidebar category '{label}'",
|
||||
"description": "The ARIA label to toggle the collapsible sidebar category"
|
||||
},
|
||||
"theme.NavBar.navAriaLabel": {
|
||||
"message": "Main",
|
||||
"description": "The ARIA label for the main navigation"
|
||||
},
|
||||
"theme.blog.post.readMore": {
|
||||
"message": "Read More",
|
||||
"description": "The label used in blog post item excerpts to link to full blog posts"
|
||||
},
|
||||
"theme.blog.post.readMoreLabel": {
|
||||
"message": "Read more about {title}",
|
||||
"description": "The ARIA label for the link to full blog posts from excerpts"
|
||||
},
|
||||
"theme.TOCCollapsible.toggleButtonLabel": {
|
||||
"message": "On this page",
|
||||
"description": "The label used by the button on the collapsible TOC component"
|
||||
},
|
||||
"theme.navbar.mobileLanguageDropdown.label": {
|
||||
"message": "Languages",
|
||||
"description": "The label for the mobile language switcher dropdown"
|
||||
},
|
||||
"theme.blog.post.readingTime.plurals": {
|
||||
"message": "One min read|{readingTime} min read",
|
||||
"description": "Pluralized label for \"{readingTime} min read\". Use as much plural forms (separated by \"|\") as your language support (see https://www.unicode.org/cldr/cldr-aux/charts/34/supplemental/language_plural_rules.html)"
|
||||
},
|
||||
"theme.docs.breadcrumbs.home": {
|
||||
"message": "Home page",
|
||||
"description": "The ARIA label for the home page in the breadcrumbs"
|
||||
},
|
||||
"theme.docs.sidebar.collapseButtonTitle": {
|
||||
"message": "Collapse sidebar",
|
||||
"description": "The title attribute for collapse button of doc sidebar"
|
||||
},
|
||||
"theme.docs.sidebar.collapseButtonAriaLabel": {
|
||||
"message": "Collapse sidebar",
|
||||
"description": "The title attribute for collapse button of doc sidebar"
|
||||
},
|
||||
"theme.docs.sidebar.navAriaLabel": {
|
||||
"message": "Docs sidebar",
|
||||
"description": "The ARIA label for the sidebar navigation"
|
||||
},
|
||||
"theme.docs.sidebar.closeSidebarButtonAriaLabel": {
|
||||
"message": "Close navigation bar",
|
||||
"description": "The ARIA label for close button of mobile sidebar"
|
||||
},
|
||||
"theme.docs.sidebar.toggleSidebarButtonAriaLabel": {
|
||||
"message": "Toggle navigation bar",
|
||||
"description": "The ARIA label for hamburger menu button of mobile navigation"
|
||||
},
|
||||
"theme.docs.sidebar.expandButtonTitle": {
|
||||
"message": "Expand sidebar",
|
||||
"description": "The ARIA label and title attribute for expand button of doc sidebar"
|
||||
},
|
||||
"theme.docs.sidebar.expandButtonAriaLabel": {
|
||||
"message": "Expand sidebar",
|
||||
"description": "The ARIA label and title attribute for expand button of doc sidebar"
|
||||
},
|
||||
"theme.navbar.mobileSidebarSecondaryMenu.backButtonLabel": {
|
||||
"message": "← Back to main menu",
|
||||
"description": "The label of the back button to return to main menu, inside the mobile navbar sidebar secondary menu (notably used to display the docs sidebar)"
|
||||
},
|
||||
"theme.SearchBar.noResultsText": {
|
||||
"message": "No results"
|
||||
},
|
||||
"theme.SearchBar.seeAll": {
|
||||
"message": "See all results"
|
||||
},
|
||||
"theme.SearchBar.seeAllOutsideContext": {
|
||||
"message": "See results outside {context}"
|
||||
},
|
||||
"theme.SearchBar.searchInContext": {
|
||||
"message": "See all results in {context}"
|
||||
},
|
||||
"theme.SearchBar.label": {
|
||||
"message": "Search",
|
||||
"description": "The ARIA label and placeholder for search button"
|
||||
},
|
||||
"theme.SearchPage.existingResultsTitle": {
|
||||
"message": "Search results for \"{query}\"",
|
||||
"description": "The search page title for non-empty query"
|
||||
},
|
||||
"theme.SearchPage.emptyResultsTitle": {
|
||||
"message": "Search the documentation",
|
||||
"description": "The search page title for empty query"
|
||||
},
|
||||
"theme.SearchPage.searchContext.everywhere": {
|
||||
"message": "everywhere"
|
||||
},
|
||||
"theme.SearchPage.documentsFound.plurals": {
|
||||
"message": "1 document found|{count} documents found",
|
||||
"description": "Pluralized label for \"{count} documents found\". Use as much plural forms (separated by \"|\") as your language support (see https://www.unicode.org/cldr/cldr-aux/charts/34/supplemental/language_plural_rules.html)"
|
||||
},
|
||||
"theme.SearchPage.noResultsText": {
|
||||
"message": "No documents were found",
|
||||
"description": "The paragraph for empty search result"
|
||||
},
|
||||
"theme.ErrorPageContent.tryAgain": {
|
||||
"message": "Try again",
|
||||
"description": "The label of the button to try again rendering when the React error boundary captures an error"
|
||||
},
|
||||
"theme.common.skipToMainContent": {
|
||||
"message": "Skip to main content",
|
||||
"description": "The skip to content label used for accessibility, allowing to rapidly navigate to main content with keyboard tab/enter navigation"
|
||||
},
|
||||
"theme.tags.tagsPageTitle": {
|
||||
"message": "Tags",
|
||||
"description": "The title of the tag list page"
|
||||
}
|
||||
}
|
||||
|
|
@ -0,0 +1,14 @@
|
|||
{
|
||||
"title": {
|
||||
"message": "Blog",
|
||||
"description": "The title for the blog used in SEO"
|
||||
},
|
||||
"description": {
|
||||
"message": "Blog",
|
||||
"description": "The description for the blog used in SEO"
|
||||
},
|
||||
"sidebar.title": {
|
||||
"message": "Recent posts",
|
||||
"description": "The label for the left sidebar"
|
||||
}
|
||||
}
|
||||
|
|
@ -0,0 +1,54 @@
|
|||
{
|
||||
"version.label": {
|
||||
"message": "Next",
|
||||
"description": "The label for version current"
|
||||
},
|
||||
"sidebar.defaultSidebar.category.快速开始": {
|
||||
"message": "Quick start",
|
||||
"description": "The label for category 快速开始 in sidebar defaultSidebar"
|
||||
},
|
||||
"sidebar.defaultSidebar.category.代码库管理": {
|
||||
"message": "Code base management",
|
||||
"description": "The label for category 代码库管理 in sidebar defaultSidebar"
|
||||
},
|
||||
"sidebar.defaultSidebar.category.组织管理": {
|
||||
"message": "Organization management",
|
||||
"description": "The label for category 组织管理 in sidebar defaultSidebar"
|
||||
},
|
||||
"sidebar.defaultSidebar.category.疑修(Issue)": {
|
||||
"message": "Issue",
|
||||
"description": "The label for category 疑修(Issue) in sidebar defaultSidebar"
|
||||
},
|
||||
"sidebar.defaultSidebar.category.合并请求(PR)": {
|
||||
"message": "PR",
|
||||
"description": "The label for category 合并请求(PR) in sidebar defaultSidebar"
|
||||
},
|
||||
"sidebar.defaultSidebar.category.DevOps引擎(Engine)": {
|
||||
"message": "DevOps Engine",
|
||||
"description": "The label for category DevOps引擎(Engine) in sidebar defaultSidebar"
|
||||
},
|
||||
"sidebar.defaultSidebar.category.维基(Wiki)": {
|
||||
"message": "Wiki",
|
||||
"description": "The label for category 维基(Wiki) in sidebar defaultSidebar"
|
||||
},
|
||||
"sidebar.defaultSidebar.category.机器人(Bot)": {
|
||||
"message": "Bot",
|
||||
"description": "The label for category 机器人(Bot) in sidebar defaultSidebar"
|
||||
},
|
||||
"sidebar.defaultSidebar.category.第三方服务": {
|
||||
"message": "Third party service",
|
||||
"description": "The label for category 第三方服务 in sidebar defaultSidebar"
|
||||
},
|
||||
"sidebar.defaultSidebar.category.通知": {
|
||||
"message": "Notification",
|
||||
"description": "The label for category 通知 in sidebar defaultSidebar"
|
||||
},
|
||||
"sidebar.defaultSidebar.category.个人主页建站": {
|
||||
"message": "Personal home page building site",
|
||||
"description": "The label for category 个人主页建站 in sidebar defaultSidebar"
|
||||
},
|
||||
"sidebar.defaultSidebar.category.服务协议": {
|
||||
"message": "Service agreement",
|
||||
"description": "The label for category 服务协议 in sidebar defaultSidebar"
|
||||
}
|
||||
}
|
||||
|
|
@ -0,0 +1,4 @@
|
|||
{
|
||||
"label": "机器人(Bot)",
|
||||
"position": 8
|
||||
}
|
||||
|
|
@ -0,0 +1,20 @@
|
|||
---
|
||||
sidebar_label: 'bot installation'
|
||||
sidebar_position: 1
|
||||
---
|
||||
|
||||
# bot installation
|
||||
|
||||
Bot installation is an important module for bot installation and management control, which mainly includes bot installation, installation query, installation management and other functions.
|
||||
|
||||
In the bot details page, after the user clicks the "Install this Bot" button, he can see the permission information required for the bot to work. The installation can proceed if the user agrees to grant the bot the relevant permissions required. The user can choose to install the bot into all warehouses (all warehouses owned by the user) or select a specified warehouse for installation.
|
||||
|
||||

|
||||
|
||||
In the personal "Settings" or "warehouse Settings", the user can see the current installed Bot, click the "configuration" button to configure the bot installation, click the "uninstall" button to uninstall.
|
||||
|
||||

|
||||
|
||||
In the bot installation and configuration page, users can master the installation location and working status of the bot. If the user needs to change the bot's working warehouse, the installation location can be changed. The working status of bot includes activation and suspension. Users can adjust the status of bot according to their needs, and suspending or activating it will affect the access permission of bot to warehouse data.
|
||||
|
||||

|
||||
|
|
@ -0,0 +1,24 @@
|
|||
---
|
||||
sidebar_label: 'bot market'
|
||||
sidebar_position: 4
|
||||
---
|
||||
|
||||
# Bot Market
|
||||
|
||||
Bot market is an important module for Bot sharing and reuse, mainly including bot search and discovery, details view and other functions.
|
||||
|
||||
The bot market homepage displays the brief information of all the bots that have been put on the market, including the bot's avatar, name, developer, introduction and installation times, etc. Users can preliminatively judge whether the bot meets their project needs according to these basic information.
|
||||
|
||||
In the bot market homepage, users can select a specific bot type, screen out a specific classification of bots, and search and select within this category.
|
||||
|
||||
In addition, the user searches by entering a keyword in the search bar to retrieve the relevant bot whose content contains the specified keyword.
|
||||
|
||||
Users can use a combination of category filtering and keyword search to narrow down the scope and quickly find the bot in the market that meets the relevant needs of the project.
|
||||
|
||||

|
||||
|
||||
In the bot Market page, the user clicks on the specified bot card to access the bot details page. The Bot details page contains the bot's avatar, name, developer, type and detailed introduction information, so that users can master the bot's introduction here and further determine whether to install it in the specified warehouse.
|
||||
|
||||

|
||||
|
||||
In the bot details page, if the user thinks that the bot meets the needs of his project, he can click the "Install this Bot" button to understand the permission information of the bot and install it in the specified warehouse. More information about the installation can be found in the "Bot Installation" section.
|
||||
|
|
@ -0,0 +1,22 @@
|
|||
---
|
||||
sidebar_label: 'bot development'
|
||||
sidebar_position: 3
|
||||
---
|
||||
|
||||
# Bot Development
|
||||
|
||||
bot development is an important module for developers to register bots.
|
||||
|
||||
In the personal "Settings", the user can see the list of registered bots, click the corresponding bot "Edit" button to configure the registered bot; Click the "Bot Register" button to start registering a new bot.
|
||||
|
||||

|
||||
|
||||
In the registration page, developers need to fill in the relevant information of bot registration, including bot name, Webhook address, detailed introduction, etc. The system will verify the legitimacy of the information entered by developers to ensure the integrity and validity of all bot information. In addition, the system will automatically generate the unique identity of the bot, and at the same time, the relevant interface of the GitLink platform will be called to generate the bot's identity certificate information, including the client key and private key.
|
||||
|
||||
Developers need to use these identity information combined with the platform interface for bot identity authentication, and then call the relevant interface to complete the relevant functions of the bot.
|
||||
|
||||
Platform development API link (pending):https://www.gitlink.org.cn/docs/api#introduction
|
||||
|
||||

|
||||
|
||||

|
||||
|
|
@ -0,0 +1,23 @@
|
|||
---
|
||||
sidebar_label: 'bot configuration'
|
||||
sidebar_position: 2
|
||||
---
|
||||
|
||||
# Bot configuration
|
||||
|
||||
Bot configuration is an important module for bot maintenance and configuration, which mainly includes bot basic information maintenance, permission & subscription event management, advanced option configuration and other functions.
|
||||
|
||||
In the maintenance of Bot basic information, developers can see the basic information of the bot, and modify the bot's avatar, name, Webhook address, etc., as needed.
|
||||
|
||||

|
||||
|
||||
In bot permissions & Subscription event management, developers can assign different permissions and levels to bots according to the needs of accessing warehouse resources, such as increasing the code base permissions, and changing the write permissions of pull requests to read permissions. Developers can also change the list of events currently subscribed to by the bot, such as subscribing to codebase push, canceling pull requests to assign subscriptions, etc., in order to update and upgrade bot features.
|
||||
|
||||

|
||||
|
||||
|
||||
In the advanced Bot option configuration, developers can change the public and private state of the bot, thus affecting the scope of use of the bot. It is important to note that a bot in its public state cannot become private if another repository is already installed. Developers can choose to put the bot on the market, and need to fill in the listing information, including market introduction, main function, secondary function and other information.
|
||||
|
||||
Developers can also delete and transfer bots, and initiating a transfer means changing ownership of the bot, requiring the recipient's username to be entered. After the recipient confirms acceptance, the ownership change of bot can be completed. If the recipient refuses, the transfer operation will be cancelled.
|
||||
|
||||

|
||||
|
|
@ -0,0 +1,4 @@
|
|||
{
|
||||
"label": "DevOps引擎(Engine)",
|
||||
"position": 6
|
||||
}
|
||||
|
|
@ -0,0 +1,12 @@
|
|||
---
|
||||
sidebar_label: 'Code pipeline'
|
||||
sidebar_position: 5
|
||||
---
|
||||
# Code pipeline
|
||||
The pipeline can be configured in the form of code (YAML format) by first selecting the code pipeline and corresponding branches:
|
||||
|
||||

|
||||
|
||||
Edit pipeline code, the pipeline name description, trigger, global parameters, execution serial/concurrent and pipeline orchestration concepts are the same as the graphic pipeline, described as follows:
|
||||
|
||||

|
||||
|
|
@ -0,0 +1,15 @@
|
|||
---
|
||||
sidebar_label: 'Parameter configuration'
|
||||
sidebar_position: 2
|
||||
---
|
||||
|
||||
# Parameter configuration
|
||||
|
||||
It can be used in the pipeline to realize dynamic parameter configuration. There are three types: string, number, and Boolean.
|
||||
|
||||

|
||||
|
||||
|
||||
You can obtain parameters in the pipeline configuration in the following ways:
|
||||
|
||||

|
||||
|
|
@ -0,0 +1,50 @@
|
|||
---
|
||||
sidebar_label: 'Graphic pipeline'
|
||||
sidebar_position: 4
|
||||
---
|
||||
|
||||
# Graphic pipeline
|
||||
## Basic information
|
||||
You can edit the name and description of the pipeline
|
||||
|
||||
Pipeline names in the same warehouse must be unique
|
||||
|
||||

|
||||
|
||||
## trigger
|
||||
Note: When pipelining, the trigger should be placed before the start node; Currently, only one trigger can be added to an pipeline
|
||||
|
||||
* Timing trigger cron: You can set the trigger time by filling in the cron expression
|
||||

|
||||
|
||||
* Event trigger GitLink_Webhook: gives common code change event triggers, including pushing code, merging requests, and creating tags
|
||||

|
||||
|
||||
## Global parameter
|
||||
|
||||
After being added, it can be used in the current pipeline
|
||||
|
||||

|
||||
|
||||
example
|
||||
|
||||

|
||||
|
||||
## Concurrent execution
|
||||
|
||||

|
||||
|
||||
When enabled, the same pipeline can execute n pipeline instances concurrently (we get one pipeline instance for each trigger);
|
||||
|
||||

|
||||
|
||||
If this parameter is disabled, subsequent instances are queued during the execution of the current pipeline instance (a maximum of five instances can be queued). The current instance completes execution, and the next instance starts execution.
|
||||
|
||||

|
||||
|
||||
|
||||
## Pipelining
|
||||
|
||||
Each pipeline must have a start node, an end node, and at least one task node. Supports serial and parallel orchestration.
|
||||
|
||||
|
||||
|
|
@ -0,0 +1,16 @@
|
|||
---
|
||||
sidebar_label: 'Key Settings'
|
||||
sidebar_position: 3
|
||||
---
|
||||
|
||||
# Key Settings
|
||||
|
||||
The account password, key, and certificate are stored in the key management. After the configuration, they can be directly used in the pipeline to avoid leakage risks caused by direct input.
|
||||
|
||||

|
||||
|
||||
Use example
|
||||
|
||||
Note: In the node input parameters, the drop-down option is the key type. You need to configure the key in advance to select and use it in the pipeline
|
||||
|
||||

|
||||
|
|
@ -0,0 +1,13 @@
|
|||
---
|
||||
sidebar_label: 'Engine'
|
||||
sidebar_position: 1
|
||||
---
|
||||
|
||||
# Engine
|
||||
|
||||
Engine is a DevOps tool from GitLink that builds development, test, and deployment pipelines through simple node orchestration to create automated software delivery processes.
|
||||
It can achieve continuous code integration, so that developers can find quality problems as early as possible, quickly locate and fix, improve the efficiency and quality of software development; Automated code scanning, compilation, packaging, and unit testing free the development team from repetitive work and focus on more valuable things.
|
||||
|
||||

|
||||
|
||||
In the engine page, users can create and edit a graphical pipeline or code pipeline, set external parameters, manage keys, and so on.
|
||||
|
|
@ -0,0 +1,10 @@
|
|||
---
|
||||
sidebar_label: 'Perform a record query'
|
||||
sidebar_position: 6
|
||||
---
|
||||
|
||||
# Perform a record query
|
||||
|
||||
You can view the pipeline running status
|
||||
|
||||

|
||||
|
|
@ -0,0 +1,19 @@
|
|||
---
|
||||
sidebar_label: "Introduce"
|
||||
label: "介绍"
|
||||
sidebar_position: 1
|
||||
slug: /intro
|
||||
---
|
||||
|
||||
# About GitLink
|
||||
GitLink (true Open Source) is an open source innovation service platform officially designated by CCF. It aims to take "serving open source innovation" as its mission, "becoming the gathering place of open source innovation" as its vision, adhering to the values of "innovation, openness, collaboration and sharing", and is committed to empowering large-scale open source collaborative innovation. Create an open source innovation ecology for incubation of innovation achievements and training of new engineering talents!
|
||||
|
||||

|
||||
|
||||
# Platform Features
|
||||
- **Distributed collaborative development** : Support online file editing, branch management, contribution statistics, warehouse copy, merge requests;
|
||||
- **One-stop process management** : Support doubt repair, milestone, notification reminder, label archive, Wiki document, organization management;
|
||||
- **Efficient pipeline operation and maintenance** : Provide lightweight workflow engine, and support custom configuration, static scanning, product construction;
|
||||
- **Multi-level code analysis** : Support code traceability analysis, license risk analysis, open source vulnerability detection and reinforcement suggestions;
|
||||
- **Multi-dimensional user Profile** : Support development activity statistics, contribution calendar, capability modeling, role and professional positioning analysis.
|
||||
|
||||
|
|
@ -0,0 +1,4 @@
|
|||
{
|
||||
"label": "个人主页建站",
|
||||
"position": 13
|
||||
}
|
||||
|
|
@ -0,0 +1,69 @@
|
|||
---
|
||||
sidebar_label: 'Site building tool'
|
||||
sidebar_position: 2
|
||||
---
|
||||
# Personal website building tool
|
||||
|
||||
Personal homepage is a free static web hosting service that can be used to host static personal homepage, personal blog and other static pages. Different tools for personal website building are as follows
|
||||
|
||||
### Hugo tool
|
||||
|
||||
|
||||
To create a repository using the Hugo tool, you need to modify the baseURL in the config.toml file in the code repository
|
||||
Change the value to the website address displayed in the personal website service,
|
||||
For example: now have a website address is http://KingChan.gitlink.net
|
||||
The config. The baseURL in toml should be http://KingChan.gitlink.net
|
||||

|
||||
|
||||
Click Submit after modification
|
||||

|
||||
After the submission is complete, deployment begins
|
||||

|
||||
Static page preview
|
||||

|
||||
|
||||
### jekyll tool
|
||||
|
||||
For jekyll project:
|
||||
To create a personal site using the jekyll tool, you need to modify the baseurl and url values in the _config.yml file in the code repository. The jekyll configuration file is special and needs to be based on the website address displayed in the personal site construction service
|
||||
Content modifies two values.
|
||||
For example: now have a website address is http://KingChan.gitlink.net
|
||||
The result is as follows:
|
||||
baseurl: "/"
|
||||
url: "http://KingChan.gitlink.net"
|
||||
|
||||

|
||||
|
||||
Click Submit changes when the changes are complete
|
||||

|
||||
After the submission is complete, go to the site construction service to start deployment
|
||||

|
||||
|
||||

|
||||
|
||||
### hexo tool
|
||||
|
||||
If it is a hexo project:
|
||||
For repositories created using the Hexo tool, you need to change the url in the _config.yml file in the code repository
|
||||
Change the value to the website address displayed in the personal website service,
|
||||
For example: now have a website address is http://KingChan.gitlink.net
|
||||
|
||||
So _config. The url in toml should be http://KingChan.gitlink.net
|
||||
|
||||

|
||||
|
||||
Click Submit changes when the changes are complete
|
||||

|
||||
After the submission is complete, go to the site construction service to start deployment
|
||||
|
||||

|
||||
|
||||

|
||||
|
||||

|
||||
|
||||
### file tool
|
||||
Document formatting tool, which deployable all files under the selected branch.
|
||||
|
||||
|
||||
Note: All of the above tools can use the gh-pages branch, when the gh-pages branch is selected at deployment time, it will be deployed according to the document format tool, that is, all files under the branch are deployed.
|
||||
|
|
@ -0,0 +1,50 @@
|
|||
---
|
||||
sidebar_label: 'Station construction process'
|
||||
sidebar_position: 1
|
||||
---
|
||||
# Personal website building process
|
||||
### My site
|
||||
Move the mouse to the profile picture position in the upper right corner and click Settings to enter the My Settings interface
|
||||
|
||||

|
||||
|
||||
Click on the left pane of Personal Site - My site
|
||||
|
||||

|
||||
|
||||
### Create a site
|
||||
|
||||
In the My site interface, click the New site button to enter the new site interface
|
||||
|
||||
On the New Site screen, enter a site name, which will be displayed in the My Sites list
|
||||
|
||||
And choose the corresponding site building tools and themes, we provide you with 3 different tools, each tool 10 kinds of themes, a total of 30 kinds for you to choose
|
||||
|
||||

|
||||
|
||||
When you're done, click the blue button at the bottom of the page: Create Site
|
||||
|
||||

|
||||
|
||||
So you have a website and you have a repository of code.
|
||||
|
||||
In the service column of the warehouse personal site service operation interface, here you can view some of your site status, site name, website address, site tool, site time
|
||||
|
||||
### Deploy the site
|
||||
|
||||

|
||||
|
||||
Click the Go to Deploy button, select the branch you want to deploy and click OK
|
||||
|
||||

|
||||
|
||||
After waiting for the program to run for a while, some server deployment information will be returned to you
|
||||
|
||||
Once the deployment is successful, you can access the site. Click on the website address to get there
|
||||
|
||||

|
||||
|
||||
### Deployment complete
|
||||
|
||||

|
||||
|
||||
|
|
@ -0,0 +1,41 @@
|
|||
---
|
||||
sidebar_label: 'WebIDE'
|
||||
sidebar_position: 9
|
||||
---
|
||||
|
||||
### **1. Language Service **
|
||||
● Support syntax highlighting in nearly 40 languages
|
||||
● Support JavaScript/TypeScript, HTML, CSS, JSON, Markdown based on the Language Server Protocol (LSP) language features, with intelligent prompt and outline information and single-file jump.
|
||||
● Support Java, Go, Python, C++, Php based on Tree Sitter online language service capabilities, providing viewing references, symbol search and other features
|
||||
|
||||
### **2. WebIDE Entry **
|
||||
From the Gitlink warehouse home page, click the Web IDE button to enter
|
||||
<br/>
|
||||
|
||||
### **3. Branch **
|
||||
Support branch switching: Click the branch name in the lower left corner to switch branches.
|
||||
<br/>
|
||||
|
||||
### **4. Search for **
|
||||
It currently supports code search within the Gitlink repository (supporting word matching and file filtering) and file search.
|
||||
<br/>
|
||||
|
||||
### **5. Line highlight **
|
||||
Support single or multiple lines of highlighting, click the line number to highlight the line, hold down Shift to select multiple consecutive lines.
|
||||
<br/>
|
||||
|
||||
### **6. Blame**
|
||||
Supports viewing single-line blame information, and displays details after the hover.
|
||||
<br/>
|
||||
|
||||
### **7. Graph**
|
||||
graph view is supported to view branch commits history and file changes for each commit, as well as file diff viewing. Click Git Graph at the bottom left corner of the status bar or enter View Git Graph in the command panel to open the Git Graph view.
|
||||
<br/>
|
||||
|
||||
### **8. WebSCM**
|
||||
You can create a new branch in the Super Edition, modify the code and see the change file list in the SCM panel, write a commit message and submit it to Gitlink. If you want to quickly modify some files, you can directly submit the code through the speed version without local modification.
|
||||
|
||||
### **9. Code running online **
|
||||
●Integration of skypack based on the more lightweight CodeSwing plug-in, you can run front-end code in the speed version.
|
||||
● Integration of Pyodide-based Code-Runner-For-Web plug-in, you can run Python to the browser.
|
||||
<br/>
|
||||
|
|
@ -0,0 +1,38 @@
|
|||
---
|
||||
sidebar_label: 'Webhook'
|
||||
sidebar_position: 8
|
||||
---
|
||||
### **1. Webhook module entry **
|
||||
On the project home page, click the "Warehouse Settings" button and then click the "Network Hook" button to enter the Webhook module of the warehouse.
|
||||
<br/>
|
||||
|
||||
### **2. Add Webhook**
|
||||
Click the Add Webhook button to access the Webhook configuration page.
|
||||
|
||||
<br/>
|
||||
<br/>
|
||||
|
||||
### **3. Edit Webhook**
|
||||
After adding Webhooks, as shown in the figure below, each Webhook can be edited by clicking the "Edit" button on the right.
|
||||
|
||||
<br/>
|
||||
|
||||
### **4. Delete the Webhook**
|
||||
After adding Webhooks, as shown in the figure below, you can delete each Webhook by clicking the "Delete" button on the right.
|
||||
|
||||
<br/>
|
||||
|
||||
### **5. Types of events supported by Webhook **
|
||||
In GitLink, Webhooks support the following types of events:
|
||||
- Push: git is pushed to the repository
|
||||
- Code base: Creates or deletes a code base
|
||||
- Create: Creates a branch or label
|
||||
- Delete: Deletes a branch or label
|
||||
- Merge request: The merge request is opened, closed, reopened, or edited
|
||||
- Merge request assignment: The merge request is assigned or unassigned
|
||||
- Merge request revenue milestone: Merge requests are recorded or cancelled in the milestone
|
||||
- Merge request is commented: Merge request comments are created, edited, or deleted
|
||||
- Merge Request tag: The tag of the merge request is updated or cleared
|
||||
- Merge request review: The merge request is approved, rejected, or submitted for review, the review thread is resolved or not resolved
|
||||
- The merge request is synchronized: The merge request is synchronized
|
||||
|
||||
|
|
@ -0,0 +1,4 @@
|
|||
{
|
||||
"label": "代码库管理",
|
||||
"position": 2
|
||||
}
|
||||
|
|
@ -0,0 +1,11 @@
|
|||
---
|
||||
sidebar_label: 'Warehouse creation'
|
||||
sidebar_position: 1
|
||||
---
|
||||
### **1. Warehouse create entry **
|
||||
Users can create a warehouse by clicking the button in the upper right corner of the platform home page and the "New" button in the personal home participation project module.
|
||||
<br/>
|
||||
|
||||
### **2. Fill in the basic information **
|
||||
Enter the new project page, as shown in the following figure, fill in the owner, project name, project ID and other information, click "Create project" button to complete the creation.
|
||||
<br/>
|
||||
|
|
@ -0,0 +1,11 @@
|
|||
---
|
||||
sidebar_label: 'Warehouse setup'
|
||||
sidebar_position: 2
|
||||
---
|
||||
### **1. Warehouse setup entrance **
|
||||
In the warehouse home page, click the "warehouse Settings" button to enter the warehouse Settings module. The repository setup allows you to modify basic project information, manage members, configure Webhooks, set up branches, and install bots.
|
||||
<br/>
|
||||
|
||||
### **2. Basic Settings **
|
||||
After entering the warehouse setting module, click the "Basic Setting" button to enter the basic setting module, as shown in the following figure, you can modify the basic information of the project such as project name, project identifier, project introduction, project category, project language, etc. Click Transfer to transfer the warehouse to another user or organization. Click Delete this Warehouse to delete the warehouse.
|
||||
<br/>
|
||||
|
|
@ -0,0 +1,24 @@
|
|||
---
|
||||
sidebar_label: 'Code submission'
|
||||
sidebar_position: 3
|
||||
---
|
||||
|
||||
|
||||
## GitLink code submission
|
||||
|
||||
- **Submitted by** : geekchen
|
||||
- **Date** : 2024.5.27
|
||||
|
||||
## 1. Submit the code directly on the webpage:
|
||||
<br/>
|
||||
**Next:**
|
||||
<br/>
|
||||
## 2. Upload local code files through git (can be a single file, can be a folder composed of multiple files) [non-code can also be up loaded]
|
||||
**Open git bash in the corresponding directory and type the following command :**
|
||||
git add +[The code file you want to submit]
|
||||
git commit -m "xxx" [xxx is your own note of submission information]
|
||||
git push
|
||||
**The diagram is as follows:**
|
||||
<br/>
|
||||
|
||||
|
||||
|
|
@ -0,0 +1,9 @@
|
|||
---
|
||||
sidebar_label: 'Branch management'
|
||||
sidebar_position: 5
|
||||
---
|
||||
|
||||
Click on the branch in the code warehouse to directly enter the branch management interface, as shown below.
|
||||
<br/>
|
||||
In this interface, we can delete branches, new branches, view deleted branches and other operations, you can also view the information of each branch change, or download a branch, also support to set the default branch, of course, there is only one default branch, you can also set in the branch setting interface as shown in the following figure.
|
||||
<br/>
|
||||
|
|
@ -0,0 +1,29 @@
|
|||
---
|
||||
sidebar_label: 'Member management'
|
||||
sidebar_position: 7
|
||||
---
|
||||
### **1. Member Management Entry **
|
||||
In the warehouse home page, click the "warehouse Settings" button, and then click the "member management" button, you can enter the member management module, as shown in the figure below.
|
||||
<br/>
|
||||
|
||||
### **2. Filter and search project members **
|
||||
After entering the member management module, you can filter the type of project members by pressing the "Role screening" button, and search the specific project members by pressing the "Search" button, as shown in the following figure.
|
||||
<br/>
|
||||
|
||||
### **3. Filter and search project members **
|
||||
After entering the member management module, you can add project members by pressing the "Add member" button. After the specific user is retrieved from the search box on the left and selected, click the "Add member" button to successfully add project members.
|
||||
<br/>
|
||||
|
||||
### **4. Project member rights management **
|
||||
After entering the member management module, click the role bar to the right of the project member, and you can select the permission level for the project member, as shown in the following figure.
|
||||
<br/>
|
||||
|
||||
|
||||
#### ***4.1. Member Rights Description ***
|
||||
On the GitLink platform, warehouse member permissions can be divided into the following types:
|
||||
<br/>
|
||||
|
||||
|
||||
### **5. Delete project members **
|
||||
After entering the member management module, click the "Delete" button to the right of the project member to delete the renamed project member, as shown in the following figure.
|
||||
<br/>
|
||||
|
|
@ -0,0 +1,11 @@
|
|||
---
|
||||
sidebar_label: 'File management'
|
||||
sidebar_position: 4
|
||||
---
|
||||
|
||||
We can directly see and manage files in the code warehouse, as shown in the following figure.
|
||||
<br/>
|
||||
You can see the corresponding branch of the file and all the information of the file, and you can see the latest changes in the file and the change person.
|
||||
We can directly click the file button on the left to upload files or create new files (note that files are not folders, if you want to upload folders, you need to use git).
|
||||
On the left, you can open the file directory, and directly find the file you want to view and preview it directly, as shown in the following figure.
|
||||
<br/>
|
||||
|
|
@ -0,0 +1,29 @@
|
|||
---
|
||||
sidebar_label: 'Label and distribution management'
|
||||
sidebar_position: 6
|
||||
---
|
||||
### **1. Tags and distribution management entry **
|
||||
In the main page of the warehouse, click the "code base" button, and then click the "label" button, you can enter the label and release management module, as shown in the figure below.
|
||||
<br/>
|
||||
|
||||
### **2. Remove tags **
|
||||
After entering the label and distribution management module, click the "Delete" button on the right side of the label to achieve the deletion operation of the label, as shown in the following figure.
|
||||
<br/>
|
||||
|
||||
### **3. View the distribution **
|
||||
After entering the label and release management module, click the "Release" button to view the release of the project, as shown in the figure below.
|
||||
<br/>
|
||||
|
||||
### **4. Create a distribution **
|
||||
After entering the label and distribution management module, click the "Create distribution" button on the right side of the label to quickly create the distribution bound to the label, as shown in the following figure.
|
||||
<br/>
|
||||
|
||||
### **5. Change the distribution **
|
||||
After entering the label and release management module, click the Modify button on the right side of the release, you can enter the modify page of the release, as shown in the figure below. After modifying the release, click Save Release to save the modified content.
|
||||
<br/>
|
||||
<br/>
|
||||
|
||||
### **6. Delete the distribution **
|
||||
After entering the label and distribution management module, click the Delete button on the right side of the distribution, you can enter the delete page of the distribution, as shown below.
|
||||
<br/>
|
||||
|
||||
|
|
@ -0,0 +1,4 @@
|
|||
{
|
||||
"label": "合并请求(PR)",
|
||||
"position": 5
|
||||
}
|
||||
|
|
@ -0,0 +1,16 @@
|
|||
---
|
||||
sidebar_label: 'Code review'
|
||||
sidebar_position: 3
|
||||
---
|
||||
|
||||
# Code Review
|
||||
1. Click the "Code Review" button at the upper right corner of the merge request interface to enter the code review interface, as shown below.
|
||||
<br/>
|
||||
2. After entering the interface, we can see the relevant information of the merger, such as the submitted file, the modified file, the difference before and after the modification of the file, etc. Click the edit button in the upper right corner to edit the submitted code, as shown in the following figure.
|
||||

|
||||
3. After editing, click Save. At this time, a modification window will pop up at the lower left corner of the interface, and the code comparison before and after review will appear in the file browsing box. You can view the code modified during the review process, and after confirming that the review information is correct, enter the review information in the modification box and submit it (note that the review information cannot be empty), as shown below.
|
||||

|
||||
4. After reviewing the file and submitting the review information, return to the management merge request interface, where we can see the review log under the "Submit" option, and finally merge the request, as shown below.
|
||||

|
||||
|
||||
Summary: The code review function is helpful for managers to modify the submitted code when managing merge requests, which is convenient for managers to control the overall code warehouse. The disadvantage is that the operability of code modification is not as good as the local IDE, but if the code is fine-tuned, this is a very good and convenient function!👍👍👍😁
|
||||
|
|
@ -0,0 +1,22 @@
|
|||
---
|
||||
sidebar_label: 'Create merge request'
|
||||
sidebar_position: 2
|
||||
---
|
||||
|
||||
# Create a merge request
|
||||
|
||||
1. Enter the "** Merge Request (PR)**" interface of the project that needs to initiate a merge request, and click the "** New Merge Request **" button at the top to enter the merge request release interface, as shown below:
|
||||
|
||||

|
||||
|
||||

|
||||
|
||||
2. Select the ** source branch ** and ** target branch ** that need to be merged, where the source branch is the branch that has completed code development and needs to merge its code changes, and the target branch is the branch that wants to merge the code changes, either other branches under the same warehouse (branch) or branches under the source warehouse that are copied;
|
||||
|
||||
3. After the branch is selected, fill in the title and description of the merge request to provide the reviewer with information to assist in understanding the merge request, thus speeding up the merge request review process (see section *** Code Review ***);
|
||||
|
||||
4. In addition, users can also specify reviewers, add milestones, markers, and priorities in the sidebar on the right (merge request is essentially a query, and these operations have the same or similar meanings as those in the query module, so you can refer to the introduction of the query chapter to help understand);
|
||||
|
||||
5. After filling in the final information, click the "** Create **" button at the bottom to submit your first merge request🎉🎉🎉!
|
||||
|
||||

|
||||
|
|
@ -0,0 +1,100 @@
|
|||
---
|
||||
sidebar_label: 'Introduction to Merge Mode'
|
||||
sidebar_position: 4
|
||||
---
|
||||
|
||||
# Introduction to merge mode
|
||||
|
||||
After the reviewer has reviewed the code changes submitted by the developer, he or she can decide whether to merge those submissions into the master branch.
|
||||
|
||||
However, there are multiple merge modes for submission merging between different branches. The following figure shows the merge modes supported in GitLink, including **Merge request **, ** change base and merge **, ** change base merge --no-ff** and ** compress commit and merge **.
|
||||
|
||||

|
||||
|
||||
1. **Merge request**
|
||||
|
||||
**Merge request** is the most commonly used merge mode, the following picture is an example, the developer in the main branch 'master' commit 3 pull development branch 'dev', and then submit A, B, C, and then merge on the 'master' branch.
|
||||
|
||||
Fast forward to the merger:
|
||||
|
||||

|
||||
|
||||
Fast forward to the merger:
|
||||
|
||||

|
||||
|
||||
** Note ** : As you can see, the process of merging is to move the `master` pointer directly to the `dev` pointer, this merger is called ** fast forward (fast-forward) **, the reason why this situation is because after committing 3, there is no new commit on the `master` branch. So the merge can be done by fast-forwarding the 'master' pointer directly; However, if there are also new commits on the `master` branch, substantial merging is required, as shown in the following two diagrams:
|
||||
|
||||
Before merging, after committing A on the `dev` branch and before committing B, 4 is committed on the `master` branch, then merging the `dev` branch can not simply fast forward, but compare the changes on the two branches, and then merge;
|
||||
|
||||
Non-fast-forward pre-merger:
|
||||
|
||||

|
||||
|
||||
|
||||
After the merge, commit A, B, and C will be added to the `master` commit record according to the timeline, and a new commit D will be generated to record the merge event. In addition, if a conflict occurs during the merge process, that is, two branches make changes to the same file, the conflict needs to be handled manually; This merge method is **non-fast-forward (no fast-forward)**, which is also the default method in **merge request** mode!
|
||||
|
||||
After the non-fast-forward merger:
|
||||
|
||||

|
||||
|
||||
For ease of understanding, you can view the commit record on the merged `master` branch in a linear manner
|
||||
|
||||

|
||||
|
||||
**Summary** : In **Merge Request** mode, the default **non-fast forward** merge development branch to the `master` branch, and **non-fast forward** mode will generate a special commit to record the merge event!
|
||||
|
||||
2. **Change base and merge**
|
||||
|
||||
From the submission records on the `master` branch after the **merge request**, it can be seen that the submission records of the two branches may cross together, which may cause trouble for subsequent development, and the **change base and merge** can solve this problem.
|
||||
|
||||
**Base change and merge** includes two operations: **base change**, **merge**. The first is to change the base, the following example, `dev` branch is pulled out from the commit 3, so commit 3 is the base of `dev`, and change the base operation is to change the base of `dev`, so that it becomes the latest commit on the `master` branch. Of course, there may be conflicts during the base change process, which needs to be handled manually.
|
||||
|
||||
Before basing:
|
||||
|
||||

|
||||
|
||||
After basing and before merging:
|
||||
|
||||

|
||||
|
||||
|
||||
After the `dev` branch changes base, there is no 'update' commit for the `master` branch, so merge at this time, and you get the following result
|
||||
|
||||
After the merger:
|
||||
|
||||

|
||||
|
||||
**Summary** : In **change base and merge** mode, the development branch `dev` can first change the base operation, so that the submission on it looks like it is carried out on the basis of the latest submission of the `master` branch, and then merge back to the `master` branch by **fast forward** way, so as to play the role of sorting out the submission record!
|
||||
|
||||
3. **Change base merger --no-ff**
|
||||
|
||||
Because **base change and merge** when the merge operation is performed, the default is **fast forward**, so that there is no special commit on the `master` branch to record the merge event. So you can use the `--no-ff` (**no fast-forward**) option to declare the **non-fast-forward** merge.
|
||||
|
||||
`--no-ff` Before merger:
|
||||
|
||||

|
||||
|
||||
`--no-ff` post-merger:
|
||||
|
||||

|
||||
|
||||
**Summary** : With the `--no-ff` option, it is possible to explicitly state that a **non-fast-forward** method is used when merging, so that a commit recording of the merge event can be added to the `master` branch!
|
||||
|
||||
4. **Compress submission and merge**
|
||||
|
||||
In development branches such as `dev` or `feature`, developers will commit multiple times in order to complete a certain requirement, but these trivial commit information will make the commit record on `master` bloated and chaotic after merging back into the `master` branch, so it is necessary to compress these commits before merging. As shown in the figure, the compression operation is performed on the `master` branch, essentially applying the changes made on the `dev` branch to the files maintained by the `master` branch, then saving these changes with a new commit5, and finally committing.
|
||||
|
||||
Before compression:
|
||||
|
||||

|
||||
|
||||
After compression, before submission:
|
||||
|
||||

|
||||
|
||||
After submission:
|
||||
|
||||

|
||||
|
||||
**Summary**: Before merging, first compress the trivial commits on the development branch, you can make the commit information on the `master` branch more concise, but note that this merging mode is essentially the `master` branch saves the changes on `dev` at once, and creates a new commit record of these changes, so the committer has changed!
|
||||
|
|
@ -0,0 +1,6 @@
|
|||
---
|
||||
sidebar_label: 'Merge requests for associated revisions'
|
||||
sidebar_position: 5
|
||||
---
|
||||
|
||||
# Merge requests for associated revisions
|
||||
|
|
@ -0,0 +1,18 @@
|
|||
---
|
||||
sidebar_label: 'Introduction to merge request'
|
||||
sidebar_position: 1
|
||||
---
|
||||
|
||||
# Merge Request brief
|
||||
|
||||
**Pull Request** is a way to merge code changes between two software repositories in modern distributed software development. It is usually used for fork repositories to submit code changes to the fork repository (source repository), and it is also a very good team collaboration way to contribute to team projects or open source projects. When you pull and modify someone else's warehouse code, inform the manager of the original warehouse of your changes, and request it to merge your changes, this process is called **merge request**.
|
||||
|
||||
**The Merge Request (PR)** module in GitLink provides both merge request creation and management functions:
|
||||
|
||||
- Support for creating (initiating) code merge requests to the source repository or other branches of the same repository;
|
||||
|
||||
- On the other hand, it is also for the warehouse manager to manage, review and finally determine whether the merge request sent by others to the warehouse is included in the warehouse.
|
||||
|
||||
The Merge Request (PR) management module is shown below:
|
||||
|
||||

|
||||
|
|
@ -0,0 +1,4 @@
|
|||
{
|
||||
"label": "平台公告",
|
||||
"position": 99
|
||||
}
|
||||
|
|
@ -0,0 +1,19 @@
|
|||
---
|
||||
sidebar_label: 'Platform announcement'
|
||||
sidebar_position: 1
|
||||
---
|
||||
|
||||
|
||||
**Dear gitlink users:**
|
||||
|
||||
We are excited to announce that a new version of the gitlink website will be available in mid-July! This update will bring a number of new features and improvements designed to enhance your user experience and site usage efficiency.
|
||||
|
||||
In the new version, you can expect a smoother interface and more intuitive operations to help you find the information and features you need faster. We will also add some new features, such as user profiles, real-time notifications, etc., so that you can better manage and share your projects.
|
||||
|
||||
In addition, we will also improve the security and stability of the website to ensure the security of your data and information. We are committed to providing you with a high-quality platform that makes it easier for you to work with your team, manage your code base, and achieve project success.
|
||||
|
||||
We hope you will continue to support the gitlink website and look forward to your experience on the new version! If you have any comments or suggestions, please feel free to contact our maintenance team (Grade 21 Software engineering professional Yang Yizhe team), we will be happy to help you.
|
||||
|
||||
Thank you for your support of gitlink!
|
||||
|
||||
Dear Yang Yizhe maintenance team
|
||||
|
|
@ -0,0 +1,4 @@
|
|||
{
|
||||
"label": "快速开始",
|
||||
"position": 1
|
||||
}
|
||||
|
|
@ -0,0 +1,24 @@
|
|||
---
|
||||
sidebar_label: 'Create your first open source project'
|
||||
sidebar_position: 2
|
||||
---
|
||||
|
||||
# Create your first open source project
|
||||
|
||||
## 1. New project
|
||||
|
||||
The platform provides a "New" button that allows users to quickly create a new public or private project from scratch with a click.
|
||||
|
||||

|
||||
|
||||
## 2. Fill in the project information
|
||||
|
||||
Fill in the basic information of the project.
|
||||
|
||||

|
||||
|
||||
## 3. The creation is successful
|
||||
|
||||
Click Create Project and enter the project home page after the project is successfully created.
|
||||
|
||||

|
||||
|
|
@ -0,0 +1,92 @@
|
|||
---
|
||||
sidebar_label: 'Import third-party Git projects such as GitHub'
|
||||
sidebar_position: 5
|
||||
---
|
||||
|
||||
# Import to third-party Git projects like GitHub
|
||||
|
||||
## 1. Import the project
|
||||
|
||||
Select **Import Project** on the home page
|
||||
|
||||

|
||||
|
||||
## 2. Fill in the information
|
||||
|
||||
Enter the address and information of the third-party Git project to be imported. If the imported project is a private repository, enter the user token of the target platform for authorization.
|
||||
|
||||

|
||||
|
||||
## 3. Authorization verification
|
||||
|
||||
When using the GitLink platform to import open source projects of other platforms (such as GitHub and Gitee), if the project is private, it cannot be imported through normal channels, and you need to enter the token value of the permission of the corresponding platform for verification.
|
||||
|
||||

|
||||
|
||||
Here are some typical token acquisition methods for open source platforms.
|
||||
|
||||
### GitHub token acquisition method
|
||||
|
||||
1. Log in to GitHub account
|
||||
|
||||
2. Access the settings menu under the user profile picture
|
||||
|
||||
|
||||
|
||||
3. Access the Developer settings at the bottom
|
||||
|
||||
|
||||
|
||||
4. Access Token (classic) in the jump page and create a new classic token (if the token is saved).
|
||||
|
||||
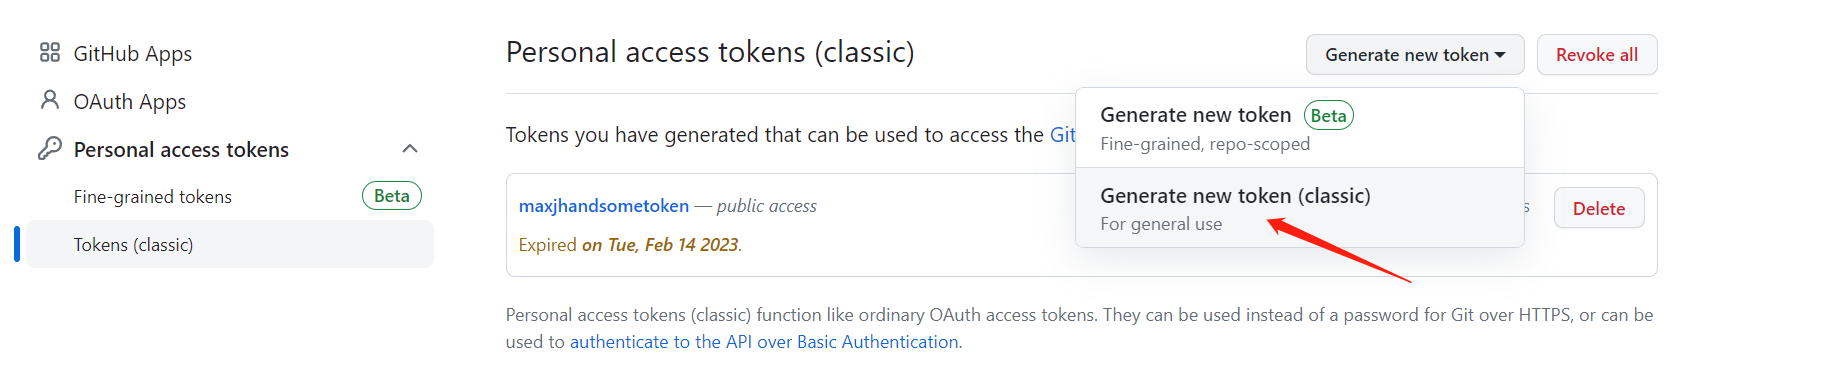
|
||||
|
||||
5. On the token configuration page, enter the token usage and ensure that repo is selected for the token. Otherwise, the token import fails
|
||||
|
||||
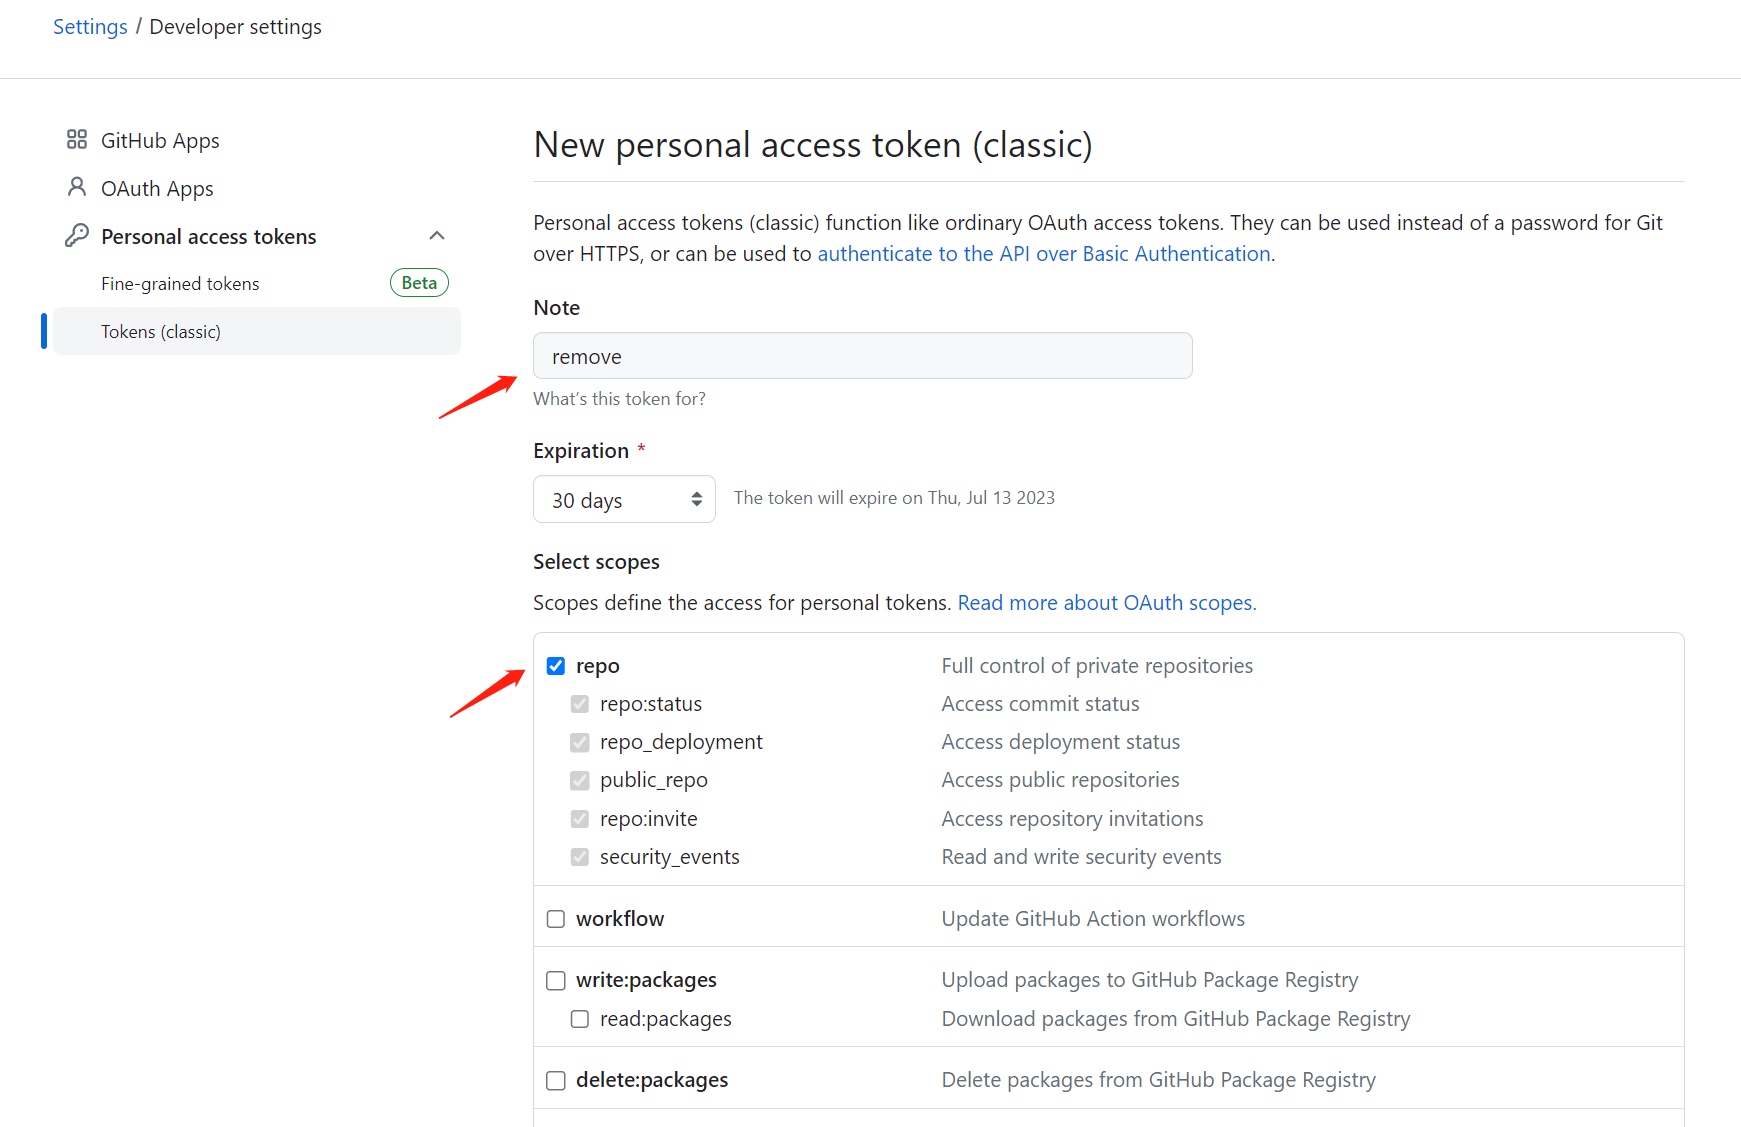
|
||||
|
||||
Click Create button
|
||||
|
||||
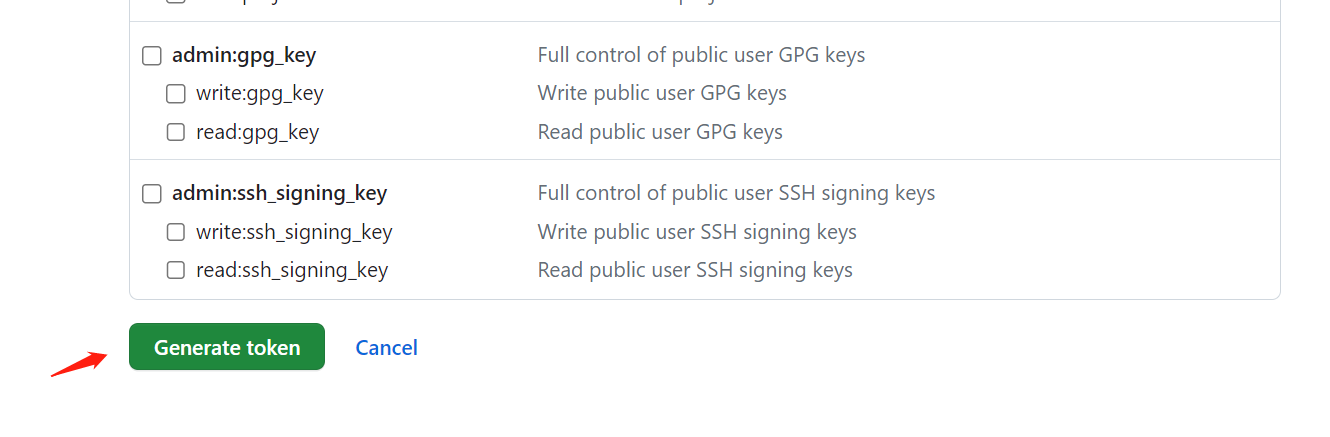
|
||||
|
||||
6. Copy the token
|
||||
|
||||
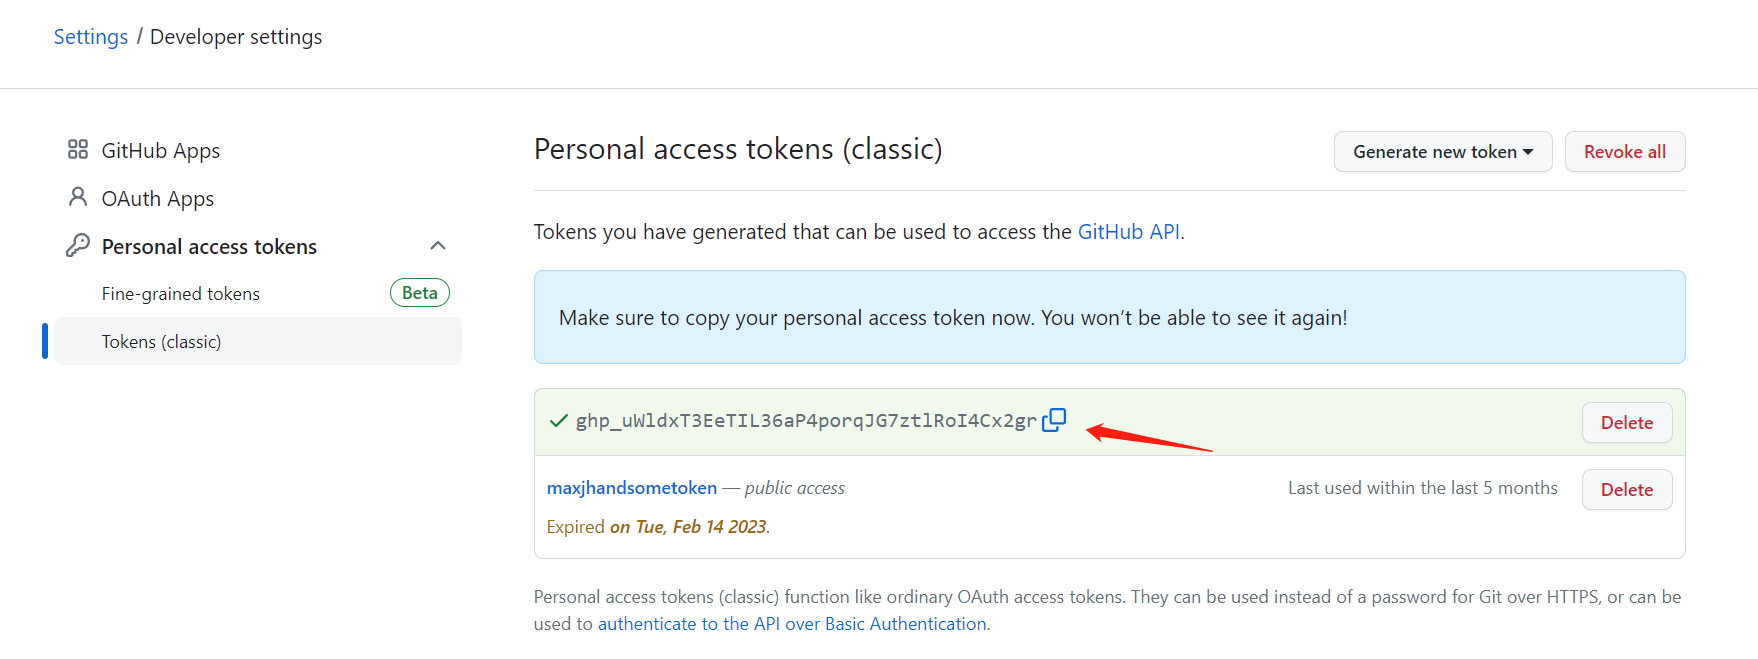
|
||||
|
||||
Enter the token into the GitLink Import Project authentication field
|
||||
|
||||

|
||||
|
||||
### Gitee token obtaining mode
|
||||
|
||||
1. Log in to the Gitee account
|
||||
|
||||
2. Access the Settings menu under the user profile picture
|
||||
|
||||
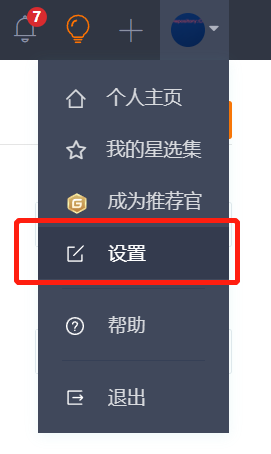
|
||||
|
||||
3. Visit the "Private Token" menu under the "Security Settings" bar
|
||||
|
||||
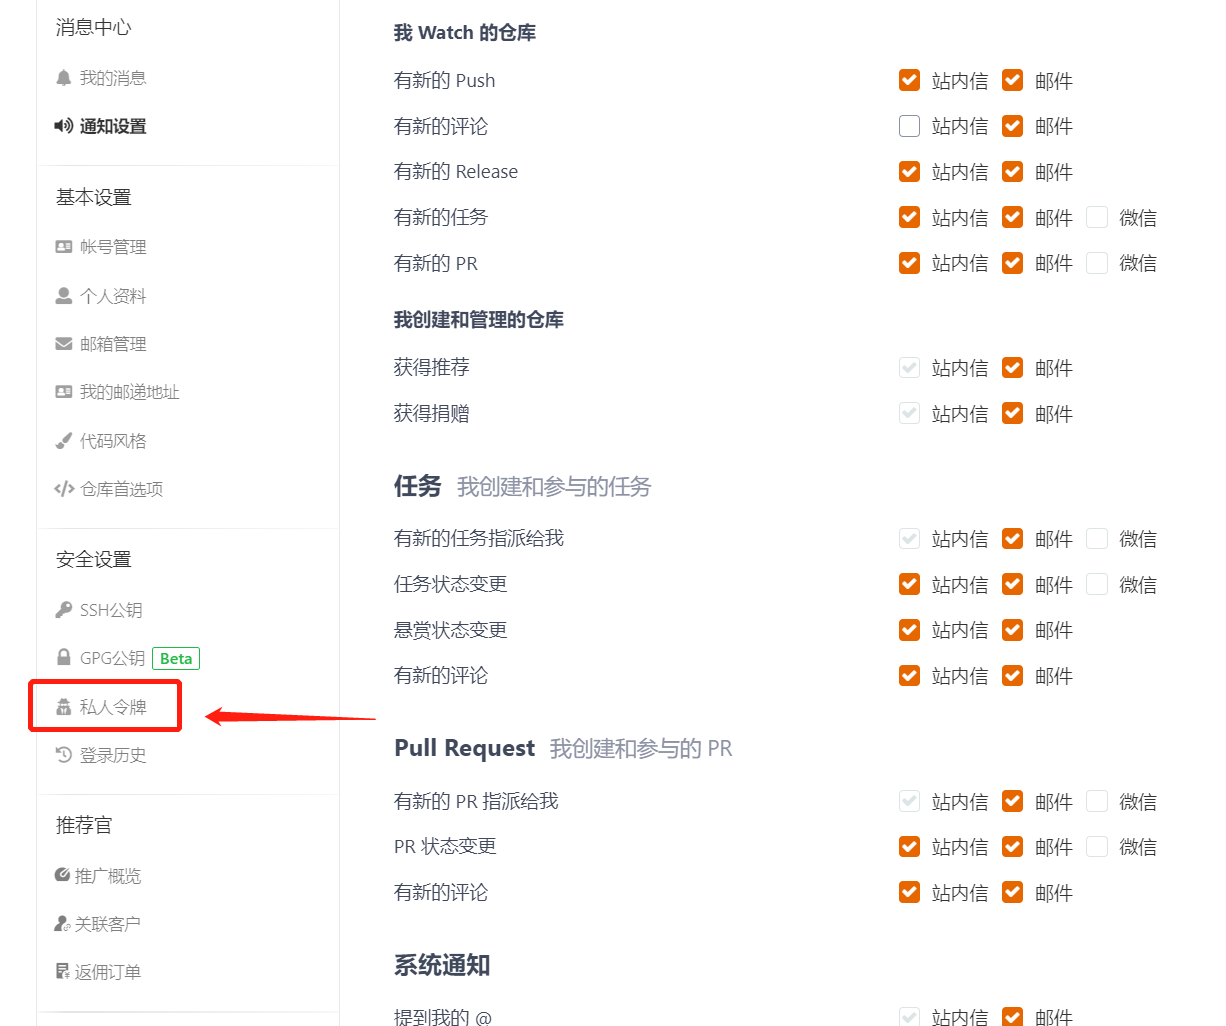
|
||||
|
||||
4. Click Generate New Token and configure the token name on the token generation page, make sure the "project" permission option is checked for the token, and save the token
|
||||
|
||||
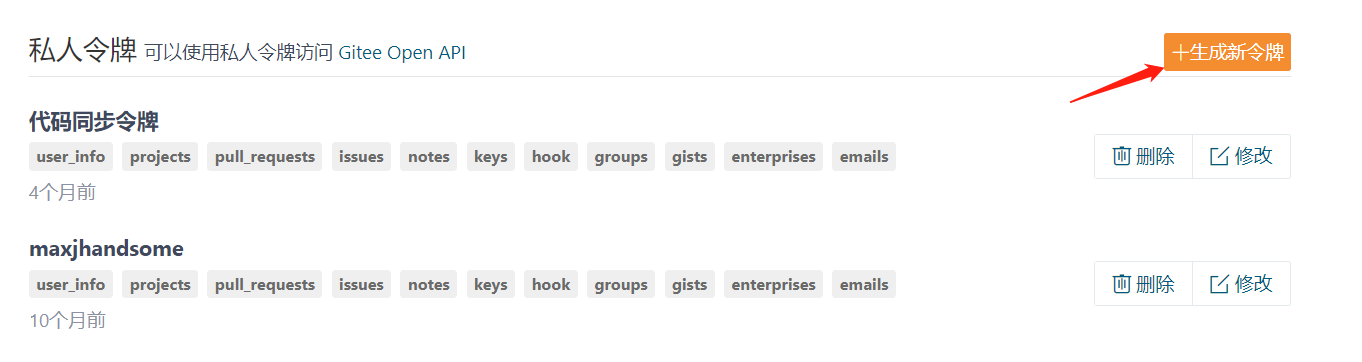
|
||||
|
||||
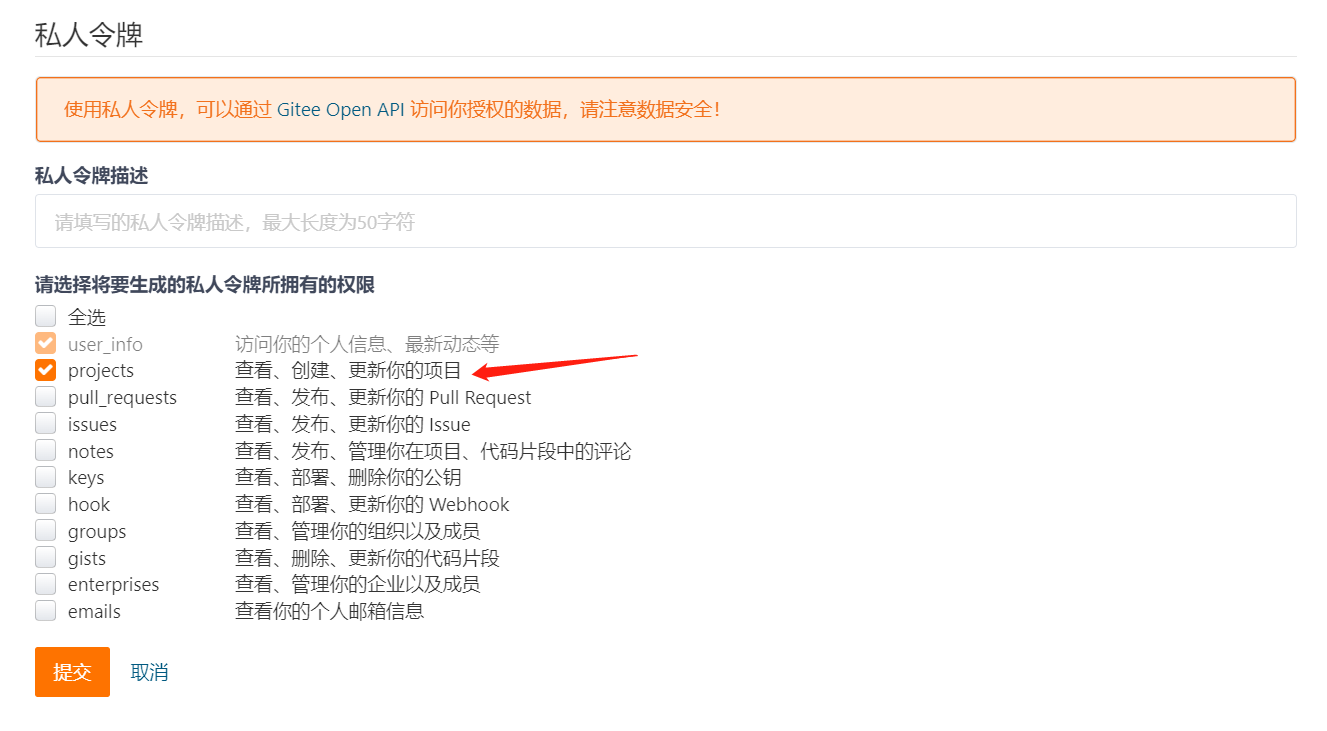
|
||||
|
||||
5. After the successful token generation pop-up, copy the token and enter the token into the GitLink Import project authentication field
|
||||
|
||||
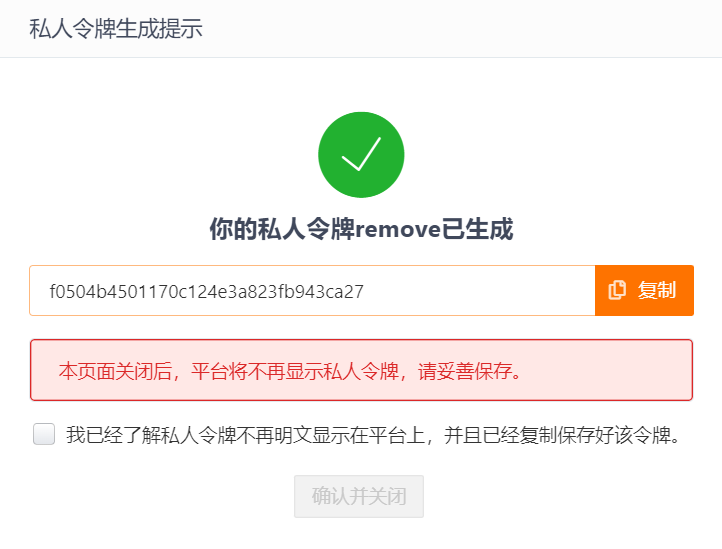
|
||||
|
||||
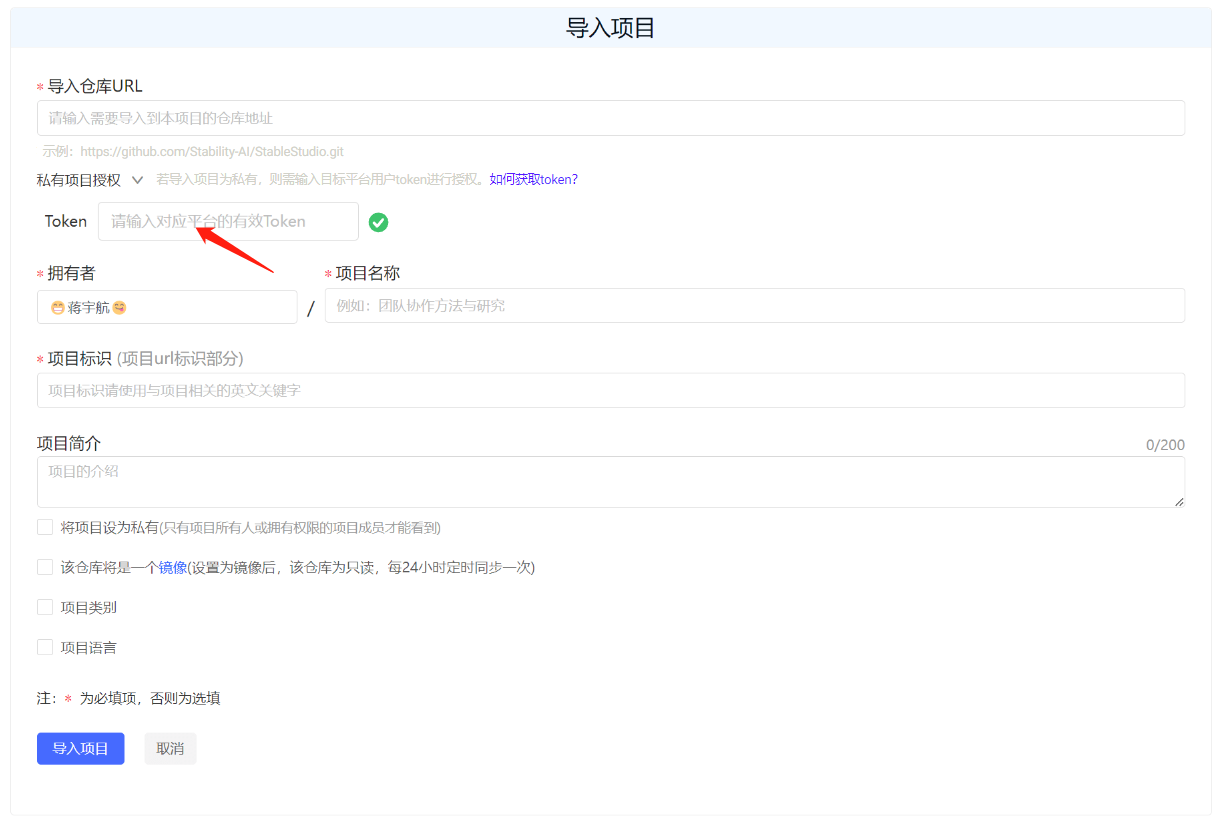
|
||||
|
||||
## 4. Import successfully
|
||||
|
||||
The message indicates that you are migrating from a third-party Git project address
|
||||
|
||||

|
||||
|
||||
If the migration succeeds, the project is successfully imported
|
||||
|
||||

|
||||
|
|
@ -0,0 +1,22 @@
|
|||
---
|
||||
sidebar_label: 'Submit the first line of code'
|
||||
sidebar_position: 3
|
||||
---
|
||||
|
||||
# Submit first line of code
|
||||
|
||||
# 1. Edit the code
|
||||
|
||||
Click the Edit button to start editing the code.
|
||||
|
||||

|
||||
|
||||
# 2. Submit the code
|
||||
|
||||
Write the code in the edit box, fill in the change information after writing and submit the change.
|
||||
|
||||

|
||||
|
||||
## 3. Code update is successful
|
||||
|
||||
After submitting the code, the code is updated successfully.
|
||||
|
|
@ -0,0 +1,44 @@
|
|||
---
|
||||
sidebar_label: 'Search Open source Projects'
|
||||
sidebar_position: 4
|
||||
---
|
||||
|
||||
# Search open source projects
|
||||
|
||||
## 1. Open Source project page introduction
|
||||
|
||||
The "Project" module aggregates and manages all managed projects and mirrored projects on the GitLink platform, and users can enter the project name keyword to search, and can also filter projects by project category.
|
||||
|
||||
Enter the "Project" module, and the left side lists the project type and project category. Among them, the project types mainly include open source hosted projects and open source mirror projects. The project categories mainly include: cloud computing, big data, blockchain, Internet of Things, machine learning, artificial intelligence, smart healthcare, and others.
|
||||
|
||||

|
||||
|
||||
The right side shows the basic information of all projects, including creator, project name, project introduction, page views, project category, update time, number of likes, number of forks and other information. Users can search for specific projects through keyword search, and can also sort projects according to update time, creation time, number of forks, number of likes and so on.
|
||||
|
||||

|
||||
|
||||
Users can click on the project name to enter the project details, view and participate in the open source project development.
|
||||
|
||||
## 2. Search for open source projects
|
||||
|
||||
There are two search boxes to search for
|
||||
|
||||
### Open Source project search box
|
||||
|
||||
Search item:
|
||||
|
||||

|
||||
|
||||
Search results:
|
||||
|
||||

|
||||
|
||||
### Menu bar search box
|
||||
|
||||
Search item:
|
||||
|
||||

|
||||
|
||||
Search results:
|
||||
|
||||

|
||||
|
|
@ -0,0 +1,27 @@
|
|||
---
|
||||
sidebar_label: 'Register a GitLink account'
|
||||
sidebar_position: 1
|
||||
---
|
||||
|
||||
# Register a GitLink account
|
||||
|
||||
## 1. Click ** Register Now ** button
|
||||
|
||||

|
||||
|
||||
## 2. Fill in the registration information
|
||||
|
||||
- Mobile number registration
|
||||
|
||||

|
||||
|
||||
- Email registration
|
||||
|
||||

|
||||
|
||||
## 3. Registration completed
|
||||
|
||||
After filling in the required information, click Register. After successful registration, you will enter the personal homepage
|
||||
|
||||

|
||||
|
||||
|
|
@ -0,0 +1,34 @@
|
|||
---
|
||||
sidebar_label: 'GitLink service agreement'
|
||||
sidebar_position: 1
|
||||
---
|
||||
|
||||
Dear users, hello!
|
||||
|
||||
Welcome to use the GitLink platform. Before using the GitLink Platform, please carefully read and abide by the GitLink Service Agreement (hereinafter referred to as the "Agreement"). Please be sure to read carefully and fully understand the terms of the Agreement.
|
||||
When you click "read and agree to this Service Agreement" during the registration process, successfully registering as a user of the GitLink Platform in accordance with the registration process means that you have fully read, understood and fully accepted all terms of this Agreement. You undertake to accept and abide by the provisions of this Agreement, and you shall not claim that this Agreement is invalid or certain provisions of this Agreement are invalid, or require the cancellation of this Agreement on the grounds that you have not read the contents of this Agreement.
|
||||
|
||||
## 一、GitLink Platform Rights and obligations
|
||||
1. Respect for user privacy: Respecting user privacy and ensuring user privacy security is a basic policy of GitLink platform;
|
||||
2. Management of Platform users: GitLink Platform manages platform registered users according to national laws, local laws and international laws and other standards as well as the rules of the industry;
|
||||
3. Deal with user feedback: The relevant staff of GitLink platform will timely deal with user feedback problems and give timely replies.
|
||||
|
||||
## 二、Rights and Obligations of Users
|
||||
When using the GitLink platform, users must comply with the following principles:
|
||||
|
||||
1. Comply with the relevant laws and regulations of China;
|
||||
2. Do not use network services for illegal purposes;
|
||||
3. Do not interfere with and disrupt network services;
|
||||
4. Comply with all network protocols, regulations, procedures and practices for the use of network services;
|
||||
5. Do not transmit any illegal, harassing, defamatory, abusive, threatening, hurtful, vulgar, obscene and other information;
|
||||
6. Not to transmit any information that incites others to commit criminal acts;
|
||||
7. Users shall not intentionally or negligently damage the legitimate rights and interests of GitLink Platform.
|
||||
|
||||
## 三、About responsibility
|
||||
In view of the special nature of the network service, the User agrees that the GitLink team has the right to change, interrupt and upgrade part of the network service with prior notice. The GitLink team does not guarantee that network services will not be interrupted, but promises to quickly restore service within an affordable time for users, while ensuring the security and reliability of user data.
|
||||
|
||||
## 四、Modification of the Terms of Service
|
||||
The GitLink team reserves the right to modify this Agreement as necessary, and in the event of any change, these terms may be updated by the GitLink team without prior notice, and the revised terms will effectively replace the original Terms of Service once published on the website. You can always check the latest version of the Terms of Service.
|
||||
|
||||
|
||||
The GitLink team reserves the right of final interpretation of this Agreement.
|
||||
|
|
@ -0,0 +1,4 @@
|
|||
{
|
||||
"label": "服务协议",
|
||||
"position": 100
|
||||
}
|
||||
|
|
@ -0,0 +1,4 @@
|
|||
{
|
||||
"label": "疑修(Issue)",
|
||||
"position": 4
|
||||
}
|
||||
|
|
@ -0,0 +1,24 @@
|
|||
---
|
||||
sidebar_label: 'Mark management'
|
||||
sidebar_position: 6
|
||||
---
|
||||
|
||||
# Tag Management
|
||||
|
||||
In the content editing page of doubtful repair, you can set marks according to the types of doubtful repair. The existence of marks facilitates the screening of target doubtful repair in the doubtful repair list, and improves the efficiency of project development management. <br/>
|
||||
GitLink defaults to defect, Feature, question, Support, task, assist, shelved, document, Test, and repeat, each with a different meaning and color symbol:
|
||||
|
||||
- **Defects:** indicates an unexpected problem or error;
|
||||
- **Function:** indicates new function application;
|
||||
- **Doubt:** indicates doubt;
|
||||
- **Support:** Indicates a specific function or requirement;
|
||||
- **Task:** Indicates the task to be assigned;
|
||||
- **Assistance:** indicates the need for community user assistance;
|
||||
- **Shelved:** indicates that this issue will not be continued for the time being;
|
||||
- **Documentation:** indicates documentation material supplement;
|
||||
- **Test:** indicates the need to test;
|
||||
- **Repeat:** indicates that a similar revision already exists.
|
||||

|
||||
|
||||
In addition, **project members** can modify the meaning or color of the mark, create new marks and delete marks according to their needs or habits.
|
||||

|
||||
|
|
@ -0,0 +1,13 @@
|
|||
---
|
||||
sidebar_label: 'List of Issue'
|
||||
sidebar_position: 4
|
||||
---
|
||||
# List of Issue
|
||||
|
||||
For all issues created during the process of project development, can be suspected in **Issue** interface unified view, as shown in the figure below for [TruelyOpenSource] indeed (https://www.gitlink.org.cn/Gitlink/forgeplus) under the project of suspected Issue list.
|
||||
|
||||

|
||||
|
||||
+ **Create Issue**:Under the Issue list interface, clicking the“**Create Issue**”button allows for the creation of a new issue, as detailed in the ***Issue created*** section;
|
||||
|
||||
+ **Filter issue** : The list of issue supports different criteria, including publisher, mark (see ***Mark management***), milestone (see ***Milestone Management***), person in charge, status and start/end date, etc.; It also supports keyword search and sorting by various sorting rules.
|
||||
|
|
@ -0,0 +1,20 @@
|
|||
---
|
||||
sidebar_label: 'Issue created'
|
||||
sidebar_position: 2
|
||||
---
|
||||
# Issue created
|
||||
|
||||
1. Enter the "**Code base**" interface of the project that needs to be released, and click the "**+Doubtful repair**" button at the top to enter the doubtful repair release interface, as shown in the following picture:
|
||||
|
||||

|
||||
|
||||
2. Start to create the doubt modifier, including the doubt modifier title and content. When entering the doubt modifier content, you can adopt the simple and flexible [Markdown syntax](https://markdown.com.cn/) and click the function button above at the same time; Then upload the required attachment content; Finally click the "**Create**" button to submit your first doubtful fix🎉🎉🎉
|
||||
|
||||

|
||||
|
||||
3. In addition, when creating a doubt modifier, you can use the symbol **`#`** to quickly add the doubt modifier that needs to be referenced, and then provide auxiliary information for the current doubt modifier; As shown in the figure below, after typing **`#`**, a list of referable doubtful fixes will pop up. After sliding the mouse or entering the doubtful fix number to select the doubtful fix that needs to be referenced, a link to the doubtful fix will be automatically added🔗
|
||||
|
||||

|
||||
|
||||

|
||||
|
||||
|
|
@ -0,0 +1,19 @@
|
|||
---
|
||||
sidebar_label: 'Issue state change'
|
||||
sidebar_position: 3
|
||||
---
|
||||
# Issue state change
|
||||
|
||||
**Issue** is essentially a development task, and the development task with the development of activities, its status will change, and "**status**" is used to track and record the change of development activities. As shown in the figure, the **status** of the issue in GitLink includes five categories: "New", "solving", "solved", "closed" and "rejected", which are used to indicate the progress of the development task.
|
||||
|
||||

|
||||
|
||||
+ **Added** : The default status of the newly created issue is "Added";
|
||||
|
||||
+ **Being resolved** : If a created issue is in the process of being resolved, change the issue status to "Being resolved" at this time;
|
||||
|
||||
+ **Solved** : The issue has been solved by the developer, and its status can be changed to "Solved".✅;
|
||||
|
||||
+ **Off** : Issues that have been solved or are not necessary to continue can be set to "off";
|
||||
|
||||
+ **Reject** : If the developer assigned to fix the issue refuses to process the issue, the issue can be set to Reject status❌.
|
||||
|
|
@ -0,0 +1,17 @@
|
|||
---
|
||||
sidebar_label: 'Introduction to Issue'
|
||||
sidebar_position: 1
|
||||
---
|
||||
# Introduction to Issue
|
||||
|
||||
**Issue** management module mainly provides project team members with **development task** release, assignment, tracking and other functional services.
|
||||
|
||||

|
||||
|
||||
**Notes**
|
||||
|
||||
1. **Xiu** is a post that can track the progress of development tasks, so it supports participants' replies and comments, see ***Comments and operation records*** section;
|
||||
|
||||
2. The default types (marks) of **Issue** include defects, functions, tasks, support, weekly reports, etc., see the section ***Mark Management*** for details;
|
||||
|
||||
3. You can set the start and end time for **Issue**, and designate the person responsible for solving the task, the day before the deadline for Issue, the system will automatically send a reminder message for the task publisher and the assigned person.
|
||||
|
|
@ -0,0 +1,18 @@
|
|||
---
|
||||
sidebar_label: 'Comments and operational records'
|
||||
sidebar_position: 5
|
||||
---
|
||||
|
||||
# Comments and operation records
|
||||
### Comments
|
||||
Each session is equivalent to a post that can be tracked, so it supports comments and replies, not just project members, but anyone can comment and reply under a session, post questions or opinions, and communicate.
|
||||

|
||||
|
||||
### Statement of issue
|
||||
Users can issue a "doubt repair statement" for any doubt repair, leaving their own ideas for the solution of the doubt repair. Click "Statement" on the right side of the details of the revision, you can edit the message, click "confirm" after editing, you can release the statement, as shown in the picture below:
|
||||

|
||||
|
||||
### Operation record
|
||||
Anyone can create a modifier, but note that non-project members can only modify the modifier they create, and project members have permission to modify all the modifier.
|
||||
All editing actions for a doubt, including **Create doubt, add leader, remove leader, change status, change priority, add mark, remove mark, add milestone, remove milestone, set associated branch, remove associated branch, set start date, and set end date**, are recorded in the action log.
|
||||

|
||||
|
|
@ -0,0 +1,34 @@
|
|||
---
|
||||
sidebar_label: 'Milestone management'
|
||||
sidebar_position: 7
|
||||
---
|
||||
|
||||
# Milestone Management
|
||||
|
||||
### Milestone introduction
|
||||
Milestones are mainly used by the project team to provide support for project development and version release, and each milestone can be associated with multiple development tasks.
|
||||
|
||||
### Create milestones
|
||||
Project members can create milestones based on the following steps:
|
||||
1. Enter the **"Milestone screen"** of the target project. The list of created milestones is displayed on the screen. All created milestones can be divided into two categories: **"Closed"** and **"Open"**.
|
||||
2. Click the **"+Create Milestone"** button at the top to enter the milestone creation interface;
|
||||

|
||||
|
||||
3. After filling in the title (required), description (required), deadline (optional), click **"Create Milestone"** in the lower right corner to complete the creation of a new milestone.
|
||||

|
||||
|
||||
### Associated milestones
|
||||
Project members can associate fixes to milestones so that milestones contain a clear list of fixes. The main steps are as follows:
|
||||
1. Click the target query in the query list;
|
||||
2. Edit the Milestone property and select the milestone to be associated.
|
||||

|
||||
|
||||
### Other operations
|
||||
- **Open milestones**
|
||||
- **Close Milestones**
|
||||
- **Editing Milestones**
|
||||
- **Delete milestones**
|
||||
|
||||
The above operations can be processed in the milestone list to achieve the target milestone, as shown in the following figure:
|
||||

|
||||

|
||||
|
|
@ -0,0 +1,122 @@
|
|||
---
|
||||
sidebar_label: 'WebIDE'
|
||||
sidebar_position: 9
|
||||
|
||||
---
|
||||
## WebIDE background
|
||||
The traditional code hosting platform provides Git/SVN management of the code warehouse, which can do code browsing, code review, defect management, CI pipeline and other code-related activities on the platform. Among them, the editor component used for code browsing and code review is generally CodeMirror, and the code highlighting uses highlight.js, often providing only the scene of reading the code. Ant R & D performance Department cloud R & D team through self-developed OpenSumi framework and based on OpenSumi framework for the Web IDE (no remote container) scene of the fast version of the Web IDE framework, It collids with the internal code hosting platform to create innovative, browser-only, IDE style code reading, code writing, code submission, code running, code review and other scenarios, which greatly improves the efficiency of users' code reading, code review, light research and development and other scenarios on the code hosting platform. This Ant R & D efficiency cloud R & D team and CCF (China Computer Society) GitLink code hosting platform cooperation, the internal speed version of the Web IDE applied to the Gitlink code hosting platform, to solve a lot of experience problems that have been feedback by users for a long time.
|
||||
|
||||
## Web IDE core competencies
|
||||
The standard version marked with containers, the speed version IDE mainly read, write, run, submit and other aspects were explored:
|
||||
|
||||
**1. Read:**
|
||||
- a. Adapted to a variety of code hosting platforms, such as Gitlink, Github, Gitlab and other code hosting platforms, businesses can easily use code services
|
||||
- b. Built-in syntax highlighting support for dozens of common languages including Java, TS/JS, C++, Go, Python, Rust, and more
|
||||
- c. Supports code reading aid plug-ins such as Git Blame and GitGraph
|
||||
|
||||
**2. Write:**
|
||||
- a. Supports online language services such as HTML, CSS, JS, and Markdown, and supports error diagnosis
|
||||
-b. The browser file system
|
||||
|
||||
**3. Run:**
|
||||
- a. Supports the front-end code running scheme based on Skypack
|
||||
- b. Supports Python running based on Pyodide
|
||||
|
||||
**4. Submit:**
|
||||
- a. Supports WebSCM and provides branch switching, adding, and code submission capabilities
|
||||
|
||||
If the browser IDE components represented by CodeMirror and Monaco are Web IDE 1.0, then the fastest version of the Web IDE with the above capabilities is Web IDE 2.0. The Super version Web IDE solution was launched in Ant in April 2021, and carried out many scenarios such as code reading, code review, online written test, code inspection result feedback, and lightweight online research and development. vscode.dev and github dev were launched in August of the same year. The super version of the Web IDE takes advantage of the high scalability of the OpenSumi framework, and the business can customize the modules and plug-ins more deeply, so that the business has more imagination space.
|
||||
|
||||
## Code reading
|
||||
When reading code on the code hosting platform, it is often necessary to see where the current method is referenced and where the current interface is implemented. The Super version Web IDE provides the ability of editor + plug-in to solve the above user needs:
|
||||

|
||||
|
||||
<center> Code Reference View </center>
|
||||
Gitlink completes the ability to view the editor Blame by implementing the Blame plugin:
|
||||
|
||||

|
||||
<center> Current line author, modification date View </center>
|
||||
|
||||
|
||||
## Code review
|
||||
Users of the code review feature have long reported the following questions:
|
||||
|
||||
- 1. Lack of language services, low reading efficiency: lack of code highlighting, prompt, jump, view reference and outline functions
|
||||
- 2. Poor browsing experience of large PR: statistics show that Gitlink PR has an average of 14-17 change files, and the traditional code Review interaction is generally the streaming display of code Diff components. For some scenarios with many change files and large internal files, the review experience is poor, and it often takes a long time to wait.
|
||||
- 3. The code modification process is heavy and time-consuming: the code Diff component only has the ability to read, and it cannot quickly modify some spelling or lint errors, which needs to be modified and submitted after finding the corresponding file locally. In response to the above needs, Ant Cloud R&D team and Gitlink have created an IDE style code review scenario:
|
||||

|
||||
|
||||
<center> Code review in IDE mode </center>
|
||||
- 1. Change tree a. You can browse the change tree in tile and tree form b. Change Tree Using OpenSumi Recycle, you can also view change files by virtual scrolling in high performance
|
||||
- 2. Toolbar a. Provides basic Settings for the IDE editor, such as font size, encoding, ignoring final Spaces, etc. b. Quick Switching Comparison between the current branch version and the baseline c. Quick locating of change files, viewing Settings, and quick execution of shortcut keys
|
||||
- 3. Editor a. Folding non-changed content through monaco fold capability b. Custom comment component embedded editor
|
||||
In addition to the above capabilities, Gitlink also supports quick code changes during code review:
|
||||
|
||||

|
||||
<center>Code can be modified during code review</center>
|
||||
|
||||
## Gitlink Web IDE
|
||||
Gitlink code reading scene although access to the fast version of the IDE editor, but the file tree, code search, shortcut keys, IDE skin, etc., are very different from the IDE used in the usual development habits, and most users just clone the code to the local code reading, although ensuring a consistent experience, but the whole link is cumbersome and time-consuming.
|
||||
Based on this insight, Ant Cloud R&D team and Gitlink launched the Gitlink Web IDE, which can quickly open the Web IDE to access and read the project warehouse code with one click, realize the seamless connection between the project and the IDE, and maintain the daily preferences and habits of R&D students. It is also perfectly compatible with the Gitlink code hosting platform. More importantly, by running a super fast IDE directly on the browser without a container, you can ensure an instant experience.
|
||||
|
||||
#### **1. Quick experience **
|
||||
You can experience it from the Gitlink Warehouse home page Web IDE entry
|
||||

|
||||
<center>Gitlink WebIDE Entrance</center>
|
||||
|
||||
#### **2. Code Viewing Experience **
|
||||
Code browsing experience consistent with traditional ides. File trees, skin styles, and shortcuts are available.
|
||||
#### **3. Language features **
|
||||
- 1. Support syntax highlighting in nearly 40 languages
|
||||
- 2. Supports Language Server Protocol (LSP) language features based on JavaScript/TypeScript, HTML, CSS, JSON, and Markdown, with intelligent prompts, outline information, and jumps within a file.
|
||||

|
||||
<center>JS Language Service Tips </center>
|
||||
|
||||
- 3. Provide Java, Go, Python, C++, Php online language service capabilities, support simple definition jump, find references and other functions, so that everyone more convenient to read the code
|
||||
|
||||

|
||||
<center>Python View references </center>
|
||||
|
||||
#### **4. Branch creation and Switchover **
|
||||
Click the branch name in the lower left corner to create/switch branches.
|
||||
|
||||

|
||||
<center> Branch creation and switching </center>
|
||||
|
||||
|
||||
#### **5. File search **
|
||||
Use CMD/Ctrl + P to invoke the file search panel
|
||||
|
||||

|
||||
<center> File Search panel </center>
|
||||
|
||||
#### **6. Line highlight **
|
||||
To highlight a single or multiple lines, click the line number to highlight the line, and hold down Shift to select multiple consecutive lines.
|
||||

|
||||
<center>Multiple selected lines are highlighted</center>
|
||||
|
||||
#### **7. Blame**
|
||||
Supports viewing single-line blame information, and displays details after the hover.
|
||||

|
||||
<center>Blame detailed information</center>
|
||||
|
||||
#### **8. Graph**
|
||||
graph view is supported to view branch commits history and file changes for each commit, as well as file diff viewing. Click Git Graph at the bottom left corner of the status bar or enter View Git Graph in the command panel to open the Git Graph view.
|
||||

|
||||
<center>Graph detailed information</center>
|
||||
|
||||
|
||||
#### **9.WebSCM**
|
||||
It is very common for development to develop multiple requirements in parallel on a daily basis, often changing some small but necessary logic, and perhaps your local environment is already developing the next requirement, frequent branch switching and parallel changes are prone to error. Switch branch change submissions quickly with the Gitlink Web IDE without interrupting the local development process.
|
||||

|
||||
<center>WebSCM</center>
|
||||
|
||||
|
||||
#### **10. Code running online **
|
||||
Currently, without containers, most applications can only run front-end code. The Gitlink Web IDE integrates the lighter CodeSwing plug-in based on skypack, which can run front-end code in the super speed version, and the code version is managed using Gitlink. Combined with the above WebSCM capabilities, front-end code initialization, writing, previewing, and code submission can be done in under a minute.
|
||||

|
||||
<center>Front-end code run</center>
|
||||
|
||||
With the development of Webassembly technology, some back-end languages can also run in the browser, and at Google IO 2021, StackBlitz showed off their most recent technology: WebContainer, the ability to compile the language runtime into Webassembly to run on the browser. The Code-Runner For-Web plug-in, combined with Pyodide, already moves Python running into the browser, and the new Zoom Edition also integrates the plug-in by default.
|
||||

|
||||
<center>Python code run</center>
|
||||
|
|
@ -0,0 +1,4 @@
|
|||
{
|
||||
"label": "第三方服务",
|
||||
"position": 9
|
||||
}
|
||||
|
|
@ -0,0 +1,84 @@
|
|||
---
|
||||
sidebar_label: 'Cross-platform code synchronization service'
|
||||
sidebar_position: 2
|
||||
---
|
||||
|
||||
### Function introduction
|
||||
|
||||
Cross-platform warehouse code synchronization service is used for the bidirectional synchronization of warehouse code between different code hosting platforms. Users bind warehouse branches of different platforms. When a push event of any warehouse branch is monitored by webhook, the code push will be automatically synchronized to another warehouse in real time to realize automatic synchronization of branches and submission information between different platforms (code hosting platforms are limited to github and gitee).
|
||||
|
||||
|
||||

|
||||
|
||||
The synchronization service not only meets the requirement of synchronization of the branch of the code base of two platforms, but also supports the synchronization of the code warehouse of up to three platforms, as shown in the following figure
|
||||
|
||||

|
||||
|
||||
### Configure bidirectional synchronization
|
||||
|
||||
1. Open the Services tab of the code base where synchronization is to be created, and enable the cross-platform code synchronization service.
|
||||
|
||||

|
||||
|
||||
2. configure cross-platform synchronization warehouse, support github and gitee. You need to enter the code base address (both git address and website access address are supported) and configure the corresponding token for authorization synchronization. Pay attention to the permission of the token and whether it has expired. <br />
|
||||
Github configuration: Personal profile picture →Settings→Developer Settings→Personal access tokens (classic)→Generate new token→ Check repo button → Save <br />
|
||||
Gitee is configured as follows: Profile picture → Settings → Private Token → Generate new token → Check projects permissions → Submit
|
||||
|
||||

|
||||
|
||||
3. When the synchronization warehouse is created for the first time, the user needs to manually create a webhook in the code base of the target warehouse to listen to the push event of the warehouse, so as to push the code to other synchronization warehouses to complete the synchronization. The synchronization steps are as follows:
|
||||
|
||||
① Click the "Copy Link" button to copy the address used by the platform to receive webhook requests
|
||||
|
||||

|
||||
|
||||
|
||||
②Go to the webhook page of the target warehouse and create a webhook. Take github as an example
|
||||
|
||||

|
||||
|
||||
③Paste the link and ensure that the webhook supports push event listening and has been successfully activated
|
||||
|
||||

|
||||
|
||||
4. After the warehouse configuration binding is complete, the specified synchronization branches of the two warehouses need to be bound to establish the first synchronization direction. <font color="red"> Note: The policy for the first synchronization is unidirectional code push. Select the synchronization direction carefully to enable synchronization to avoid code overwriting</font>
|
||||
|
||||

|
||||
|
||||
5. complete the binding of the branch, and immediately execute a synchronization according to the selected synchronization direction after binding. The webhook then monitors that any branch has code push and pushes the code to the synchronization code of another bound branch in real time
|
||||
|
||||

|
||||
|
||||
### Manage synchronization branches
|
||||
|
||||
|
||||
After the synchronization branch configuration is complete, the user can complete a series of operations in the synchronization branch list <br />
|
||||
① Add and bind a new synchronization branch. For example, Develop branches have been established in two warehouses and synchronization of feature branches needs to be established. You can add <br /> in real time.
|
||||
② Query the latest synchronization time and synchronization status between two branches. If the synchronization fails, you can query the reason for the log analysis failure in the synchronization record. <br />
|
||||
③ Add synchronous warehouse, if you have bound github synchronous warehouse, want to import a warehouse in gitee for development, and want to complete real-time branch synchronization of multiple warehouses. <br />
|
||||
④ View the synchronization configuration, which can be used to query the address of the synchronization warehouse, GitLink is used to accept the address of the third-party webhook request, and update the token. In case of token expiration <br />
|
||||
⑤ Query synchronization records, including the code change party, synchronization time, synchronization status and commt id of previous synchronization, and query synchronization logs. <br />
|
||||
⑥ Stop and start synchronization, which is equivalent to a synchronization switch and can be started and stopped at any time
|
||||
|
||||

|
||||
|
||||
### Precautions
|
||||
|
||||
1. When establishing synchronization, the tool will push the code once according to the first synchronization direction selected by the user. Please choose the synchronization direction carefully to avoid the risk of code being overwritten. After synchronization is established, the push event triggered by the webhook will be synchronized to the other party. Do not submit code in multiple warehouses at the same time to prevent conflicts.
|
||||
2, currently only support personal warehouse synchronization, organizational warehouse synchronization is not supported, please look forward to <br />
|
||||
3. During the configuration, check whether the token permission includes warehouse read and write. At the same time, please check whether the token has expired. If it has expired, please click [view synchronous configuration] button to enter the page to update the token<br />.
|
||||
4. During the configuration, carefully check whether the listening events of Webhooks of other platforms contain push events and whether webhooks are activated
|
||||
|
||||
|
||||
|
||||
|
|
@ -0,0 +1,67 @@
|
|||
---
|
||||
sidebar_label: "Heavy eye bird code traceability"
|
||||
sidebar_position: 1
|
||||
---
|
||||
|
||||
## Code analysis entry
|
||||
|
||||
<br/>
|
||||
|
||||
<center> Code analysis entry </center><br/>
|
||||
Page description: <br/>
|
||||
1. Users can click the "Service" menu tab to enter the service page. <br/>
|
||||
2. The warehouse manager can turn on/off the visibility of the code analysis menu in the project navigation in the "Warehouse Settings" tab, as shown below: <br/>
|
||||
|
||||
<br/>
|
||||
|
||||
<center> Project navigation </center><br/>
|
||||
|
||||
## Code analysis detection
|
||||
|
||||
<br/>
|
||||
|
||||
<center>Code analysis detection</center><br/>
|
||||
|
||||
<br/>
|
||||
|
||||
<center> New analysis </center><br/>
|
||||
Page description: <br/>
|
||||
1. This page is displayed when there is no historical analysis record. <br/>
|
||||
2. The "New Analysis" button is only visible to warehouse administrators. When warehouse developers, observers, and visitors visit this page, the New Analysis button is not visible. <br/>
|
||||
3. Click the "New Analysis" button to determine whether to enable the code analysis function. <br/>
|
||||
|
||||
## Branch selection
|
||||
|
||||
<br/>
|
||||
|
||||
<center> Branch selection </center><br/>
|
||||
Page description :<br/>
|
||||
1. When the user clicks the "New Analysis" button, it pops up that the new analysis needs to select and fill in the branch. <br/>
|
||||
2. The detection type and detection parameters in the figure are default values, which are not allowed to be modified by users. They are displayed here on the interface and only serve to prompt users and let them know. <br/>
|
||||
3. Click "Start Detection" here to start detection based on the selected branch and create a new detection list. <br/>
|
||||
|
||||
## Tabular presentation
|
||||
|
||||
<br/>
|
||||
|
||||
<center>Tabular presentation</center><br/>
|
||||
Page description :<br/>
|
||||
1. When the number of rows in the detection list exceeds one row, the filter drop-down box of the branch name is provided on the left of the "New Analysis" button, and the options in the drop-down box are the sets of branches in the list. If the warehouse has branches 1, 2, 3, 4, 5, and there are branches 3 and 4 in this list, then the branch type in the drop-down box is only 3 and 4. <br/>
|
||||
2. When a new analysis task is being detected, a percentage progress bar is displayed in the detection status to display the existing progress. <br/>
|
||||
3. Click the "Rescan" button, and a pop-up window for new analysis will pop up. This pop-up window saves all the last configured branch information, and the detected branch cannot be modified (the drop-down box of the branch is gray). After confirming the creation, a new detection data is added. <br/>
|
||||
|
||||
## Result presentation
|
||||
|
||||
<br/>
|
||||
|
||||
<center>Result presentation</center><br/>
|
||||
Page description: <br/>
|
||||
1. The user clicks the "View" button in the code detection "operation" list, and the result display page will be expanded on the current page. When the user clicks the "View" button again, the result display page is withdrawn; When the user clicks the "View" button of other test records, the result page of other test records will be expanded, and the currently expanded result display page will be retrieved; <br/>
|
||||
2. When the detection state is "failed" or the current state is "Testing", the "View" button will be grey and cannot be clicked; <br/>
|
||||
3, the result display page fetch code traceability existing pages, embedded in GitLink can be, no need to design again. <br/>
|
||||
|
||||
## User operation flow
|
||||
|
||||
<br/>
|
||||
|
||||
<center>User operation flow</center><br/>
|
||||
|
|
@ -0,0 +1,4 @@
|
|||
{
|
||||
"label": "组织管理",
|
||||
"position": 3
|
||||
}
|
||||
|
|
@ -0,0 +1,31 @@
|
|||
---
|
||||
sidebar_label: 'Organization creation and set'
|
||||
sidebar_position: 2
|
||||
---
|
||||
# Organization Creation
|
||||
|
||||
In *https://www.gitlink.org.cn* page click the "+" symbol at the top of the navigation can organize the new operation.
|
||||
|
||||

|
||||
|
||||
Input in the new page **organization account** , **organization name**, **description** ,**region**,**visibility** and **organization head** information, click the "**create organization**" button to complete the organization's creation.
|
||||
|
||||

|
||||
|
||||
## Organization account
|
||||
|
||||

|
||||
|
||||
**注**:只能使用以字母、数字开头,包含字母、数字、下划线、横杠等,长度4到20个字符
|
||||
|
||||
## Organization name and description
|
||||
|
||||

|
||||
|
||||
**Note** : This field is required and must not be blank
|
||||
|
||||
## Visibility
|
||||
|
||||

|
||||
|
||||
**Note** : There are three categories of visibility: public, restricted (visible only to logged in users), and private (visible only to organization members).
|
||||
|
|
@ -0,0 +1,34 @@
|
|||
---
|
||||
sidebar_label: 'Organize team management'
|
||||
sidebar_position: 3
|
||||
---
|
||||
# Organize team management
|
||||
|
||||
## Create an organizational team
|
||||
Click the "New Team" button on the organization information page to create a team that belongs to that organization (the platform creates an "Owners" team by default, with the organization's creators as members).
|
||||
|
||||
On the team creation page, enter the team identity, team name, team description, project permissions, and version library permissions, and click "New Team" to complete the creation of the team.
|
||||
|
||||

|
||||
|
||||
## View the organization team
|
||||
|
||||
Click on a team name in the organization information page to view the details of the team, which includes the team name, description and other information, in addition to listing the members and projects associated with the team.
|
||||
|
||||

|
||||
|
||||
## Manage and organize the team
|
||||
|
||||
Click the "Team Settings" button in the team information page to manage the team
|
||||
|
||||
- Basic Settings: Modify the basic information of a project, such as the name and description.
|
||||

|
||||
|
||||
- Team member management: Add new members to the team or remove existing members.
|
||||

|
||||
|
||||
- Team Project management: Associate new projects (projects that the organization has already created) or remove associated projects for the team.
|
||||

|
||||
|
||||
|
||||
|
||||
|
|
@ -0,0 +1,23 @@
|
|||
---
|
||||
sidebar_label: 'Members Management'
|
||||
sidebar_position: 4
|
||||
---
|
||||
In the member management interface, we can see all the members involved in a project as well as their email numbers and roles, roles are divided into manager, developer and reporter, the difference between the three is that the authority is inconsistent, the manager is the highest level role has all the rights, other rights decline. As shown in the figure below, you can also invite new members to the group or adjust the role level of the team members, or delete the team members as required.
|
||||

|
||||
# Members Management
|
||||
|
||||
**Member Management** in the **repository Settings** in the project managed by an individual can enter the member management interface
|
||||
|
||||

|
||||
|
||||
## Member query and add
|
||||
In the member management interface, you can query and add organization members
|
||||
|
||||

|
||||
|
||||
## Member invitation permission Settings
|
||||
The administrator can set the permissions for inviting members
|
||||

|
||||
In addition, you can copy the invite link to make it easier to invite members to join the project
|
||||
|
||||
**Note** : This feature is only visible to administrators
|
||||
|
|
@ -0,0 +1,28 @@
|
|||
---
|
||||
sidebar_label: 'Organization Profile'
|
||||
sidebar_position: 1
|
||||
---
|
||||
|
||||
# Organization Profile
|
||||
|
||||
Organizations are shared accounts where business and open source projects collaborate across multiple projects simultaneously, with sophisticated security and management features. Multiple individual accounts can collaborate on shared projects by joining the same organizational account.
|
||||
|
||||
Your team can collaborate on GitLink by using an organization account, which acts as a container for shared work and gives the work a unique name and brand. At the same time, the platform supports organizations to publish news updates on the "Organization Details" page, showing content such as project overview and warehouse details
|
||||
|
||||

|
||||
|
||||
## As an organization owner
|
||||
|
||||
Managing your organization effectively is your mission.
|
||||
|
||||
The organization provides a centralized collaboration and sharing center for your teams to work together, share resources and communicate more effectively.
|
||||
|
||||
To simplify access management and enhance collaboration, you can create nested teams that reflect the group structure. You can group people according to their roles or projects and assign tasks.
|
||||
|
||||

|
||||
|
||||
The platform also enables organization owners to manage custom Settings for data access.
|
||||
|
||||
## As a member of the organization
|
||||
|
||||
You can collaborate with an unlimited number of people on multiple projects through organization, with like-minded people, through division of labor and writing, participate in the development process, publish or work on problems.
|
||||
Some files were not shown because too many files have changed in this diff Show More
Loading…
Reference in New Issue